How to Change a VPS IP Address? The Complete Guide
A Virtual Private Server (VPS hosting) has become an indispensable tool for hosting websites, applications, and various services. However, sometimes it becomes necessary to change the IP address of the VPS. This may be due to various reasons: changing providers, improving security, migrating to another server, or simply wanting a new, «clean» IP. In this complete guide, we will take a detailed look at all possible ways to change the IP address of a VPS, from simple to more complex, and provide practical examples and recommendations based on many years of server administration experience.In this article, we will analyze the following topics step by step:
- General Information about IP Addresses and VPS Changing the servers with IP addresses Through the Control Panel
- Changing the IP Address in Linux Configuration Files
- Using DHCP to Obtain an IP Address
- Configuring DNS After Changing the IP Address
- Troubleshooting After Changing the IP Address
General Information about IP Addresses and VPS

Before proceeding to change the IP address, it is necessary to understand what an IP address is and how it is related to a VPS. An IP address (Internet Protocol Address) is a unique numerical identifier assigned to each device in a computer network operating over the IP protocol. It allows devices to exchange data over the network, whether it’s a local network or the global Internet.
There are two main types of IP addresses: IPv4 and IPv6. IPv4 uses a 32-bit address space, allowing for approximately 4.3 billion devices to be addressed. IPv6, on the other hand, uses a 128-bit address space, offering a virtually unlimited number of addresses. Most VPSs use IPv4, but more and more providers are offering IPv6 support.
IP addresses can also be static or dynamic. A static IP address is a permanent address that does not change over time. A dynamic IP address is assigned by a DHCP (Dynamic Host Configuration Protocol) server and can change each time you connect to the network. Most VPSs use static IP addresses, as this is necessary for the stable operation of websites and services.
In the context of a VPS, the IP address is used to identify your server on the Internet. When a user enters your site’s domain name into a browser, the DNS server converts that domain name into the IP address of your VPS. The browser then sends a request to this IP address, and your server responds by sending the site’s content.
Here are examples of basic commands for working with IP addresses in Linux:
# Show the current IP address
ip addr show eth0

# Check the default route
ip route show default

# Check DNS configuration
cat /etc/resolv.conf

# Check host availability
ping google.com

# Find out the external IP address
curl ifconfig.me
Example output of the `ip addr show eth0` command:
2: eth0: <BROADCAST,MULTICAST,UP,LOWER_UP> mtu 1500 qdisc pfifo_fast state UP group default qlen 1000
    link/ether fa:16:3e:1c:2a:3b brd ff:ff:ff:ff:ff:ff
    inet 192.168.1.100/24 brd 192.168.1.255 scope global eth0
       valid_lft forever preferred_lft forever
    inet6 fe80::f816:3eff:fe1c:2a3b/64 scope link
       valid_lft forever preferred_lft forever
In this example, `192.168.1.100` is the IP address of the `eth0` interface, and `/24` indicates the subnet mask. `eth0` is the name of the network interface.
Understanding these basics is necessary for successfully changing the IP address of a VPS. Next, we will look at the specific steps to change the IP address in various situations.
«Changing the IP address of a VPS may require updating DNS records, which may take some time for the changes to propagate across the network.»
Dmitry Ivanov, System Administrator
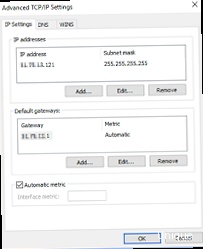
Changing the IP Address Through the Control Panel
 highlighting the IP address settings.")
Most hosting providers provide a web control panel for VPS, such as cPanel, Plesk, Virtualmin, or ISPmanager. These control panels typically offer a graphical interface for managing various aspects of your server, including IP addresses.
Steps to change the IP address through the control panel:
- Log in to the control panel. Use the credentials provided by your hosting provider.
- Find the «IP Addresses» or «Network Settings» section. The location of this section may vary depending on the control panel.
- Check the list of available IP addresses. If you have multiple IP addresses, select the one you want to use.
- Assign the IP address to your site or service. In most control panels, this can be done through the domain or website settings.
- Save the changes and restart the server (if necessary). Some control panels require a server reboot to apply the changes.
Example for cPanel:
- Log in to cPanel.
- Go to the «Domains» section.
- Select «Zone Editor».
- Find the «A» record for your domain.
- Change the IP address in this record to the new IP address.
- Save the changes.
Example for Plesk:
- Log in to Plesk.
- Go to the «Websites & Domains» section.
- Select your domain.
- Go to «DNS Settings».
- Change the «A» record for your domain to the new IP address.
- Save the changes.
Important: After changing the IP address through the control panel, you need to verify that the DNS records are updated. It may take up to 48 hours for the changes to propagate worldwide. You can use online tools such as What’s My DNS to check which IP address is associated with your domain name.
If you do not see the option to change the IP address in your control panel, contact your hosting provider. You may need to request a new IP address from them.
Here are some commands that may be helpful when working with DNS:
# Check DNS records for a domain
nslookup yourdomain.com

# Check DNS records from a specific DNS server
nslookup yourdomain.com 8.8.8.8

# Get detailed information about a DNS record
dig yourdomain.com
Example output of the `nslookup yourdomain.com` command:
Server:		8.8.8.8
Address:	8.8.8.8#53

Non-authoritative answer:
Name:	yourdomain.com
Address:	192.168.1.101
In this example, `192.168.1.101` is the IP address associated with the domain name `yourdomain.com`.
Changing the IP Address in Linux Configuration Files
Changing the IP address directly in Linux configuration files is a more advanced method that requires knowledge of the command line and an understanding of network settings. This method is often used when there is no access to the control panel or when more fine-grained network configuration is required.
General process:
- Determine the network interface. The most common interface names are: `eth0`, `eth1`, `enp0s3`, `wlan0`. Use the `ip addr show` or `ifconfig -a` command to determine the name of your network interface.
- Edit the network interface configuration file. The location and format of this file depends on the Linux distribution.
- Restart the network service. This is necessary to apply the changes.
Examples for different Linux distributions:
Debian/Ubuntu
In Debian/Ubuntu, the network interfaces configuration file is located at `/etc/network/interfaces`. Edit this file using a text editor, such as `nano` or `vim`:
sudo nano /etc/network/interfacesExample contents of the `/etc/network/interfaces` file (static IP):
# This file describes the network interfaces available on your system
# and how to activate them. For more information, see interfaces(5).

source /etc/network/interfaces.d/*

auto eth0
iface eth0 inet static
    address 192.168.1.101
    netmask 255.255.255.0
    gateway 192.168.1.1
    dns-nameservers 8.8.8.8 8.8.4.4
In this example:
- `auto eth0` — indicates that the `eth0` interface should be activated when the system boots.
- `iface eth0 inet static` — indicates that the `eth0` interface uses a static IP address.
- `address 192.168.1.101` — the IP address of the interface.
- `netmask 255.255.255.0` — the subnet mask.
- `gateway 192.168.1.1` — the default gateway IP address.
- `dns-nameservers 8.8.8.8 8.8.4.4` — the IP addresses of the DNS servers.
Change the IP address, subnet mask, gateway, and DNS servers according to your network. After making changes, restart the network service:
sudo systemctl restart networkingOr:
sudo /etc/init.d/networking restartCentOS/RHEL
In CentOS/RHEL, the network interface configuration files are located in the `/etc/sysconfig/network-scripts/` directory. The file name is usually in the form `ifcfg-eth0`, `ifcfg-enp0s3`, etc. Edit the appropriate file:
sudo nano /etc/sysconfig/network-scripts/ifcfg-eth0Example contents of the `ifcfg-eth0` file (static IP):
TYPE="Ethernet"
PROXY_METHOD="none"
BROWSER_ONLY="no"
BOOTPROTO="static"
DEFROUTE="yes"
IPV4_FAILURE_FATAL="no"
IPV6INIT="yes"
IPV6_AUTOCONF="yes"
IPV6_DEFROUTE="yes"
IPV6_FAILURE_FATAL="no"
IPV6_ADDR_GEN_MODE="stable-privacy"
NAME="eth0"
UUID="a1b2c3d4-e5f6-7890-1234-567890abcdef"
DEVICE="eth0"
ONBOOT="yes"
IPADDR="192.168.1.101"
NETMASK="255.255.255.0"
GATEWAY="192.168.1.1"
DNS1="8.8.8.8"
DNS2="8.8.4.4"
In this example:
- `BOOTPROTO=»static»` — indicates that the interface uses a static IP address.
- `IPADDR=»192.168.1.101″` — the IP address of the interface.
- `NETMASK=»255.255.255.0″` — the subnet mask.
- `GATEWAY=»192.168.1.1″` — the default gateway IP address.
- `DNS1=»8.8.8.8″` and `DNS2=»8.8.4.4″` — the IP addresses of the DNS servers.
- `ONBOOT=»yes»` — indicates that the interface should be activated when the system boots.
After making changes, restart the network service:
sudo systemctl restart networkOr:
sudo service network restartAfter restarting the network service, check the IP address using the `ip addr show` or `ifconfig -a` command.
Important: Be careful when editing configuration files. Errors in these files can lead to loss of network connectivity. It is recommended to back up the file before making changes.
| Linux Distribution | Configuration File | Command to Restart Network Service |
|---|---|---|
| Debian/Ubuntu | /etc/network/interfaces | sudo systemctl restart networking or sudo /etc/init.d/networking restart |
| CentOS/RHEL | /etc/sysconfig/network-scripts/ifcfg-eth0 (or similar) | sudo systemctl restart network or sudo service network restart |
Using DHCP to Obtain an IP Address
DHCP (Dynamic Host Configuration Protocol) is a protocol that allows IP addresses, subnet masks, gateways, and DNS servers to be automatically assigned to devices on the network. Using DHCP simplifies network setup and reduces the likelihood of IP address conflicts.
If your hosting provider provides DHCP, you can configure your VPS to automatically obtain an IP address. This is usually easier than setting up a static IP address manually.
Configuring DHCP in Debian/Ubuntu:
Edit the `/etc/network/interfaces` file:
sudo nano /etc/network/interfacesChange the interface configuration to:
auto eth0
iface eth0 inet dhcp
In this example, `iface eth0 inet dhcp` indicates that the `eth0` interface should receive an IP address automatically using DHCP.
Restart the network service:
sudo systemctl restart networkingOr:
sudo /etc/init.d/networking restartConfiguring DHCP in CentOS/RHEL:
Edit the `/etc/sysconfig/network-scripts/ifcfg-eth0` file:
sudo nano /etc/sysconfig/network-scripts/ifcfg-eth0Change the value of the `BOOTPROTO` parameter to `dhcp`:
BOOTPROTO="dhcp"Make sure that the `IPADDR`, `NETMASK`, and `GATEWAY` parameters are commented out or deleted, as they will be assigned automatically by the DHCP server.
Restart the network service:
sudo systemctl restart networkOr:
sudo service network restartAfter restarting the network service, check the IP address using the `ip addr show` or `ifconfig -a` command. You should see that the IP address was assigned automatically.
Important: Make sure that your hosting provider provides DHCP. If DHCP is not configured, your VPS will not be able to obtain an IP address, and you will lose network connectivity.
Sometimes, after switching to DHCP, you may need to clear the old IP address. This can be done with the command:
sudo dhclient -r eth0This command releases the current IP address, and then restarts the network service to obtain a new IP address from the DHCP server.
Configuring DNS After Changing the IP Address
After changing the IP address of a VPS, you need to update the DNS records for your domain. DNS (Domain Name System) is a system that translates domain names into IP addresses. If the DNS records are not updated, users will not be able to access your website or service after the IP address changes.
Steps to configure DNS:
- Log in to the DNS control panel. This may be the control panel of your domain registrar (e.g., GoDaddy, Namecheap) or the control panel of a DNS service (e.g., Cloudflare, AWS Route 53).
- Find the «A» records for your domain. «A» records associate a domain name with an IP address.
- Change the IP address in the «A» records to the new IP address. Make sure you update the IP address for all «A» records that point to your VPS.
- Save the changes.
- Wait for the changes to propagate. It may take up to 48 hours for DNS changes to propagate worldwide.
Example DNS settings on Cloudflare:
- Log in to Cloudflare.
- Select your domain.
- Go to the «DNS» section.
- Find the «A» records for your domain (e.g., `yourdomain.com`, `www.yourdomain.com`).
- Change the IP address in the «Content» field to the new IP address of your VPS.
- Set the «Proxy status» switch to «DNS only» (if you are not using Cloudflare’s proxy).
- Save the changes.
Example DNS settings on Namecheap:
- Log in to Namecheap.
- Go to the «Domain List» section.
- Select your domain.
- Click the «Manage» button.
- Go to the «Advanced DNS» section.
- Find the «A» records for your domain.
- Change the IP address in the «Value» field to the new IP address of your VPS.
- Save the changes.
In addition to «A» records, changes may also be required in other types of DNS records, such as «AAAA» records (for IPv6), «CNAME» records (for subdomains), or «MX» records (for the mail server). Make sure that all necessary records are updated.
You can check the current DNS records for your domain using online tools such as What’s My DNS or the `dig` command in Linux:
dig yourdomain.comExample output of the `dig yourdomain.com` command:
; <<>> DiG 9.11.5-P4-5.1+deb10u4 <<>> yourdomain.com
;; global options: +cmd
;; Got answer:
;; ->>HEADER<<- opcode: QUERY, status: NOERROR, id: 12345
;; flags: qr rd ra; QUERY: 1, ANSWER: 1, AUTHORITY: 0, ADDITIONAL: 1

;; OPT PSEUDOSECTION:
; EDNS: version: 0, flags:; udp: 512
;; QUESTION SECTION:
;yourdomain.com.			IN	A

;; ANSWER SECTION:
yourdomain.com.		300	IN	A	192.168.1.102

;; Query time: 0 msec
;; SERVER: 8.8.8.8#53(8.8.8.8)
;; WHEN: Sat Dec 16 12:00:00 2023
;; MSG SIZE  rcvd: 59
In this example, `192.168.1.102` is the current IP address associated with the domain name `yourdomain.com`. Make sure that this IP address matches the new IP address of your VPS.
Important: If you are using DNS servers provided by your hosting provider, refer to their documentation or support service for instructions on updating DNS records.
«Incorrect DNS configuration can lead to your site being unavailable, so carefully check all changes and make sure they have propagated correctly.»
Anna Petrova, Network Engineer
Troubleshooting After Changing the IP Address
After changing the IP address of a VPS, various problems can occur, such as website unavailability, email problems, or other network errors. It is important to be able to diagnose and fix these problems.
Common problems and solutions:
- Website unavailable.
- Make sure that the DNS records are updated and point to the new IP address. Use online tools such as What’s My DNS to check DNS record propagation.
- Check that the web server (e.g., Apache or Nginx) is configured to listen on the new IP address.
- Check that the firewall is not blocking incoming connections on ports 80 (HTTP) and 443 (HTTPS).
- Problems with email.
- Make sure that the MX records are updated and point to the new IP address of the mail server.
- Check that the mail server (e.g., Postfix or Exim) is configured to send and receive mail using the new IP address.
- Check the SPF and DKIM records to make sure that they allow sending mail from the new IP address.
- Loss of network connectivity.
- Check that the network interface is configured correctly (static IP or DHCP).
- Check that the default gateway is configured correctly.
- Check that the firewall is not blocking outgoing connections.
Useful commands for troubleshooting:
# Check host availability
ping yourdomain.com
ping 8.8.8.8

# Trace the route to the host
traceroute yourdomain.com

# Check network connections
netstat -tulnp

# Check service status
systemctl status apache2
systemctl status nginx
systemctl status postfix

# View service logs
journalctl -u apache2
journalctl -u nginx
journalctl -u postfix

# Check firewall configuration
iptables -L
ufw status
Example output of the `ping yourdomain.com` command:
PING yourdomain.com (192.168.1.102) 56(84) bytes of data.
64 bytes from 192.168.1.102 (192
```


