Installing and Configuring Pterodactyl Panel on a VPS: Creating a Game Hosting in Docker
TL;DR
In this guide, we will break down the process of deploying Pterodactyl Panel — the most popular open-source game server control panel based on Docker. You will learn how to set up a modern stack (PHP 8.3+, MariaDB 11, Redis 7) and install Wings (the node management daemon) to run game servers with full resource isolation.
- Using Docker to isolate game processes and ensure system security.
- Setting up the Laravel-based web interface (Panel) for user and server management.
- Installing and configuring Wings — a high-performance daemon written in Go.
- Ensuring security through SSL certificates (Let's Encrypt) and firewall configuration.
- Automating game server data backups to external storage.
- Optimizing system performance for minimal latency in games.
1. What we are setting up and why
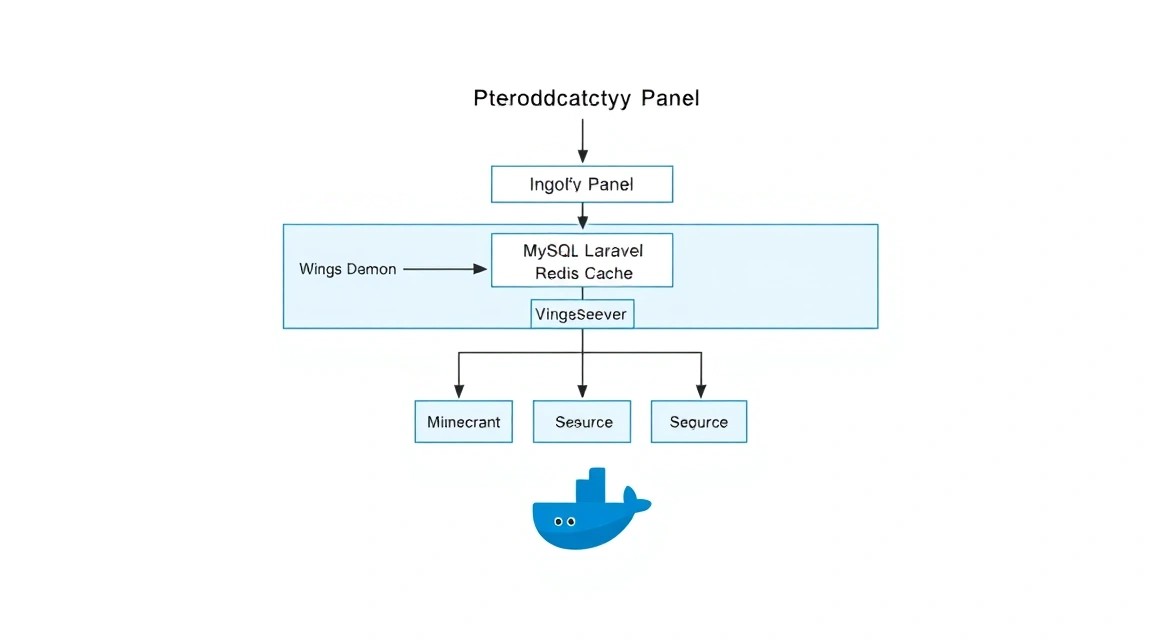 Diagram: 1. What we are setting up and why
Pterodactyl is not just a control panel; it is a powerful ecosystem for managing game servers that has become the de facto industry standard for private and commercial game hosting. Unlike older solutions that ran processes directly on the operating system, Pterodactyl uses Docker containers. This provides three critical advantages: security (a process in a container has no access to the host system), resource isolation (one server cannot "eat" all of its neighbor's memory), and portability (a server is easily moved between physical nodes).
The main components of the system are:
- Panel: Written in Laravel (PHP). This is the "brain" of the system, housing the user database, server settings, billing, and API.
- Wings: Written in Go. This is the agent installed on every server where games will physically run. It manages Docker containers, monitors their status, and transmits logs in real-time.
A self-hosted solution on your own VPS is preferable to cloud game hostings because you get full control over the hardware, no limits on the number of slots, and the ability to fine-tune the OS kernel to reduce ping. This is the ideal choice for communities, mod developers, or those who want to start their own game server rental business.
2. What VPS configuration is needed for this task
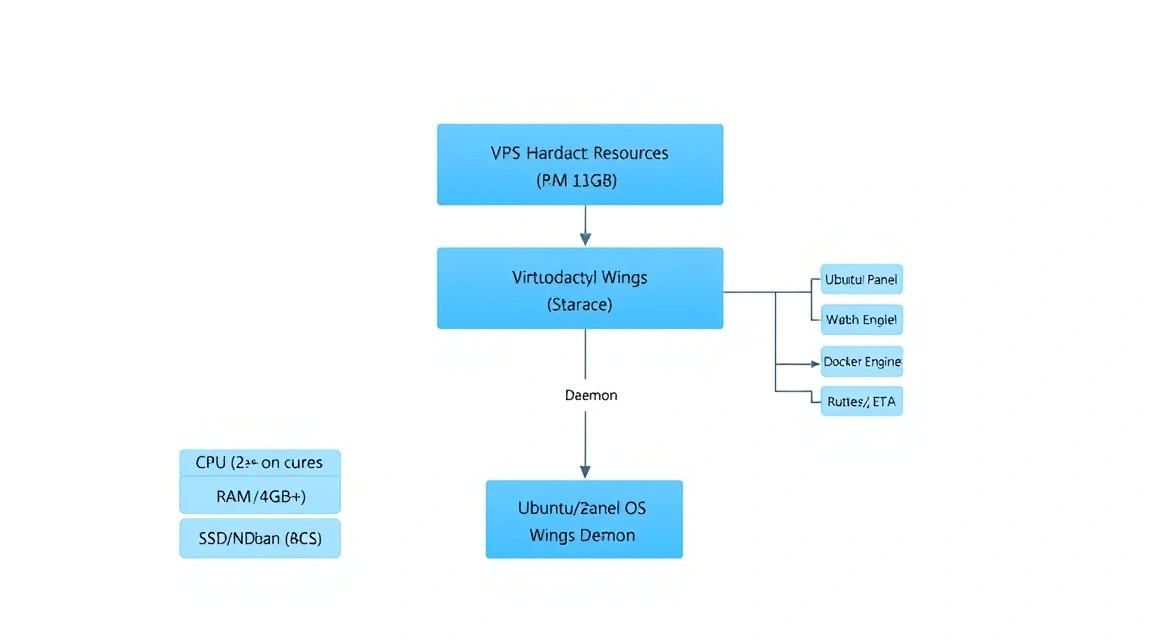 Diagram: 2. What VPS configuration is needed for this task
Resource requirements depend heavily on the games you plan to run. The panel itself consumes minimal resources, but Wings and Docker containers require CPU and RAM overhead.
| Component |
Minimum (1-2 light servers) |
Recommended (10+ servers) |
| Processor (CPU) |
2 cores (high frequency) |
4+ cores (3.5 GHz+) |
| RAM |
4 GB |
16 GB+ (ECC welcomed) |
| Disk (Storage) |
40 GB SSD |
200 GB+ NVMe |
| Network |
100 Mbps |
1 Gbps (DDoS protection) |
For stable operation of game servers, especially resource-intensive ones like Minecraft with heavy modpacks, Rust, or ARK, single-core processor performance is critical. KVM virtualization is mandatory, as Docker does not work correctly in OpenVZ/LXC environments. You can rent a VPS with the specified characteristics to ensure the smooth operation of your gaming community. If you plan on large-scale hosting with 50+ servers, you should consider moving to dedicated servers to avoid the influence of hypervisor neighbors on FPS stability.
The server location should be as close as possible to your target audience. For players from Europe, data centers in Germany or the Netherlands are optimal; for the CIS, Moscow or Warsaw. Latency (RTT) over 50-60 ms already starts to be felt in fast-paced shooters.
3. Server Preparation
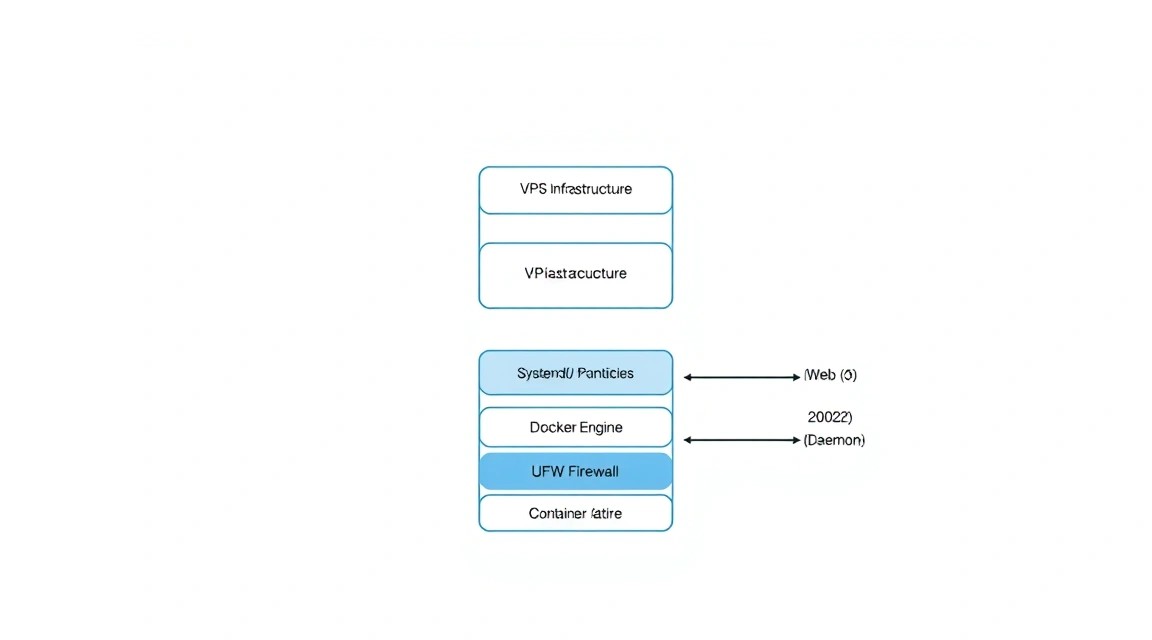 Diagram: 3. Server Preparation
We will use Ubuntu 24.04 LTS as the most current and stable base for 2026. First, it is necessary to update the system and set up basic security.
# Update package list and installed components
sudo apt update && sudo apt upgrade -y

# Install necessary utilities
sudo apt install -y software-properties-common curl apt-transport-https ca-certificates gnupg lsb-release htop tar unzip git
Firewall configuration (UFW). We need to open ports for the web (80, 443) and ports for Wings (8080, 2022), as well as a range of ports for the game servers themselves.
# Allow SSH (ensure the port is correct)
sudo ufw allow 22/tcp

# Ports for the web interface
sudo ufw allow 80/tcp
sudo ufw allow 443/tcp

# Ports for communication with Wings
sudo ufw allow 8080/tcp
sudo ufw allow 2022/tcp

# Enable firewall
sudo ufw enable
It is also recommended to configure Fail2Ban to protect against SSH brute-force attacks, as game servers often become targets for automated bot attacks.
4. Pterodactyl Panel Installation
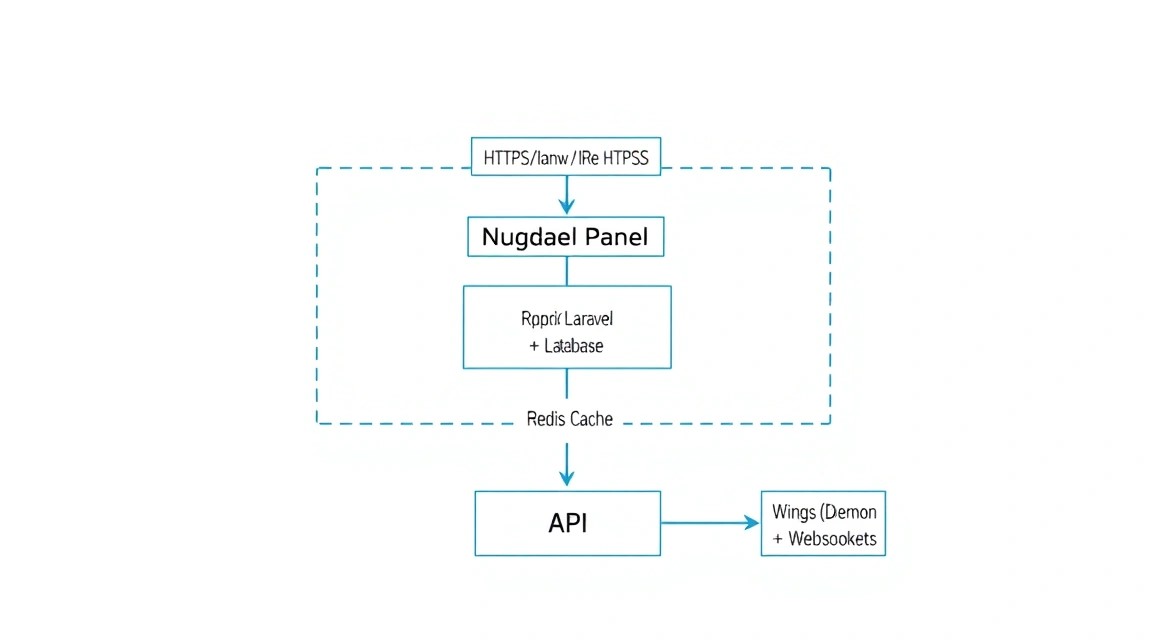 Diagram: 4. Pterodactyl Panel Installation
The panel requires PHP 8.3 or higher, a web server (Nginx), and a database. Let's add repositories for PHP and MariaDB.
# Add PHP repository
sudo add-apt-repository ppa:ondrej/php -y

# Install PHP 8.3 and extensions
sudo apt install -y php8.3 php8.3-common php8.3-gd php8.3-mysql php8.3-mbstring php8.3-bcmath php8.3-xml php8.3-fpm php8.3-curl php8.3-zip php8.3-intl php8.3-sqlite3 php8.3-tokenizer

# Install MariaDB and Redis
sudo apt install -y mariadb-server redis-server nginx
Now let's download the panel itself. We will create the directory /var/www/pterodactyl and upload the release files there.
# Create directory and enter it
mkdir -p /var/www/pterodactyl
cd /var/www/pterodactyl

# Download the latest version of the panel
curl -Lo panel.tar.gz https://github.com/pterodactyl/panel/releases/latest/download/panel.tar.gz
tar -xzvf panel.tar.gz
chmod -R 755 storage/* bootstrap/cache/
Installing Composer — the PHP dependency manager. It is necessary for deploying the Laravel core.
curl -sS https://getcomposer.org/installer | sudo php -- --install-dir=/usr/local/bin --filename=composer
composer install --no-dev --optimize-autoloader
5. Database and Queue Configuration
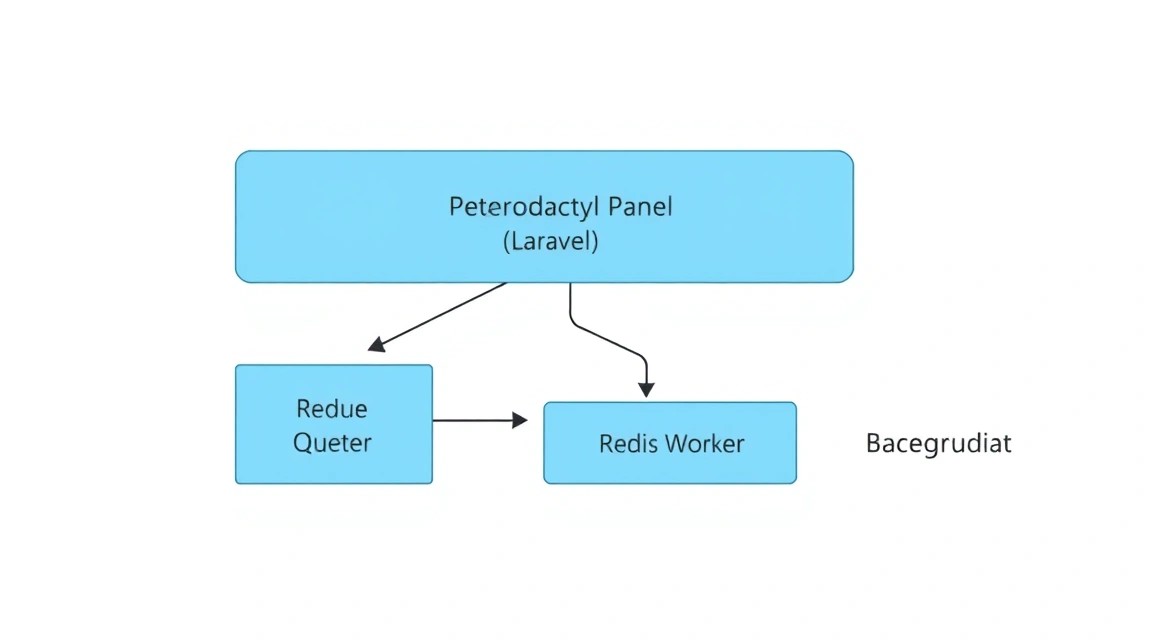 Diagram: 5. Database and Queue Configuration
Let's create a database and a user for Pterodactyl. In 2026, it is recommended to use MariaDB 11 for better performance of JSON queries, which the panel actively uses.
# Enter MySQL console
sudo mysql -u root

# Execute SQL queries (replace 'your_password' with a complex password)
CREATE DATABASE ptero_db;
CREATE USER 'ptero_user'@'127.0.0.1' IDENTIFIED BY 'your_password';
GRANT ALL PRIVILEGES ON ptero_db.* TO 'ptero_user'@'127.0.0.1' WITH GRANT OPTION;
FLUSH PRIVILEGES;
EXIT;
Now let's configure the panel environment. We will copy the configuration example and generate a unique encryption key.
cp .env.example .env
php artisan key:generate --force

# Configure DB parameters in .env
# Edit the file via nano or use artisan
php artisan p:environment:setup
php artisan p:environment:database
Database migration (creating tables) and creating the first administrator:
php artisan migrate --seed --force
php artisan p:user:make
An important step is setting up access permissions so that the web server (www-data) can write logs and cache.
chown -R www-data:www-data /var/www/pterodactyl/*
6. Web Server and SSL Configuration
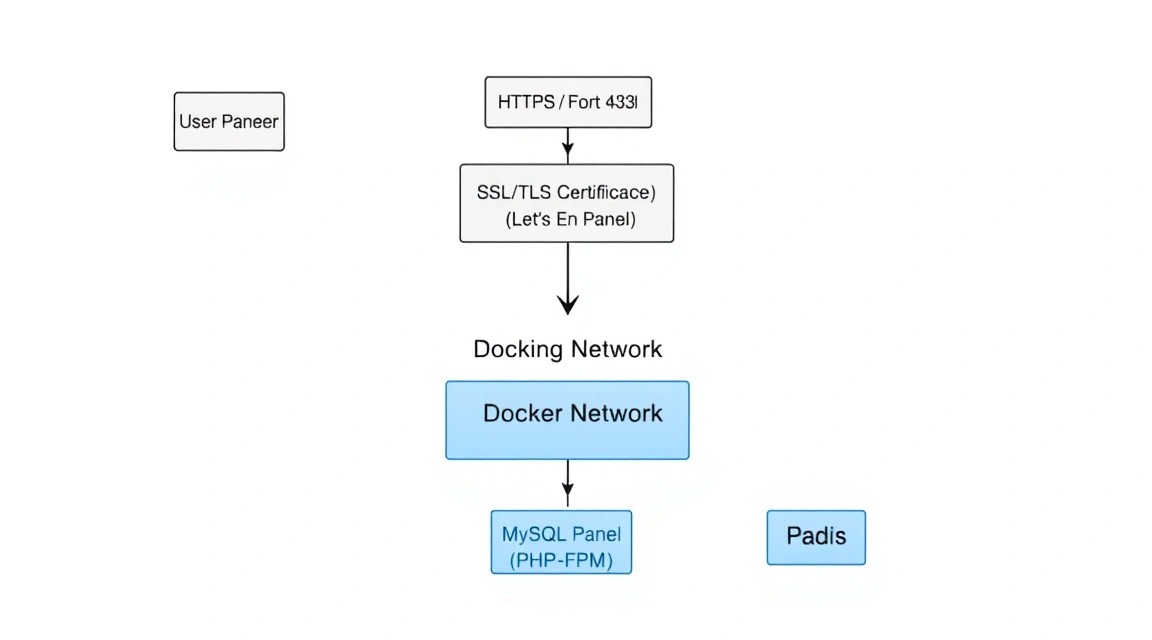 Diagram: 6. Web Server and SSL Configuration
For the panel to work, we need an Nginx configuration file. We will use a modern approach with forced HTTPS via Certbot.
# Install Certbot
sudo apt install -y certbot python3-certbot-nginx

# Obtain certificate (replace panel.example.com with your domain)
sudo certbot certonly --nginx -d panel.example.com
Example Nginx configuration (/etc/nginx/sites-available/pterodactyl.conf):
server {
    listen 80;
    server_name panel.example.com;
    return 301 https://$server_name$request_uri;
}

server {
    listen 443 ssl http2;
    server_name panel.example.com;

    root /var/www/pterodactyl/public;
    index index.php;

    access_log /var/log/nginx/pterodactyl.app-access.log;
    error_log  /var/log/nginx/pterodactyl.app-error.log error;

    # SSL (paths to Certbot certificates)
    ssl_certificate /etc/letsencrypt/live/panel.example.com/fullchain.pem;
    ssl_certificate_key /etc/letsencrypt/live/panel.example.com/privkey.pem;

    location / {
        try_files $uri $uri/ /index.php?$query_string;
    }

    location ~ \.php$ {
        fastcgi_split_path_info ^(.+\.php)(/.+)$;
        fastcgi_pass unix:/run/php/php8.3-fpm.sock;
        fastcgi_index index.php;
        include fastcgi_params;
        fastcgi_param SCRIPT_FILENAME $document_root$fastcgi_script_name;
    }
}
Activate the config and restart Nginx:
sudo ln -s /etc/nginx/sites-available/pterodactyl.conf /etc/nginx/sites-enabled/pterodactyl.conf
sudo systemctl restart nginx
7. Installing and Configuring Wings
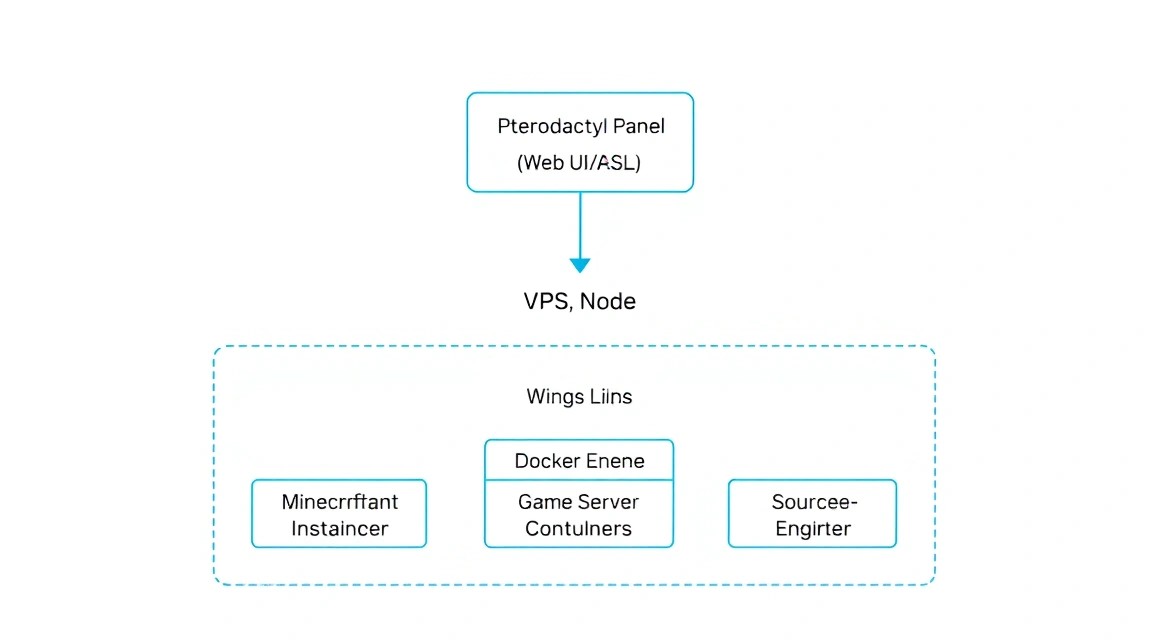 Diagram: 7. Installing and Configuring Wings
Wings is the heart of the system, running on the node side. First, let's install Docker, which is required for Wings to function.
curl -sSL https://get.docker.com/ | CHANNEL=stable bash
sudo systemctl enable --now docker
Now let's download the Wings binary and create the necessary directories.
sudo mkdir -p /etc/pterodactyl
curl -L -o /usr/local/bin/wings https://github.com/pterodactyl/wings/releases/latest/download/wings_linux_amd64
sudo chmod +x /usr/local/bin/wings
To link Wings with the panel, go to the panel's web interface (which we set up in the previous step):
- Go to the Nodes section and create a new node.
- Specify your server's IP, memory, and disk limits.
- After creation, go to the Configuration tab of this node.
- Copy the content (YAML) into the
/etc/pterodactyl/config.yml file on the server.
Starting Wings as a system service (/etc/systemd/system/wings.service):
[Unit]
Description=Pterodactyl Wings Daemon
After=docker.service
Requires=docker.service

[Service]
User=root
WorkingDirectory=/etc/pterodactyl
LimitNOFILE=4096
PIDFile=/var/run/wings/daemon.pid
ExecStart=/usr/local/bin/wings
Restart=on-failure
StartLimitInterval=180
StartLimitBurst=30

[Install]
WantedBy=multi-user.target
sudo systemctl enable --now wings
8. Creating Your First Game Server
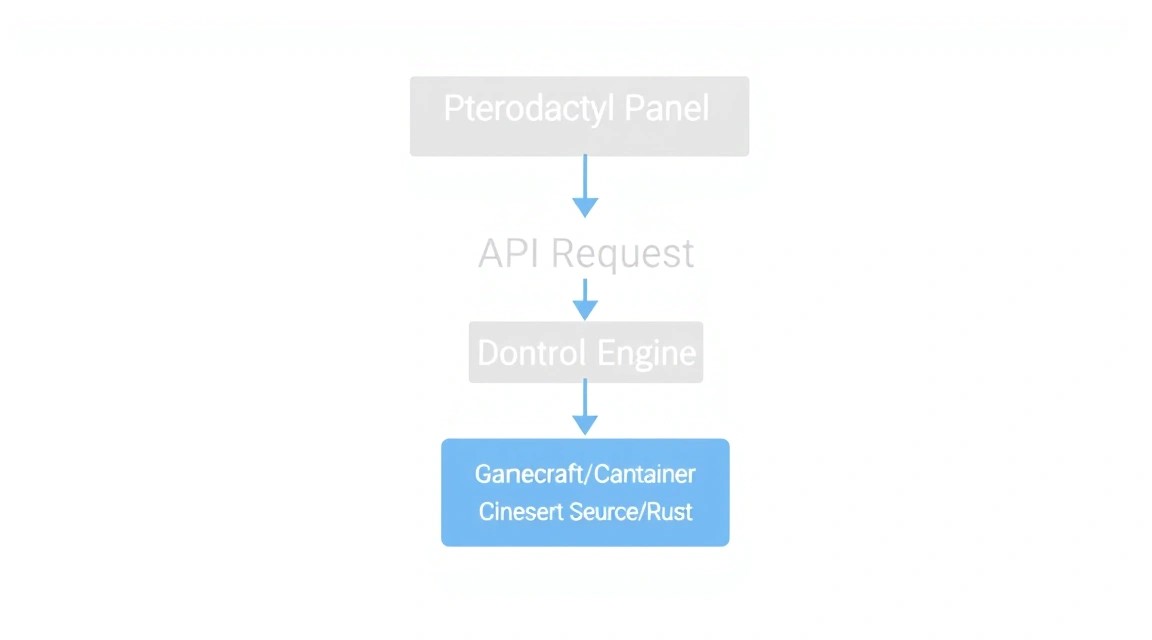 Diagram: 8. Creating Your First Game Server
Once the Node in the panel shows a green heart (status "Online"), you can proceed to create a game server. In Pterodactyl, this is done through "Nests" and "Eggs".
Nest — is a category (e.g., Minecraft or Steam Games).
Egg — is a specific config for a game (e.g., Paper Minecraft or CS2), containing a Docker image and startup scripts.
Steps to create a server:
- Go to Admin -> Servers -> Create New.
- Select a user (owner).
- Select the Node where the server will run.
- Configure Allocations (IP and port). If there are no ports, create them first in Node -> Allocations settings.
- Specify limits: for example, 4000MB RAM and 200% CPU (this is 2 full cores).
- Click Install.
At this point, Wings will receive a command from the Panel, download the required Docker image (e.g., ghcr.io/pterodactyl/yolks:java_17), download the game files, and start the installation process. You can monitor this in the server console in real-time.
9. Backups and Maintenance
Game data is the most valuable asset. Pterodactyl has a built-in backup system, but it needs to be configured correctly. By default, backups are stored locally, which is unsafe if a disk fails.
It is recommended to use S3-compatible storage (e.g., Minio or AWS S3) for storing archives. Configure the following parameters in the panel's .env file:
BACKUP_DRIVER=s3
AWS_ACCESS_KEY_ID=your_key
AWS_SECRET_ACCESS_KEY=your_secret
AWS_DEFAULT_REGION=us-east-1
AWS_BUCKET=your_bucket
AWS_ENDPOINT=https://s3.example.com
For system maintenance, it is important to regularly update both the panel and Wings. The panel update process looks like this:
cd /var/www/pterodactyl
php artisan down
curl -Lo panel.tar.gz https://github.com/pterodactyl/panel/releases/latest/download/panel.tar.gz
tar -xzvf panel.tar.gz
chmod -R 755 storage/ bootstrap/cache/
composer install --no-dev --optimize-autoloader
php artisan migrate --seed --force
php artisan up
Updating Wings is even easier: download the new binary file and restart the service with systemctl restart wings.
10. Troubleshooting + FAQ
Why is the Node status displayed as "Heartbeat Last Reported: Never"?
This is the most common issue. Check three things: 1) Is the wings service running (systemctl status wings). 2) Is port 8080 open in UFW. 3) Is the FQDN or IP correctly specified in the Node settings in the panel. Also, ensure that the SSL certificate for Wings is valid; otherwise, the browser will block the WebSocket connection due to Mixed Content.
Error "419 Page Expired" when logging into the panel
This error is usually related to PHP sessions or cache. Try clearing your browser cache and running php artisan config:clear and php artisan cache:clear in the panel directory. Also, check that the permissions for the storage/framework/sessions directory are set correctly for the www-data user.
What is the minimum VPS configuration suitable?
For the panel itself and one small Minecraft (Vanilla) server, 2 CPU cores and 4 GB of RAM are sufficient. However, for a comfortable game with friends (5-10 people), it's better to aim for 8 GB of RAM to avoid swapping, which instantly kills TPS in the game.
What to choose — VPS or dedicated for this task?
If you are running 1-3 servers for friends, a VPS is an ideal and cheap option. If you plan on commercial hosting or running heavy games like Rust, ARK: Survival Evolved, or servers with 100+ players, you will need a Dedicated server. On a VPS, CPU resources are shared, and "noisy neighbors" can cause micro-stutters critical to gameplay.
The server's Docker container keeps restarting
Check the server logs through the panel or directly via Docker: docker logs [container_id]. Often the problem is a lack of memory (Out of Memory) or an incorrect version of Java/libraries in the selected "Egg". Ensure you have allocated enough RAM to the server with a small margin for the needs of the Docker image itself.
How to change resource limits on the fly?
In Pterodactyl, you can change CPU and RAM limits in the server settings at any time. Wings will automatically apply the changes to the running Docker container without needing a full reinstallation, although some changes may require a server restart (Restart).
11. Conclusions and Next Steps
We have successfully deployed a professional environment for game hosting. Pterodactyl Panel provides a convenient management interface, while Wings ensures isolation and stability of game processes in Docker containers.
Now that the foundation is ready, you can move forward:
- Scaling: Rent additional VPS in different locations and connect them as new Nodes to your central panel.
- Customization: Explore the ParkerVCP Eggs repository to add support for hundreds of other games, from Terraria to Palworld.
- Automation: Set up API integration with billing systems (e.g., WHMCS or Blesta) if you plan to sell game servers.
Remember that game server security is an ongoing process. Regularly update the system kernel, monitor Wings logs, and perform daily backups of databases and game world files.