
Deploying Pi-hole and Unbound on a VPS: Private DNS and Ad Blocking
TL;DR
In this guide, we will set up a Pi-hole and Unbound combination on a Virtual Private Server (VPS) to create your own private, recursive DNS server with ad and tracker blocking capabilities. This will provide enhanced privacy, security, and control over internet traffic for all devices on your network.
- Complete ad and tracker blocking at the DNS level for all devices.
- Enhanced privacy by using your own recursive DNS (Unbound), which does not rely on third-party DNS providers.
- Improved performance through DNS query caching on your VPS.
- Centralized management of DNS queries and blocks via the user-friendly Pi-hole web interface.
- Maximum data control and no transmission of DNS queries to third parties.
- Detailed step-by-step instructions for setting up the server on Ubuntu 24.04 LTS.
What we are setting up and why
In the modern internet, ads and trackers have become an integral part of the user experience, often negatively impacting page load speed, traffic consumption, and most importantly, privacy. Standard DNS servers provided by internet service providers or large companies (Google, Cloudflare), while fast, collect data about your queries, which can be used for profiling and targeted advertising.
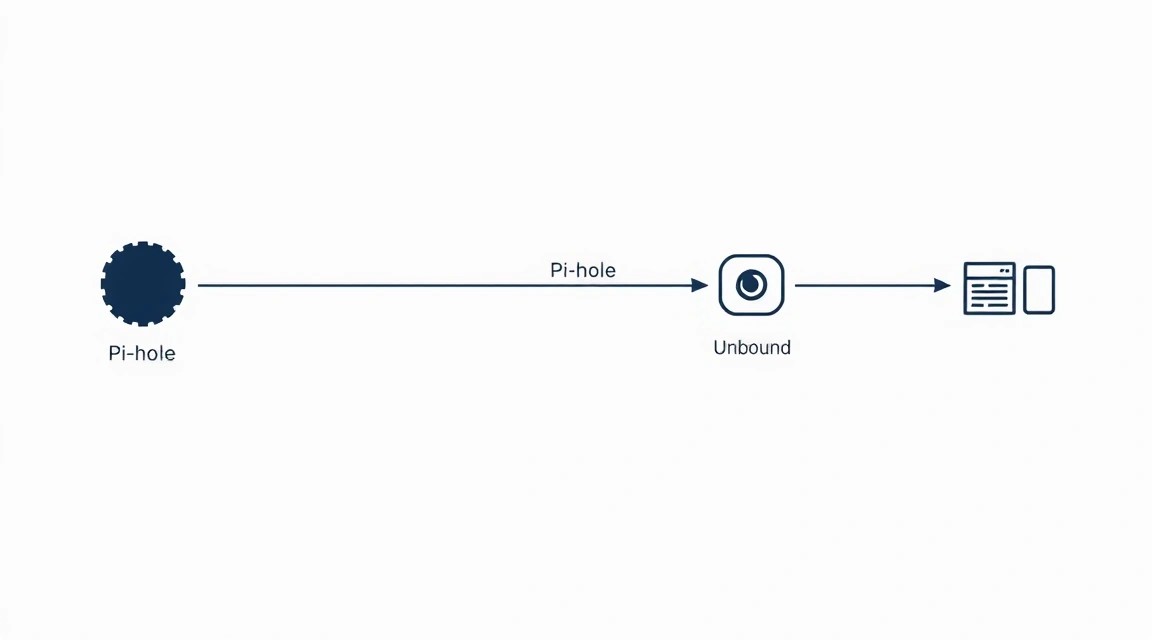
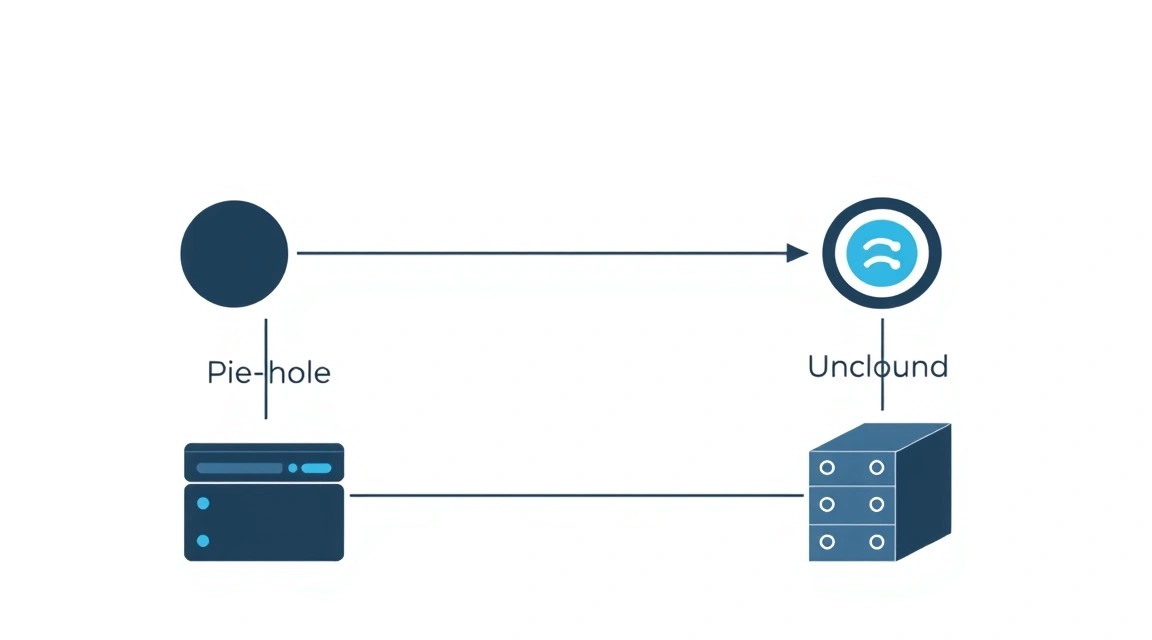
This article is dedicated to deploying the Pi-hole and Unbound combination on your own VPS. Pi-hole is a network-wide ad and tracker blocker that operates at the DNS level. It intercepts DNS queries from all devices on your network and blocks requests to known advertising and tracker domains, returning an empty response. As a result, ads simply do not load, which significantly improves browsing speed and reduces data consumption.
Unbound is a validating, recursive, caching DNS resolver. Unlike traditional DNS servers that simply forward your queries to other servers, Unbound independently performs the entire domain name resolution process, starting from the root DNS servers and gradually descending through the domain hierarchy. This means that your DNS queries do not pass through third-party providers, ensuring maximum privacy and resistance to censorship, as no one but your VPS knows which sites you visit.
Ultimately, the reader will get a completely private and effective DNS server that:
- Blocks ads, pop-ups, and trackers on all devices (computers, smartphones, Smart TVs, IoT devices) connected to your network.
- Enhances privacy by not transmitting your DNS queries to third parties.
- Speeds up web page loading by blocking unnecessary content and caching DNS queries.
- Provides detailed statistics of DNS queries and blocks through a user-friendly web interface.
- Provides an additional layer of security through DNSSEC validation.
Alternatives and why self-hosted on a VPS
There are several alternatives for ad blocking and enhancing DNS privacy:
- Browser extensions: Effective only for a specific browser and do not work for applications, Smart TVs, or other devices.
- Public DNS servers with ad blocking: For example, AdGuard DNS or NextDNS. They block ads, but you still trust your DNS queries to a third-party provider who may collect and analyze data.
- VPN services: Many VPNs offer ad blocking and privacy protection. However, you still trust the VPN provider, and DNS queries are often handled by their own servers, not recursively.
- Cloud-managed solutions: Some providers offer managed DNS services with advanced features, but they are usually more expensive and less flexible to configure than your own solution.
Deploying Pi-hole and Unbound on your own VPS offers a unique combination of advantages:
- Full control: You have complete control over your data and settings.
- Maximum privacy: Unbound ensures that your queries do not pass through third-party DNS servers.
- Flexibility: Ability to add any blocklists, create custom rules, integrate with other services.
- Cost-effectiveness: The cost of a small VPS is often comparable to paid DNS services, but with much greater functionality and privacy.
- Access from anywhere: Your Pi-hole/Unbound server will be accessible from anywhere in the world with internet access, if you configure secure access to it (e.g., via VPN on the same VPS).
This is an ideal solution for those who value privacy, security, and want to have full control over their internet experience.
What VPS configuration is needed for this task
Deploying Pi-hole and Unbound does not require significant computing resources. These services are quite lightweight and can run even on the most modest configurations.
Minimum requirements:
- CPU: 1 core (virtual). Modern processors provide sufficient performance.
- RAM: 512 MB. This is sufficient for basic Pi-hole and Unbound operation. If you plan for a large number of clients (more than 50-100) or very large blocklists, 1 GB might be needed.
- Disk: 10-20 GB SSD. Pi-hole and Unbound take up little space, but the operating system and logs require some room. SSD is preferred for better DNS query performance and faster system boot.
- Network: 100 Mbps. DNS queries consume very little traffic, so even a basic channel speed will be more than sufficient.
- Operating System: Ubuntu Server 24.04 LTS (or Debian 12/13).
Recommended VPS plan for the task:
For comfortable operation, with room for future expansion and the possibility of installing additional small services (e.g., WireGuard VPN on the same VPS), the following configuration is recommended:
- CPU: 2 vCPU
- RAM: 2 GB
- Disk: 40 GB SSD
- Network: 1 Gbit/s port (with traffic from 500 GB/month)
Such a VPS with the specified characteristics will ensure stable operation of Pi-hole and Unbound, and will also allow expanding the server's functionality in the future without the need for an upgrade. You can choose a suitable plan from any reliable provider offering a VPS with these parameters.
When a dedicated server is needed, not a VPS
For Pi-hole and Unbound as the sole or primary task, a dedicated server is usually not required. A VPS fully handles this workload. However, a dedicated server may be justified in the following cases:
- Very high load: If you plan to serve hundreds or thousands of clients (e.g., a large office, public network) and use very aggressive and extensive blocklists.
- Many other resource-intensive services: If your server will host not only Pi-hole/Unbound but also game servers, high-load web applications, databases with a large volume of I/O operations.
- Disk performance requirements: If you need maximum IOPS for specific tasks that are not directly related to DNS.
- Full control over hardware: For some tasks related to security or specific hardware requirements, a dedicated server might be preferable.
For most users who want private DNS and ad blocking, a VPS is an optimal and cost-effective solution. However, if you decide that you need a dedicated server, you can consider a suitable dedicated server with similar or higher specifications.
Location: what it affects
The location of your VPS primarily affects the latency of DNS queries. The closer the server is to you geographically, the faster domain names will be resolved. For most tasks, a difference of 50-100 ms is unnoticeable, but for online gaming or high-frequency trading, it can be critical.
- Closest datacenter to you: Ideal for personal use to minimize latency.
- Central location: If you serve users from different regions, choose a datacenter in a central point to average latency for everyone.
- Laws and regulations: In some cases, the choice of location may depend on the country's legislation, especially if you are concerned about data privacy.
For most users deploying Pi-hole and Unbound, it is sufficient to choose a VPS in a country or region that is relatively close to their primary location.
Server Preparation
It is assumed that you have already gained SSH access to your VPS with root user privileges. We will be using Ubuntu Server 24.04 LTS, as it is a current and stable version for 2026.
1. System Update
First of all, let's update the package list and the system itself to the latest state. This will ensure the presence of the latest security patches and stable software versions.
sudo apt update && sudo apt upgrade -y # Update package list and install updates
sudo apt autoremove -y # Remove unnecessary packages
sudo reboot # Reboot the server if the kernel or critical components were updated
2. Creating a New User and Configuring Sudo
Working directly under the root account is not recommended for security reasons. Let's create a new user and grant them sudo privileges.
sudo adduser username # Create a new user. Replace 'username' with your desired name.
sudo usermod -aG sudo username # Add the user to the sudo group so they can execute commands with root privileges
Now, exit the root session and log in as the new user:
exit # Exit root session
ssh username@your_vps_ip # Log in as the new user
3. Configuring SSH Key Authentication (Recommended)
Using SSH keys instead of passwords significantly enhances security. If you haven't set this up yet, do it now. Generate an SSH key on your local machine (if you don't have one):
ssh-keygen -t ed25519 -C "[email protected]" # Creates a new Ed25519 SSH key
Then, copy the public key to your VPS:
ssh-copy-id username@your_vps_ip # Copies your public key to the server
After successful setup, disable password authentication in the /etc/ssh/sshd_config file. Open it:
sudo nano /etc/ssh/sshd_config # Open the SSH server configuration file
Find and modify the following lines (or add them if they are missing):
# Запрещаем вход под root по SSH
PermitRootLogin no

# Отключаем аутентификацию по паролю
PasswordAuthentication no

# Включаем аутентификацию по ключам
PubkeyAuthentication yes
Save the changes (Ctrl+O, Enter, Ctrl+X) and restart the SSH service:
sudo systemctl restart sshd # Restart the SSH server
Make sure you can log in via SSH with the key before closing the current session.
4. Firewall Configuration (UFW)
To protect the server from unauthorized access, we will configure the UFW (Uncomplicated Firewall).
sudo apt install ufw -y # Install UFW
sudo ufw default deny incoming # Deny all incoming connections by default
sudo ufw default allow outgoing # Allow all outgoing connections
sudo ufw allow ssh # Allow SSH (port 22)
sudo ufw allow 53/tcp # Allow DNS (TCP) for Pi-hole
sudo ufw allow 53/udp # Allow DNS (UDP) for Pi-hole and Unbound
sudo ufw allow 80/tcp # Allow HTTP (TCP) for Pi-hole web interface
sudo ufw enable # Enable the firewall
sudo ufw status # Check firewall status
If you plan to use HTTPS for the Pi-hole web interface (via Caddy, as we will discuss later), you will also need to allow port 443:
sudo ufw allow 443/tcp # Allow HTTPS (TCP)
sudo ufw reload # Reload UFW rules
5. Installing Fail2Ban
Fail2Ban protects the server from brute-force attacks by blocking IP addresses from which numerous failed login attempts originate.
sudo apt install fail2ban -y # Install Fail2Ban
sudo systemctl enable fail2ban # Enable Fail2Ban autostart on boot
sudo systemctl start fail2ban # Start the Fail2Ban service
sudo cp /etc/fail2ban/jail.conf /etc/fail2ban/jail.local # Copy config for local changes
sudo nano /etc/fail2ban/jail.local # Open the file for configuration
In the jail.local file, ensure that the [sshd] section is active (enabled = true) and, optionally, adjust bantime (block time) and findtime (period for detecting attempts) as desired. Default settings are generally good. For example, you can increase bantime for a longer block:
[DEFAULT]
bantime = 1h # IP address block time (default 10m)
findtime = 10m # Period for counting attempts (default 10m)
maxretry = 5 # Number of attempts before blocking (default 5)

[sshd]
enabled = true
Save the changes and restart Fail2Ban:
sudo systemctl restart fail2ban # Restart Fail2Ban to apply changes
sudo fail2ban-client status # Check Fail2Ban status
sudo fail2ban-client status sshd # Check SSH protection status
Now your server is ready for Pi-hole and Unbound installation.
Software Installation — Step-by-Step
We will install Unbound first, and then Pi-hole, configuring Pi-hole to use Unbound as its sole upstream DNS server.
1. Unbound Installation
Unbound is a recursive DNS resolver that will directly interact with root DNS servers, ensuring maximum privacy. We will install it from the official Ubuntu 24.04 LTS repositories.
sudo apt update # Update package list
sudo apt install unbound -y # Install Unbound version 1.19.0 (current for Ubuntu 24.04 LTS)
After installation, you need to configure Unbound to work with Pi-hole. We will create a separate configuration file to avoid modifying the main one.
sudo nano /etc/unbound/unbound.conf.d/pi-hole.conf # Create a new configuration file for Unbound
Paste the following content into the pi-hole.conf file. This configuration sets Unbound to listen only on the local interface, perform recursive queries, enable DNSSEC validation, and cache responses.
server:
    # Port on which Unbound will listen for queries
    port: 5335
    # Listen only on the local interface (for Pi-hole)
    interface: 127.0.0.1
    # Disable listening on all interfaces
    do-not-query-address: 0.0.0.0/0
    do-not-query-address: ::0/0

    # Allow queries only from localhost (where Pi-hole will be)
    access-control: 127.0.0.1 allow

    # Enable DNSSEC validation
    auto-trust-anchor-file: "/var/lib/unbound/root.key"

    # Enable query logging
    verbosity: 0 # 0 for minimal logging, 1 for more verbose

    # Performance optimization
    num-threads: 1 # Number of threads (1 is usually sufficient for a VPS)
    msg-cache-size: 128m # Message cache size (128MB recommended for 2GB RAM)
    rrset-cache-size: 256m # Resource record cache size
    # Increase limits to prevent errors under heavy load
    outgoing-range: 8192
    num-queries-per-thread: 4096
    aggressive-nsec: yes # Speeds up resolution of non-existent domains
    do-ip4: yes
    do-ip6: no # Disable IPv6 if not used or if provider does not support it
    prefer-ip6: no
    harden-glue: yes # Strengthens glue record checking
    harden-dnssec-stripped: yes # Disallows returning invalid DNSSEC responses
    harden-referral-path: yes # Strengthens referral path checking
    use-caps-for-id: yes # Improves cache poisoning protection
    private-address: 192.168.0.0/16 # Specify private IP ranges so Unbound doesn't try to resolve them
    private-address: 10.0.0.0/8
    private-address: 172.16.0.0/12
    private-address: 169.254.0.0/16
    private-address: fd00::/8
    private-address: fe80::/10
    hide-version: yes # Hide Unbound version
    # Disable DNS64 if not required
    do-daemonize: yes
    root-hints: "/var/lib/unbound/root.hints" # Path to the file with root DNS servers
Save the file (Ctrl+O, Enter, Ctrl+X). Now let's download the current root DNS servers and the DNSSEC key.
sudo wget -O /var/lib/unbound/root.hints https://www.internic.net/domain/named.root # Download current root DNS servers
sudo unbound-anchor -a /var/lib/unbound/root.key # Generate and update trust anchor for DNSSEC
sudo systemctl enable unbound # Enable Unbound autostart on boot
sudo systemctl restart unbound # Restart Unbound to apply the new configuration
sudo systemctl status unbound # Check Unbound status. Should be 'active (running)'
Let's check that Unbound is listening on port 5335 and can resolve domains:
dig @127.0.0.1 -p 5335 google.com # Check domain resolution via Unbound
You should see a response with google.com IP addresses. If you see an error, check Unbound's configuration and logs (sudo journalctl -u unbound).
2. Pi-hole Installation
Pi-hole will use Unbound as its upstream DNS server. Pi-hole installation is performed using a convenient script.
sudo apt install curl -y # Install curl if it's not already present
curl -sSL https://install.pi-hole.net | sudo bash # Run the Pi-hole installation script (version 5.x, current for 2026)
The Pi-hole installer will guide you through several steps:
- Static IP Address: The installer will suggest configuring a static IP address for your server. Confirm the use of the current IP address, which is your VPS's external IP.
- Upstream DNS Provider: At this step, it is VERY IMPORTANT to select
Customand enter127.0.0.1#5335. This tells Pi-hole to use your locally running Unbound on port 5335. - Select Blocklists: Choose the default blocklists. You can always add more later via the web interface.
- Install Web Admin Interface: Make sure to select "On" to install the web interface.
- Install Lighttpd Web Server: Confirm the installation of the Lighttpd web server.
- Log Queries: Select the logging level (default "Log all queries" — recommended).
After the installation is complete, Pi-hole will show you a screen with the web interface URL and a temporary administrator password. Be sure to save this password!
Example output after installation:
...
[✓] Enabling Pi-hole automated updates
[✓] Enabling Pi-hole blocklist updates
[✓] Restarting lighttpd service
[✓] FTL is listening on port 53
[✓] Pi-hole blocking is enabled

The Pi-hole Web interface is now available!
        http://your_vps_ip/admin

You are strongly advised to change the default password.
        Default password: your_generated_password

Installation Complete!
Now Pi-hole is installed and configured to use Unbound. The DNS servers on your VPS will operate on port 53 (Pi-hole), and Pi-hole will forward queries to Unbound on port 5335.
Configuration
After installing Pi-hole and Unbound, you need to perform several steps for their optimal configuration and to verify their functionality.
1. Accessing the Pi-hole Web Interface
Open a web browser and navigate to http://your_vps_ip/admin (replace your_vps_ip with the actual IP address of your VPS). You will see the Pi-hole login page.
# If you forgot your password, you can reset it
pihole -a -p # Sets a new random password
pihole -a -p your_new_password # Sets a specified password
Log in using the password that was shown after installation. After logging in, you will see the dashboard with DNS query statistics, blocked ads, and other useful information.
2. Changing the Pi-hole Administrator Password
Immediately after the first login, it is recommended to change the temporary password to a stronger one. This can be done in the web interface: Settings > Web Interface > Password.
3. Adding and Managing Blocklists
Pi-hole comes with several default blocklists. You can add more for more aggressive filtering. Go to Group Management > Adlists in the web interface.
Some popular lists:
- OISD Full:
https://abp.oisd.nl/ - StevenBlack's Unified Hosts File:
https://raw.githubusercontent.com/StevenBlack/hosts/master/hosts - Lightswitch05's Blocklist:
https://raw.githubusercontent.com/Lightswitch05/Hosts/master/ads-and-tracking-extended.txt
After adding new lists, update Pi-hole's gravity database:
pihole -g # Updates all blocklists
This can also be done via the web interface: Tools > Update Gravity.
4. Configuring Whitelist/Blacklist
If a website does not work correctly due to Pi-hole blocking, you can add its domain to the "whitelist". If you want to block a specific domain that is not on the lists, add it to the "blacklist". This is done via Domains in the web interface.
5. Optional: Configuring Conditional Forwarding
If you are using Pi-hole in a home network and want to see device names instead of just IP addresses in Pi-hole logs, you can configure "Conditional Forwarding". This will make Pi-hole forward requests for your local network (e.g., .local or .lan) to your router or local DNS server. Go to Settings > DNS > Advanced DNS settings and enable Use Conditional Forwarding, specifying your router's IP address and local domain.
6. Optional: Configuring HTTPS for Pi-hole Web Interface with Caddy
By default, the Pi-hole web interface is accessible via HTTP. For increased security, it is recommended to configure HTTPS. We will use Caddy — a modern web server that automatically manages Let's Encrypt certificates.
Installing Caddy:
sudo apt install -y debian-keyring debian-archive-keyring apt-transport-https # Install necessary packages
curl -1sLf 'https://dl.cloudsmith.io/public/caddy/stable/gpg.key' | sudo gpg --dearmor -o /usr/share/keyrings/caddy-stable-archive-keyring.gpg # Add Caddy's GPG key
curl -1sLf 'https://dl.cloudsmith.io/public/caddy/stable/debian.deb.txt' | sudo tee /etc/apt/sources.list.d/caddy-stable.list # Add Caddy repository
sudo apt update # Update package list
sudo apt install caddy -y # Install Caddy (current version 2.x as of 2026)
Configuring Caddyfile:
Create a DNS record (A/AAAA) for your domain (e.g., pihole.yourdomain.com) pointing to your VPS's IP address. Then configure Caddy to proxy requests to Pi-hole.
sudo nano /etc/caddy/Caddyfile # Open Caddy configuration file
Replace its content with the following, changing pihole.yourdomain.com to your domain:
pihole.yourdomain.com {
    # Automatic SSL certificate acquisition from Let's Encrypt
    tls {
        dns cloudflare {env.CLOUDFLARE_API_TOKEN} # Example for Cloudflare. Specify your DNS provider and API token.
    }
    # Proxy requests to the Pi-hole web interface
    reverse_proxy 127.0.0.1:80
    # Settings to hide the client's real IP address from Pi-hole (optional)
    header_up X-Forwarded-For {remote_host}
    header_up Host {host}
    header_up X-Real-IP {remote_host}
}
Note: For automatic Let's Encrypt certificate acquisition via DNS (so Caddy can run on port 80/443, even if they are occupied by Pi-hole), you will need a DNS provider with API access (e.g., Cloudflare, Namecheap, DigitalOcean). You will need to install the corresponding Caddy plugin and specify an API token. If you do not want to use a DNS challenge, ensure that ports 80 and 443 are free, or use a different port for Caddy.
If using a DNS challenge, save your API token in an environment variable for security.
# Example for Cloudflare
echo 'CLOUDFLARE_API_TOKEN="your_cloudflare_api_token"' | sudo tee -a /etc/environment
source /etc/environment # Load the environment variable
Restart Caddy to apply changes:
sudo systemctl reload caddy # Reload Caddy
sudo systemctl enable caddy # Enable Caddy autostart
sudo ufw allow 80,443/tcp # Ensure ports 80 and 443 are allowed in the firewall
Now your Pi-hole web interface will be accessible via HTTPS at https://pihole.yourdomain.com/admin.
7. Verifying Functionality
After all configurations, it is necessary to ensure that everything is working as expected.
- Verifying DNS Resolution via Pi-hole:
dig @your_vps_ip example.com # Check a regular domain
dig @your_vps_ip doubleclick.net # Check an advertising domain - should be blocked (0.0.0.0 or ::)
You should see that
example.comresolves to its real IP, anddoubleclick.netresolves to0.0.0.0or::. - Checking Pi-hole Logs:
pihole -t # View Pi-hole logs in real-timeYou will see all DNS queries passing through Pi-hole and their status (
OK,Blocked,Cached). - Client Device Configuration:
To start using your Pi-hole/Unbound server, you need to configure the DNS server on client devices (computer, smartphone) or on your router in your home network. Specify your VPS's IP address as the primary DNS server.
- Windows: Network and Internet Settings -> Change adapter options -> Properties of your connection -> Internet Protocol Version 4 (TCP/IPv4) -> Properties -> Use the following DNS server addresses.
- macOS: System Settings -> Network -> Select connection -> Advanced -> DNS.
- Linux: Usually in
/etc/resolv.confor via NetworkManager. - Router: Log in to your router's web interface and find the WAN/LAN DNS settings. It is recommended to set your VPS's IP address as the primary DNS server for the entire local network.
- Client Testing:
After configuring DNS on the client, open a web browser and visit several websites with ads (e.g., news portals). You should notice a significant reduction or complete absence of ads. Also, check the Pi-hole web interface to ensure that queries from your client are displayed and blocked.
Now your private DNS server with ad blocking is fully functional!