
Deploying Lemmy on a VPS: Your Own Federated Social Network Server
TL;DR
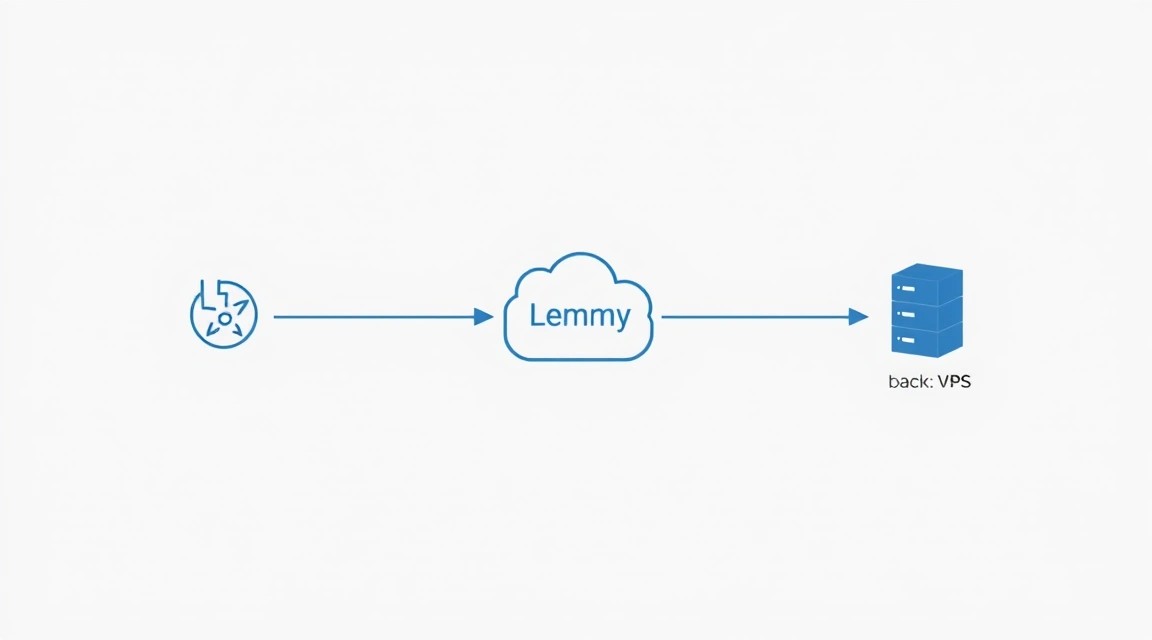
In this comprehensive guide, we will set up your own Lemmy server step-by-step on a Virtual Private Server (VPS) or a dedicated server. You will learn how to prepare the Ubuntu 24.04 LTS operating system, install Docker and Docker Compose, deploy Lemmy using PostgreSQL, and configure the Caddy web server for automatic HTTPS certificate acquisition. As a result, you will have a fully functional, independent, and scalable federated social network Lemmy, ready for use and management.
- Setting up a secure and up-to-date (2026) Ubuntu 24.04 LTS environment.
- Deploying Lemmy using Docker Compose for simplified component management.
- Configuring PostgreSQL as the database for Lemmy.
- Using Caddy for automatic HTTPS certificate management (Let's Encrypt).
- Detailed instructions for backing up and maintaining your Lemmy instance.
- Answers to frequently asked questions and troubleshooting tips.
What we are setting up and why
In the modern digital landscape, where centralized social networks are often criticized for censorship, data collection, and opaque algorithms, federated platforms offer an attractive alternative. Lemmy is one such project: a free and open-source platform for link aggregation and discussions, similar to Reddit, but built on the ActivityPub protocol. This means that your Lemmy server (also called an "instance") can interact with other Lemmy instances, as well as with servers from other federated networks like Mastodon, Kbin, and Pixelfed.
By setting up your own Lemmy instance on a VPS, you gain full control over your social network. You define moderation rules, choose which other federation instances to interact with, and ensure the privacy of your users' data. This is an ideal solution for creating niche communities, private forums for teams, or simply for those seeking an independent platform for communication, free from corporate dictates.
Ultimately, the reader will have a fully functional Lemmy server, accessible via their own domain name, with automatic HTTPS encryption, configured backups, and an understanding of how to keep the system up-to-date. You will become the administrator of your own micro-social network, capable of integrating with the broader federated universe.
There are alternatives, such as using cloud-managed services (though there aren't as many for Lemmy as there are for, say, WordPress) or other self-hosted platforms (Mastodon for microblogging, Kbin as a broader content aggregator). However, choosing a self-hosted solution on a VPS for Lemmy is driven by several key advantages:
- Full Control: You own all data, manage the software and infrastructure without intermediaries.
- Flexibility and Customization: Ability to fine-tune all server parameters, install plugins and themes that may not be available on managed platforms.
- Privacy: Absence of third parties who could collect or sell your users' data.
- Cost-effectiveness: Often, at a certain level of usage, your own VPS turns out to be cheaper than a subscription to a managed service, especially in the long run.
- Learning and Skill Development: The installation and configuration process provides invaluable experience with server technologies.
These advantages make self-hosting on a VPS an attractive choice for deploying Lemmy, allowing you to create a unique and independent online community.
What VPS configuration is needed for this task

Choosing the right VPS is critically important for the stable and efficient operation of your Lemmy instance. Resource requirements can vary depending on the expected number of users, activity, and the volume of stored data. Below are the minimum and recommended configurations for 2026.
Minimum requirements for a small instance (up to 50 active users)
- CPU: 2 cores (modern processors, e.g., Intel Xeon E3/E5 or AMD EPYC).
- RAM: 4 GB DDR4. Lemmy and PostgreSQL are quite resource-intensive, and 4 GB is the absolute minimum for stable operation.
- Disk: 50 GB SSD. For the operating system, Docker images, database, and a small volume of user uploads. SSD is mandatory for good DB performance.
- Network: 1 Gbit/s port with unlimited traffic or sufficient allowance (minimum 1 TB/month).
Recommended VPS plan for a medium instance (up to 500 active users)
For more comfortable operation and growth potential, the following configuration is recommended:
- CPU: 4 cores (modern processors).
- RAM: 8 GB DDR4. This will provide sufficient buffer for PostgreSQL and Lemmy, as well as for caching.
- Disk: 100-200 GB NVMe SSD. NVMe will significantly speed up disk operations, which is critical for database performance and media file uploads.
- Network: 1 Gbit/s port with unlimited traffic.
When choosing a provider, you can consider a VPS with the specified characteristics to ensure a reliable foundation for your Lemmy server.
When a Dedicated Server is needed
If you plan to run a large Lemmy instance with thousands of active users, a significant volume of media files, or if you want to host several resource-intensive services on one machine, then you should consider a dedicated server. Dedicated servers offer guaranteed resources, higher disk I/O performance, and often more flexible network settings. This is also relevant for those who require specific hardware (e.g., GPU for certain tasks) or the maximum level of isolation.
For very large Lemmy instances that can serve thousands of users, you can consider a suitable dedicated server. On such a server, you will be able to allocate more CPU cores, significantly increase RAM (e.g., 32 GB or more), use RAID arrays for disks to improve reliability and speed, and gain full control over the network card.
Location: what it affects
The choice of your VPS's geographical location also matters:
- Latency: Place the server as close as possible to your primary audience to minimize access delays to the site.
- Legislation: Consider data privacy laws (GDPR, CCPA, etc.) and freedom of speech in the country where the server is located. This can be critical for content moderation and user data processing.
- Cost: VPS prices can vary significantly across different regions.
- Network Connectivity: Some locations have better connectivity to certain regions of the world.
For most projects, the optimal choice will be a VPS in a data center located in Western Europe or North America, which provides a good balance between legislation, connectivity, and cost.
Server Preparation
Before installing Lemmy, you need to perform basic operating system configuration. We will use Ubuntu Server 24.04 LTS, as it is a stable and widely used platform with long-term support.
1. SSH Connection and Initial Update
Connect to your VPS as the root user, using the IP address provided by your provider. If you are using Windows, you can use PuTTY or the built-in PowerShell/CMD SSH client. For Linux/macOS:
ssh root@ВАШ_IP_АДРЕС
After a successful login, update the package list and install all available updates. This will ensure the system's currency and security.
sudo apt update             # Update package list
sudo apt upgrade -y         # Install available updates without confirmation
sudo apt autoremove -y      # Remove unnecessary dependencies
2. Creating a New User with sudo Privileges
Working as the root user is insecure. Let's create a new user and grant them sudo privileges.
adduser lemmyadmin          # Create a new user named lemmyadmin
usermod -aG sudo lemmyadmin # Add user lemmyadmin to the sudo group
Set a strong password for the new user when prompted by the system. Then, exit the root session and log in as the new user:
exit                        # Exit root session
ssh lemmyadmin@ВАШ_IP_АДРЕС # Log in as the new user
3. Configuring SSH Keys (Recommended)
To enhance security, it is recommended to use SSH keys instead of passwords. If you don't have a key pair yet, generate them on your local computer:
ssh-keygen -t rsa -b 4096 -C "[email protected]"
Then copy the public key to the server:
ssh-copy-id lemmyadmin@ВАШ_IP_АДРЕС
After that, disable password authentication in the /etc/ssh/sshd_config file on the server. Open it for editing:
sudo nano /etc/ssh/sshd_config
Find the lines:
#PasswordAuthentication yes
And change them to:
PasswordAuthentication no
PermitRootLogin no
Restart the SSH service:
sudo systemctl restart sshd
Try connecting via SSH again using the key. If everything works, you have successfully increased security.
4. Firewall Configuration (UFW)
The UFW (Uncomplicated Firewall) firewall is installed by default in Ubuntu. Let's configure it to allow only the necessary ports:
sudo ufw allow OpenSSH        # Allow SSH (port 22)
sudo ufw allow http           # Allow HTTP (port 80)
sudo ufw allow https          # Allow HTTPS (port 443)
sudo ufw enable               # Enable UFW
sudo ufw status verbose       # Check UFW status
When prompted for confirmation, type y. UFW is now active and protecting your server.
5. Installing Fail2ban
Fail2ban protects the server from brute-force attacks by blocking IP addresses from which multiple failed login attempts occur. Let's install it:
sudo apt install fail2ban -y  # Install Fail2ban
sudo systemctl enable fail2ban # Enable Fail2ban autostart
sudo systemctl start fail2ban  # Start Fail2ban
Fail2ban is configured by default to protect SSH. You can create a /etc/fail2ban/jail.local file to customize rules, but for most users, the default settings are sufficient.
6. Time Zone and Time Synchronization Configuration
Ensure that the server's time zone is configured correctly. This is important for logging and proper application operation.
sudo timedatectl set-timezone Europe/Moscow # Replace with your time zone
timedatectl status                          # Check status
Ubuntu 24.04 LTS uses systemd-timesyncd for NTP time synchronization, which is usually sufficient. Make sure the service is active:
timedatectl show-timesync --value # Show synchronization status
If more advanced synchronization is required, you can install chrony:
sudo apt install chrony -y
sudo systemctl enable chrony
sudo systemctl start chrony
chronyc sources -v
Your server is now basically configured, secured, and ready for the installation of the main software for Lemmy.
Software Installation — Step-by-Step
For deploying Lemmy, we will use Docker and Docker Compose. This approach significantly simplifies dependency management, component isolation, and system updates. Caddy will be used as the web server and reverse proxy with automatic HTTPS.
1. Installing Docker and Docker Compose
First, let's install Docker Engine. We will use the official Docker repository to get the latest versions (as of 2026, this will likely be Docker 26.x+).
# Update packages and install necessary dependencies for the Docker repository
sudo apt update
sudo apt install -y ca-certificates curl gnupg

# Add Docker's official GPG key
sudo install -m 0755 -d /etc/apt/keyrings
curl -fsSL https://download.docker.com/linux/ubuntu/gpg | sudo gpg --dearmor -o /etc/apt/keyrings/docker.gpg
sudo chmod a+r /etc/apt/keyrings/docker.gpg

# Add Docker repository to APT sources
echo \
  "deb [arch="$(dpkg --print-architecture)" signed-by=/etc/apt/keyrings/docker.gpg] https://download.docker.com/linux/ubuntu \
  "$(. /etc/os-release && echo "$VERSION_CODENAME")" stable" | \
  sudo tee /etc/apt/sources.list.d/docker.list > /dev/null

# Update package list with the new repository
sudo apt update

# Install Docker Engine, Docker CLI, and containerd
sudo apt install -y docker-ce docker-ce-cli containerd.io docker-buildx-plugin docker-compose-plugin

# Add your user to the docker group to work without sudo
sudo usermod -aG docker lemmyadmin
After adding the user to the docker group, you need to either log out and log back into your SSH session, or run newgrp docker for the changes to take effect. Let's check the Docker installation:
docker run hello-world # Run a Docker test container
If you see the message "Hello from Docker!", then Docker is installed correctly. The Docker Compose Plugin is already installed with Docker Engine.
2. Installing Caddy (Reverse Proxy and HTTPS)
Caddy is a powerful, easy-to-use web server with automatic HTTPS support via Let's Encrypt. Let's install it from the official Caddy repository.
# Install necessary packages for the Caddy repository
sudo apt install -y debian-keyring debian-archive-keyring apt-transport-https

# Add Caddy's GPG key
curl -1sLf 'https://dl.cloudsmith.io/public/caddy/stable/gpg.key' | sudo gpg --dearmor -o /usr/share/keyrings/caddy-stable-archive-keyring.gpg

# Add Caddy repository
curl -1sLf 'https://dl.cloudsmith.io/public/caddy/stable/debian.deb.txt' | sudo tee /etc/apt/sources.list.d/caddy-stable.list

# Update package list and install Caddy
sudo apt update
sudo apt install -y caddy

# Check Caddy status
sudo systemctl status caddy
Caddy should be installed and running. We will configure it later.
3. Cloning the Lemmy Docker Compose Repository
Lemmy provides official Docker Compose files for easy deployment. We will clone them and configure them for our needs.
# Install Git if not already installed
sudo apt install -y git

# Navigate to the user's home directory
cd ~

# Clone the official Lemmy Docker Compose repository
git clone https://github.com/LemmyNet/lemmy-docker-compose.git
cd lemmy-docker-compose

# Switch to a stable version (e.g., v0.19.x or v0.20.x, current for 2026)
# Check for current releases on GitHub LemmyNet/lemmy-docker-compose
git checkout tags/0.19.3 -b 0.19.3-branch # Example for version 0.19.3. Replace with the current one.
Important: Always check for current stable Lemmy versions on the official GitHub repository and use the corresponding tag for git checkout. As of 2026, versions 0.19.x or even 0.20.x will likely be available.
4. Configuring the .env and docker-compose.yml Files
The lemmy-docker-compose directory contains configuration files. Copy the examples for further configuration:
cp lemmy.env.example .env       # Copy the environment variables file
cp docker-compose.yml.example docker-compose.yml # Copy the main Docker Compose file
Now, edit the .env file. This is a key file containing secrets and main settings:
nano .env
In this file, you will need to change the following parameters (examples are current for 2026):
LEMMY_HOSTNAME=your.lemmy.domain.com: Specify your domain name through which Lemmy will be accessible.LEMMY_DATABASE_NAME=lemmy: Database name (can be left as default).LEMMY_DATABASE_USER=lemmy: Database user (can be left as default).LEMMY_DATABASE_PASSWORD=ВАШ_ОЧЕНЬ_СЛОЖНЫЙ_ПАРОЛЬ: Mandatory: change to a strong, unique password.LEMMY_DATABASE_HOST=lemmy_db: Database host (default, do not change).LEMMY_DATABASE_PORT=5432: Database port (default, do not change).LEMMY_APU_KEY=ВАШ_СЕКРЕТНЫЙ_КЛЮЧ_APU: Generate a random string of 32+ characters.PICTRS_API_KEY=ВАШ_СЕКРЕТНЫЙ_КЛЮЧ_PICTRS: Generate a random string of 32+ characters. Pict-rs is an image processing service.
Save changes (Ctrl+O, Enter, Ctrl+X).
In the docker-compose.yml file, you may need to make minimal changes if you want to use Caddy instead of Nginx (which is the default). In the standard docker-compose.yml.example, Lemmy often includes Nginx. We will remove or comment out the Nginx section and ensure that the Lemmy service is available on port 8536 (or another port specified in the Lemmy configuration) for Caddy. If you have cloned the current repository, Caddy might already be offered as an option, or minimal adaptation might be required for its use.
For simplicity, we will assume that the lemmy-ui and lemmy services in docker-compose.yml do not expose their ports externally (i.e., there are no ports: sections that would map 8536 or 1234 to the host system), but are only accessible within the Docker network. Caddy will access them by their service names.
5. Starting Lemmy
Now that everything is configured, you can start Lemmy:
docker compose build --no-cache # Build Lemmy images (may take some time)
docker compose up -d            # Start all services in the background
After starting, check the container status:
docker compose ps
You should see that all services (lemmy_db, lemmy, lemmy_ui, pict-rs) are in "running" status.
At this stage, Lemmy is running within the Docker network but is not yet accessible externally. For this, we need the Caddy configuration, which will be described in the next section.
Configuration
Now that the main Lemmy components are running in Docker, you need to configure external access via the Caddy web server, which will act as a reverse proxy and automatically manage HTTPS certificates.
1. DNS Record Configuration
Before configuring Caddy, ensure that your domain (e.g., your.lemmy.domain.com) points to your VPS's IP address. Add or update an A-record with your domain registrar:
- Type:
A - Name/Host:
your.lemmy.domain.com(or@if it's the root domain) - Value/IP Address:
YOUR_VPS_IP_ADDRESS
Wait a few minutes for DNS changes to propagate across the network (this can take up to several hours).
2. Caddyfile Configuration
Caddy uses a configuration file called Caddyfile. Open it for editing:
sudo nano /etc/caddy/Caddyfile
Remove all default content and insert the following configuration, replacing your.lemmy.domain.com with your actual domain:
your.lemmy.domain.com {
    # Enable automatic GZIP compression
    encode gzip

    # Reverse proxy for static UI files
    handle /pictrs/ {
        reverse_proxy pict-rs:8080
    }
    handle /api/ {
        reverse_proxy lemmy:8536
    }
    handle /feeds/ {
        reverse_proxy lemmy:8536
    }
    handle /nodeinfo/ {
        reverse_proxy lemmy:8536
    }
    handle /ap/ {
        reverse_proxy lemmy:8536
    }
    handle /actor/ {
        reverse_proxy lemmy:8536
    }
    handle /inbox/ {
        reverse_proxy lemmy:8536
    }
    handle /outbox/ {
        reverse_proxy lemmy:8536
    }
    handle /well-known/ {
        reverse_proxy lemmy:8536
    }
    handle /person/ {
        reverse_proxy lemmy:8536
    }

    # Reverse proxy for UI
    reverse_proxy lemmy-ui:1234 {
        # Headers for proper WebSocket and other functionality
        header_up Host {host}
        header_up X-Real-IP {remote_ip}
        header_up X-Forwarded-For {remote_ip}
        header_up X-Forwarded-Proto {scheme}
    }

    # Enable logging
    log {
        output file /var/log/caddy/lemmy_access.log
        format console
    }
}
Caddyfile Explanations:
your.lemmy.domain.com: Caddy will automatically request and renew HTTPS certificates for this domain.encode gzip: Enables GZIP compression for faster loading.handle /pictrs/: Redirects requests to the Pict-rs service (image processing).handle /api/and others: Redirect requests to the Lemmy API.reverse_proxy lemmy-ui:1234: Main proxy for the Lemmy user interface.lemmy,lemmy-ui,pict-rs: These are the service names in yourdocker-compose.yml. Caddy, running on the host machine, cannot directly see containers by their names unless they are in the same Docker network or Caddy is also running as a container in the same network. For Caddy to work correctly with Docker containers, Caddy must either be run as a Docker container in the same network, or you must explicitly specify container IP addresses or use a Docker proxy.
Correction for Caddy on the host: If Caddy is running on the host and Lemmy in Docker, Caddy will not be able to resolve the names lemmy, lemmy-ui, pict-rs. There are two main solutions:
- Run Caddy as a Docker container in the same network as Lemmy. This is more complex but preferred.
- Modify
docker-compose.ymlso that Lemmy and Lemmy-UI publish their ports to the host (e.g.,lemmy:8536to127.0.0.1:8536), and then Caddy will proxy tolocalhost:8536. This is simpler for this tutorial.
Let's modify docker-compose.yml so that Lemmy and Pict-rs are available on localhost. Open docker-compose.yml:
nano docker-compose.yml
Find the lemmy, lemmy-ui, and pict-rs sections. Add or modify the ports section so they look like this:
# ...
services:
  lemmy:
    image: dessalines/lemmy:0.19.3 # Replace with the actual version
    # ...
    ports:
      - "127.0.0.1:8536:8536" # Lemmy API/Backend

  lemmy-ui:
    image: dessalines/lemmy-ui:0.19.3 # Replace with the actual version
    # ...
    ports:
      - "127.0.0.1:1234:1234" # Lemmy UI

  pict-rs:
    image: kaniini/pict-rs:0.4.0 # Replace with the actual version
    # ...
    ports:
      - "127.0.0.1:8080:8080" # Pict-rs (image proxy)
# ...
Save docker-compose.yml, then restart Lemmy to apply the port changes:
docker compose down
docker compose up -d
Now the Caddyfile should be adjusted to use localhost:
your.lemmy.domain.com {
    encode gzip

    handle /pictrs/ {
        reverse_proxy 127.0.0.1:8080 # Reverse proxy for Pict-rs
    }
    handle /api/ {
        reverse_proxy 127.0.0.1:8536 # Reverse proxy for Lemmy API
    }
    handle /feeds/ {
        reverse_proxy 127.0.0.1:8536
    }
    handle /nodeinfo/ {
        reverse_proxy 127.0.0.1:8536
    }
    handle /ap/ {
        reverse_proxy 127.0.0.1:8536
    }
    handle /actor/ {
        reverse_proxy 127.0.0.1:8536
    }
    handle /inbox/ {
        reverse_proxy 127.0.0.1:8536
    }
    handle /outbox/ {
        reverse_proxy 127.0.0.1:8536
    }
    handle /well-known/ {
        reverse_proxy 127.0.0.1:8536
    }
    handle /person/ {
        reverse_proxy 127.0.0.1:8536
    }

    reverse_proxy 127.0.0.1:1234 { # Reverse proxy for Lemmy UI
        header_up Host {host}
        header_up X-Real-IP {remote_ip}
        header_up X-Forwarded-For {remote_ip}
        header_up X-Forwarded-Proto {scheme}
    }

    log {
        output file /var/log/caddy/lemmy_access.log
        format console
    }
}
Save Caddyfile.
3. Caddy Check and Restart
Check the Caddyfile syntax and restart Caddy to apply the new configuration:
sudo caddy validate --config /etc/caddy/Caddyfile # Syntax check
sudo systemctl reload caddy                       # Restart Caddy
sudo systemctl status caddy                       # Check status
If everything is in order, Caddy should start successfully and begin listening on ports 80 and 443. Check Caddy logs for errors, especially those related to obtaining HTTPS certificates:
sudo journalctl -u caddy --no-pager
You should see messages indicating that Caddy successfully obtained Let's Encrypt certificates.
4. Functionality Check
Open your domain (https://your.lemmy.domain.com) in a web browser. You should see the Lemmy interface. If not, check the following:
- DNS: Ensure your domain correctly points to your VPS's IP.
- Firewall (UFW): Ensure ports 80 and 443 are open.
- Caddy logs: Check
sudo journalctl -u caddy --no-pagerfor errors. - Docker logs: Check Lemmy container logs:
docker compose logs lemmy,docker compose logs lemmy-ui,docker compose logs pict-rs.
After the Lemmy page loads successfully, register the first user. This user will automatically become the instance administrator.
5. Additional Lemmy Configuration (lemmy.hjson)
The lemmy.hjson file (or lemmy.toml depending on the version) contains Lemmy's own settings. It is located in the Docker container's volume. To edit it, you will either need to connect to the container or mount it as a volume. The easiest way to do this is by adding volumes to docker-compose.yml for the configuration file.
In your docker-compose.yml, in the lemmy section, add (or modify) the volume:
# ...
services:
  lemmy:
    image: dessalines/lemmy:0.19.3
    # ...
    volumes:
      - ./lemmy.hjson:/app/lemmy.hjson # Path to the configuration file
    # ...
Then create the lemmy.hjson file in the same directory as docker-compose.yml:
touch lemmy.hjson
nano lemmy.hjson
Example lemmy.hjson content (the actual version may have other parameters, see official documentation):
{
  "hostname": "your.lemmy.domain.com",
  "database": {
    "url": "postgres://lemmy:YOUR_VERY_COMPLEX_PASSWORD@lemmy_db:5432/lemmy"
  },
  "federation": {
    "enabled": true,
    "allowed_instances": [],
    "blocked_instances": []
  },
  "captcha": {
    "enabled": false
  },
  "log_level": "info",
  "port": 8536
}
Important: Make sure hostname matches your domain. The password in database.url must match LEMMY_DATABASE_PASSWORD from .env.
After modifying lemmy.hjson, restart Lemmy:
docker compose restart lemmy
Your Lemmy instance is now fully configured and ready for use.
Backups and Maintenance
Regular backups and timely maintenance are crucial for the stable and secure operation of your Lemmy instance. Data loss can be catastrophic, so the approach to backups must be reliable.
1. What Needs to be Backed Up
For a full Lemmy recovery, you will need three main components:
- PostgreSQL Database: Contains all information about users, posts, comments, communities, federation, and settings. This is the most critical component.
- Lemmy Configuration Files: The
.envfile (with secrets) andlemmy.hjson. - User Data (Media Files): Images and other files uploaded by users are stored in the
pict-rsDocker container volume.
2. Simple Auto-Backup Script
Let's create a simple script that will back up these components. We will use pg_dump for the database and tar for the files.
# Go to the user's home directory
cd ~
mkdir -p lemmy_backups # Create a directory for backups

# Create the backup script
nano ~/backup_lemmy.sh
Insert the following content into the backup_lemmy.sh file:
#!/bin/bash

# Settings
BACKUP_DIR="/home/lemmyadmin/lemmy_backups" # Directory for storing backups
TIMESTAMP=$(date +%Y%m%d%H%M%S)
DOCKER_COMPOSE_DIR="/home/lemmyadmin/lemmy-docker-compose" # Path to your lemmy-docker-compose directory
DB_CONTAINER="lemmy_db" # Database container name
DB_USER="lemmy"         # Database user from .env
DB_NAME="lemmy"         # Database name from .env
DB_PASSWORD="ВАШ_ОЧЕНЬ_СЛОЖНЫЙ_ПАРОЛЬ" # Database password from .env
PICTRS_VOLUME="lemmy-docker-compose_pict-rs_data" # pict-rs volume name (check docker volume ls)

# Clean up old backups (e.g., older than 7 days)
find "$BACKUP_DIR" -type f -name ".tar.gz" -mtime +7 -delete
find "$BACKUP_DIR" -type f -name ".sql" -mtime +7 -delete

echo "--- Starting Lemmy backup process ($TIMESTAMP) ---"

# 1. PostgreSQL Database Backup
echo "Creating database backup..."
export PGPASSWORD=$DB_PASSWORD
docker exec -t $DB_CONTAINER pg_dump -U $DB_USER -d $DB_NAME > "$BACKUP_DIR/lemmy_db_backup_$TIMESTAMP.sql"
if [ $? -eq 0 ]; then
    echo "Database backup successfully created: $BACKUP_DIR/lemmy_db_backup_$TIMESTAMP.sql"
else
    echo "Error creating database backup!"
fi
unset PGPASSWORD

# 2. Backup configuration files (.env and lemmy.hjson)
echo "Copying configuration files..."
cp "$DOCKER_COMPOSE_DIR/.env" "$BACKUP_DIR/lemmy_env_backup_$TIMESTAMP.env"
cp "$DOCKER_COMPOSE_DIR/lemmy.hjson" "$BACKUP_DIR/lemmy_hjson_backup_$TIMESTAMP.hjson"
cp "$DOCKER_COMPOSE_DIR/docker-compose.yml" "$BACKUP_DIR/lemmy_docker-compose_$TIMESTAMP.yml"
echo "Configuration files copied."

# 3. Backup user data (pict-rs volume)
echo "Creating user data archive (pict-rs)..."
# Stop pict-rs for consistent backup, if possible, or use rsync
# For simplicity, we will create a tar archive of the volume.
# Get the path to the pict-rs volume on the host system
PICTRS_VOLUME_PATH=$(docker volume inspect $PICTRS_VOLUME --format '{{ .Mountpoint }}')
if [ -d "$PICTRS_VOLUME_PATH" ]; then
    tar -czf "$BACKUP_DIR/lemmy_pict-rs_data_$TIMESTAMP.tar.gz" -C "$PICTRS_VOLUME_PATH" .
    if [ $? -eq 0 ]; then
        echo "pict-rs data backup successfully created: $BACKUP_DIR/lemmy_pict-rs_data_$TIMESTAMP.tar.gz"
    else
        echo "Error creating pict-rs data backup!"
    fi
else
    echo "Path to pict-rs volume not found or does not exist."
fi

echo "--- Backup process completed ---"
Important: Replace ВАШ_ОЧЕНЬ_СЛОЖНЫЙ_ПАРОЛЬ with the actual password from your .env file. Also, ensure that the PICTRS_VOLUME name matches the name Docker assigned to your pict-rs volume (usually docker volume ls.
Make the script executable:
chmod +x ~/backup_lemmy.sh
3. Where to Store Backups
Storing backups on the same server as your operational data is strongly discouraged. In the event of hardware failure or server compromise, you will lose both your data and your backups. It is recommended to use:
- External S3-compatible storage: Amazon S3, DigitalOcean Spaces, Backblaze B2, MinIO. This is the most reliable and scalable option. Use utilities like
rclone,restic, orborgbackupfor encrypting and uploading backups. - Separate VPS: You can set up a second, less powerful VPS to receive backups via SFTP/RSYNC.
- Local computer: For very small instances, you can periodically download backups to your computer.
For example, if you want to upload backups to S3-compatible storage using rclone, you need to install rclone, configure it (rclone config), and then add the command to your backup_lemmy.sh script:
# ... (after all backups are created)
echo "Uploading backups to remote S3 storage..."
rclone sync "$BACKUP_DIR" "remote_s3_name:lemmy-backups" # Replace remote_s3_name with your remote storage name
if [ $? -eq 0 ]; then
    echo "Backups successfully uploaded to S3."
else
    echo "Error uploading backups to S3!"
fi
4. Scheduling Backups with Cron
Let's configure Cron to run the backup script daily. Open the Cron table for your user:
crontab -e
Add the following line to the end of the file so that the script runs every day at 3:00 AM:
0 3 * /home/lemmyadmin/backup_lemmy.sh >> /home/lemmyadmin/lemmy_backup.log 2>&1
This will execute the script daily and log the output to lemmy_backup.log for tracking.
5. Updates: Rolling vs. Maintenance Window
Updates to Lemmy and its components (Docker, Caddy) are important for security and new features.
- OS and base package updates: Regularly run
sudo apt update && sudo apt upgrade -y(e.g., once a week). - Docker and Caddy updates: Perform these as new stable versions are released, using the same commands as during installation.
- Lemmy updates: This requires stopping containers, pulling new images, and starting them.
cd ~/lemmy-docker-compose
git pull origin main # Update lemmy-docker-compose repository
# If you used a tag branch, you might need to switch to a new tag
# git fetch --tags
# git checkout tags/НОВАЯ_ВЕРСИЯ -b НОВАЯ_ВЕРСИЯ-branch

docker compose down # Stop all Lemmy containers
docker compose pull # Pull new images
docker compose up -d # Start new containers
docker image prune -f # Remove old unused images
This will cause a brief interruption (a few minutes), so it's best to perform it during a "maintenance window" — a time when user activity is minimal.
Always check the official Lemmy releases and lemmy-docker-compose on GitHub before updating to familiarize yourself with changes and potential migration instructions.
Troubleshooting + FAQ
This section contains answers to frequently asked questions and solutions to common problems that may arise during the deployment and operation of Lemmy.
What is the minimum VPS configuration suitable for Lemmy?
For a small Lemmy instance (up to 50 active users), a VPS with 2 CPU cores, 4 GB of RAM, and a 50 GB SSD disk is minimally suitable. It is important that the disk is SSD, as database performance heavily depends on I/O speed. The network channel should be at least 1 Gbit/s with sufficient traffic volume (minimum 1 TB/month). This configuration will allow you to run Lemmy, PostgreSQL, and Pict-rs with acceptable performance, but for growth and more comfortable operation, 4 CPU cores, 8 GB RAM, and 100-200 GB NVMe SSD are recommended.
What to choose — VPS or dedicated for this task?
The choice between a VPS and a dedicated server depends on the scale of your project. For most Lemmy instances, designed for hundreds or even low thousands of users, a VPS is sufficient and more economical. A VPS provides good resource isolation and flexibility. A dedicated server becomes necessary when maximum performance, guaranteed resources, very large data storage (terabytes) are required, or if you plan to host many other resource-intensive services. Dedicated servers also provide full control over the hardware, which can be important for specific requirements or very high loads.
Lemmy does not start after docker compose up -d. What to do?
First, check the logs of each container. Navigate to the lemmy-docker-compose directory and execute:
docker compose ps             # Check container status
docker compose logs lemmy     # Check logs of the main Lemmy service
docker compose logs lemmy_ui  # Check logs of the user interface
docker compose logs lemmy_db  # Check logs of the PostgreSQL database
docker compose logs pict-rs   # Check logs of the image service
Look for errors such as database connection issues (incorrect password in .env), port conflicts, or missing necessary files. Ensure that all variables in .env are correct, especially passwords and the domain name.
HTTPS is not working, the browser shows "connection not secure" error.
This is usually related to issues in Caddy or DNS configuration. Check the following:
- DNS records: Make sure your A-record for the Lemmy domain (e.g.,
your.lemmy.domain.com) points to your VPS's IP address. Usedig your.lemmy.domain.comor online tools. - Firewall (UFW): Ensure that ports 80 (HTTP) and 443 (HTTPS) are open.
sudo ufw status verbose. - Caddyfile: Check the syntax of
/etc/caddy/Caddyfilefor typos. Make sure the domain is specified correctly. - Caddy logs: Check Caddy logs for errors when obtaining Let's Encrypt certificates:
sudo journalctl -u caddy --no-pager. If there are errors like "rate limit exceeded" or "DNS problem", wait and try again. - Port conflicts: Make sure no other service is occupying ports 80 or 443.
Lemmy is running very slowly or returning 50x errors.
Slow performance or server errors usually indicate a lack of resources or database issues. Check:
- VPS resource usage: Use
htopto monitor CPU and RAM. If RAM is full or CPU is constantly at 100%, your VPS may be lacking resources. - Docker container logs: Check
lemmyandlemmy_dblogs for performance or connection-related errors. - Docker statistics:
docker statswill show CPU, RAM, and I/O usage for each container. - Database: Ensure that PostgreSQL is running stably and is not overloaded. In very active instances, PostgreSQL optimization may be required.
How to update Lemmy to a new version?
Updating Lemmy usually involves the following steps:
- Navigate to the
lemmy-docker-composedirectory. - Stop the current containers:
docker compose down. - Update the
lemmy-docker-composerepository (git pullorgit checkoutto a new version tag). - Download new Docker images:
docker compose pull. - Start the containers with the new images:
docker compose up -d. - (Optional) Remove old unused images:
docker image prune -f.
Always read the release notes for the new Lemmy version, as additional database migration steps or configuration changes may sometimes be required.
How to restore data from a backup?
Data restoration involves several steps:
- Stop Lemmy:
docker compose down. - Restore the database: First, delete the current database (if this is a new deployment) or clear it. Then, load your
.sqlbackup file into the PostgreSQL container:
Make sure thecat "$BACKUP_DIR/lemmy_db_backup_$TIMESTAMP.sql" | docker exec -i lemmy_db psql -U lemmy -d lemmylemmy_dbcontainer is running for this. - Restore configuration files: Copy
.envandlemmy.hjsonfrom the backup to yourlemmy-docker-composedirectory. - Restore user data: Unpack
lemmy_pict-rs_data_$TIMESTAMP.tar.gzinto the corresponding Docker volume. You may need to determine the volume path usingdocker volume inspect lemmy-docker-compose_pict-rs_data. - Start Lemmy:
docker compose up -d.
After restoration, check Lemmy's logs and functionality.
I forgot the Lemmy administrator password. How do I reset it?
If you forgot the administrator password, you can reset it by executing commands inside the PostgreSQL container. First, find the administrator user's ID in the person table, then update the password (setting it to NULL) and reset the session token. After this, you will be able to log in with that username without a password and set a new password via the web interface.
# Connect to the PostgreSQL container
docker exec -it lemmy_db psql -U lemmy -d lemmy

# Inside psql:
# 1. Find your administrator user's ID (replace 'your_admin_username' with the username)
SELECT id, name FROM person WHERE name = 'your_admin_username';
# Remember the ID (e.g., 1)

# 2. Update the password and clear the session token for this ID
UPDATE person SET password_hashed = NULL, matrix_user_id = NULL, email_verified = false WHERE id = 1;
UPDATE person_agg SET auth_token = NULL WHERE person_id = 1;

# 3. Exit psql
\q

# Restart the Lemmy container
docker compose restart lemmy
Now you will be able to log in to Lemmy with your username without a password, and the system will prompt you to set a new password.
Conclusions and Next Steps
Congratulations! You have successfully deployed your own Lemmy instance on a VPS, configured it to work with a PostgreSQL database, and secured access via Caddy with automatic HTTPS. You now have a fully functional federated social network, ready to welcome users and integrate with the Fediverse. This process has not only provided you with a working platform but also deepened your understanding of server administration, Docker, and web servers.
What to do next?
- Moderation and management: Familiarize yourself with Lemmy's moderation tools, set up community rules, and decide which other Lemmy or ActivityPub instances you want to federate with.
- Scaling and optimization: As your instance grows, you may need to optimize your PostgreSQL configuration, increase VPS resources, or even consider a dedicated database server if the load becomes too high.
- Community and promotion: Invite friends, share the link to your instance to start building an active community. Participate in the Fediverse to make your instance part of the wider network.