How to Use KVM Virtualization? A Complete Guide
KVM (Kernel-based Virtual Machine) virtualization is a powerful virtualization technology built directly into the Linux kernel. It allows you to create and run multiple virtual machines (VMs) on a single physical server, which significantly increases resource utilization and reduces costs. This guide, written by an experienced system administrator, will walk you through all the steps of setting up and using KVM, from installation to performance optimization. We will thoroughly cover the installation of necessary packages, creation and configuration of virtual machines, their management, and troubleshooting common issues. Whether you are new to virtualization or an experienced user, this guide will provide you with all the necessary knowledge and practical skills for successful KVM usage.
Table of Contents
- Installing KVM and Necessary Packages
- Creating Your First Virtual Machine
- Managing Virtual Machines
- Networking and Connecting to VMs
- Optimizing KVM Performance
- Troubleshooting KVM
Installing KVM and Necessary Packages

sudo apt update
sudo apt install -y qemu-kvm libvirt-daemon-system libvirt-clients bridge-utils virtinstqemu-kvm: The core package for KVM emulation.
* libvirt-daemon-system: The libvirtd daemon, which manages virtual machines.
* libvirt-clients: Client tools for managing libvirtd.
* bridge-utils: Utilities for creating network bridges.
* virtinst: Tools for creating virtual machines from the command line.
After installation, you need to check if virtualization is supported on your processor. Run the following command:
egrep -c '(vmx|svm)' /proc/cpuinfolibvirt group to gain access to managing virtual machines without using sudo:
sudo usermod -a -G libvirt $USER
newgrp libvirtlibvirtd service:
systemctl status libvirtdsudo systemctl start libvirtd
sudo systemctl enable libvirtdsudo yum install -y qemu-kvm libvirt virt-install bridge-utilsqemu-kvm: The core package for KVM emulation.
* libvirt: The package containing the libvirtd daemon and client tools.
* virt-install: Tools for creating virtual machines from the command line.
* bridge-utils: Utilities for creating network bridges.
Checking for virtualization support on the processor is similar to Ubuntu/Debian:
egrep -c '(vmx|svm)' /proc/cpuinfolibvirt group:
sudo usermod -a -G libvirt $USER
newgrp libvirtlibvirtd service:
sudo systemctl status libvirtdsudo systemctl start libvirtd
sudo systemctl enable libvirtdNow that KVM is installed and configured, let’s move on to creating your first virtual machine.Virtualization allows you to effectively use computing resources, reducing the need for physical servers and simplifying infrastructure management.
Dmitry Ivanov, System Architect
Creating Your First Virtual Machine

sudo apt install -y virt-manager   # Ubuntu/Debian
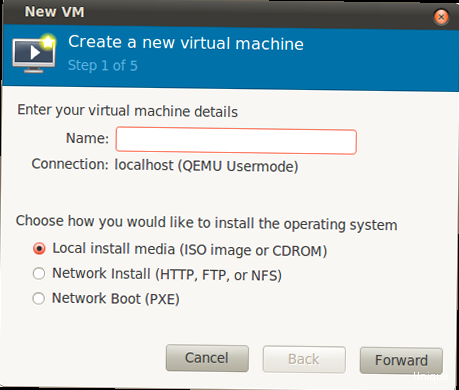
sudo yum install -y virt-manager # CentOS/RHELvirt-manager- The name of the virtual machine.
- The method of installing the operating system (ISO image, network installation, etc.).
- The amount of allocated RAM and the number of virtual processors.
- The size of the virtual machine disk.
- Network settings.
virt-install \
--name=centos7-vm \
--ram=2048 \
--vcpus=2 \
--os-variant=centos7.0 \
--cdrom=/path/to/CentOS-7-x86_64-DVD-2009.iso \
--disk path=/var/lib/libvirt/images/centos7-vm.img,size=20 \
--network bridge=virbr0,model=virtio \
--graphics vnc,listen=0.0.0.0 --noautoconsole--name: The name of the virtual machine (centos7-vm).--ram: The amount of allocated RAM in MB (2048).--vcpus: The number of virtual processors (2).--os-variant: The operating system variant (centos7.0). Specify the most appropriate option for your OS. A list of available options can be obtained using the commandosinfo-query os.--cdrom: The path to the ISO image of the installation disk (/path/to/CentOS-7-x86_64-DVD-2009.iso). Replace with your path.--disk: Virtual machine disk parameters.path– the path to the disk image file (/var/lib/libvirt/images/centos7-vm.img),size– the disk size in GB (20).--network: Network settings.bridge=virbr0– connection to the virbr0 network bridge (default),model=virtio– using the virtio driver for the network card (provides better performance).--graphics: Graphics interface settings.vnc,listen=0.0.0.0– using VNC to connect to the virtual machine.listen=0.0.0.0means that the VNC server will listen on all IP addresses.--noautoconsoledisables automatic connection to the console.
sudo firewall-cmd --permanent --add-port=5900/tcp
sudo firewall-cmd --reloadNow that you have created a virtual machine, let’s move on to managing them.Proper resource planning is key to successful virtualization. Consider the needs of both the host system and the virtual machines.
Elena Smirnova, DevOps Engineer
Managing Virtual Machines
KVM virtual machines are managed using thevirsh utility (command-line interface for libvirt). It provides a wide range of commands for performing various operations.
Basic virsh commands
* **List virtual machines:**
virsh list --allvirsh start centos7-vmcentos7-vm with the name of your virtual machine.
* **Shut down a virtual machine:**
virsh shutdown centos7-vmvirsh destroy centos7-vmvirsh reboot centos7-vmvirsh console centos7-vmCtrl+].
* **Get information about a virtual machine:**
virsh dominfo centos7-vmvirsh edit centos7-vm<domain type='kvm' id='1'>
<name>centos7-vm</name>
<uuid>9690f123-58c4-4b1e-b917-7b76474930a4</uuid>
<memory unit='KiB'>2097152</memory>
<currentMemory unit='KiB'>2097152</currentMemory>
<vcpu placement='static'>2</vcpu>
<os>
<type arch='x86_64' machine='pc-i440fx-rhel7.6.0'>hvm</type>
<boot dev='cdrom'/>
<boot dev='hd'/>
</os>
<features>
<acpi/>
<apic/>
<vmport state='off'/>
</features>
<cpu mode='host-model' check='partial'>
<model fallback='allow'/>
</cpu>
<clock offset='utc'/>
<on_poweroff>destroy</on_poweroff>
<on_reboot>restart</on_reboot>
<on_crash>destroy</on_crash>
<devices>
<emulator>/usr/bin/qemu-kvm</emulator>
<disk type='file' device='disk'>
<driver name='qemu' type='qcow2'/>
<source file='/var/lib/libvirt/images/centos7-vm.img'/>
<target dev='vda' bus='virtio'/>
<address type='pci' domain='0x0000' bus='0x00' slot='0x04' function='0x0'/>
</disk>
<disk type='file' device='cdrom'>
<driver name='qemu' type='raw'/>
<source file='/path/to/CentOS-7-x86_64-DVD-2009.iso'/>
<target dev='hdc' bus='ide'/>
<readonly/>
<address type='drive' controller='0' bus='1' target='0' unit='0'/>
</disk>
<interface type='bridge'>
<mac address='52:54:00:7f:b8:e9'/>
<source bridge='virbr0'/>
<model type='virtio'/>
<address type='pci' domain='0x0000' bus='0x00' slot='0x03' function='0x0'/>
</interface>
<serial type='pty'>
<target port='0'/>
</serial>
<console type='pty'>
<target type='serial' port='0'/>
</console>
<input type='tablet' bus='usb'/>
<input type='mouse' bus='ps2'/>
<graphics type='vnc' port='5900' autoport='no' listen='0.0.0.0'>
<listen type='address' address='0.0.0.0'/>
</graphics>
<sound model='ich6'/>
<video>
<model type='cirrus' vram='16384' heads='1' primary='yes'/>
<address type='pci' domain='0x0000' bus='0x00' slot='0x02' function='0x0'/>
</video>
<memballoon model='virtio'>
<address type='pci' domain='0x0000' bus='0x00' slot='0x05' function='0x0'/>
</memballoon>
</devices>
</domain>
/path/to/CentOS-7-x86_64-DVD-2009.iso with the actual path to your ISO image.
**Tip:** Create backups of virtual machine configuration files before making changes.
**Warning:** Incorrect virtual machine configuration can lead to its failure.
Now let’s look at configuring the network for virtual machines.Automating virtual machine management tasks can significantly reduce administrative costs and increase infrastructure reliability.
Red Hat KVM Documentation
Networking and Connecting to VMs
Network configuration is an important aspect of virtualization. KVM supports various network configuration options, including bridged networking and NAT (Network Address Translation). Bridged Networking Bridged networking allows the virtual machine to connect directly to the physical network. The virtual machine receives an IP address from the same subnet as the host system. By default, libvirt creates a network bridgevirbr0 with NAT. To use bridged networking, you need to create a bridge interface on the host system and assign it the IP address of the physical interface.
**Example of configuring a network bridge on Ubuntu/Debian:**
Suppose you have a network interface enp0s3 with the IP address 192.168.1.100. Create the file /etc/network/interfaces.d/br0.cfg:
auto br0
iface br0 inet static
    address 192.168.1.100
    netmask 255.255.255.0
    gateway 192.168.1.1
    bridge_ports enp0s3
    bridge_stp off
    bridge_fd 0
bridge_maxwait 0auto br0: Enables the br0 interface when the system boots. iface br0 inet static: Specifies that the br0 interface uses a static servers with IP addresses.address: The IP address of the br0 interface (192.168.1.100).netmask: The subnet mask (255.255.255.0).gateway: The IP address of the gateway (192.168.1.1).bridge_ports enp0s3: Specifies that the enp0s3 interface is a member of the br0 bridge.bridge_stp off: Disables the STP (Spanning Tree Protocol) protocol.bridge_fd 0: Sets the forward delay time to 0 seconds.bridge_maxwait 0: Sets the maximum wait time before activating the bridge to 0 seconds.
/etc/network/interfaces file, commenting out or deleting the settings for the enp0s3 interface:
#auto enp0s3
#iface enp0s3 inet static
#    address 192.168.1.100
#    netmask 255.255.255.0
# gateway 192.168.1.1sudo ifdown enp0s3
sudo ifup br0br0 bridge will receive IP addresses from the same subnet as the host system.
**Example of configuring a network bridge on CentOS/RHEL:**
Create the file /etc/sysconfig/network-scripts/ifcfg-br0:
DEVICE=br0
TYPE=Bridge
BOOTPROTO=static
IPADDR=192.168.1.100
NETMASK=255.255.255.0
GATEWAY=192.168.1.1
ONBOOT=yes
/etc/sysconfig/network-scripts/ifcfg-enp0s3 (replace enp0s3 with the name of your physical interface):
DEVICE=enp0s3
TYPE=Ethernet
BOOTPROTO=none
ONBOOT=yes
BRIDGE=br0
sudo systemctl restart networkvirbr0 (default). Libvirt automatically configures NAT and routing.
**Checking the network connection:**
Inside the virtual machine, run the command:
ping 8.8.8.8Now let’s move on to optimizing KVM performance.Proper network configuration is the key to a stable and secure virtual infrastructure.
Ubuntu KVM Documentation
Optimizing KVM Performance
Optimizing KVM performance is an important step to getting the most out of virtualization. There are several ways to improve the performance of virtual machines. Using VirtIO Drivers VirtIO is a set of virtualization drivers designed to improve the performance of virtual machines. They provide direct communication between the virtual machine and the host system, minimizing emulation overhead. Make sure that when creating a virtual machine, you use VirtIO drivers for disks and network cards. In most Linux distributions, VirtIO drivers are installed by default. If this is not the case, install them manually:sudo apt install -y virtio-blk virtio-net # Ubuntu/Debian
sudo yum install -y virtio-win # CentOS/RHEL (for Windows VM)virsh edit command or in the virt-manager graphical interface.
Using KVM-clock
KVM-clock is a virtual time source designed to improve time accuracy in virtual machines. It provides more stable and accurate time synchronization compared to emulated time sources.
To enable KVM-clock, add the following lines to the virtual machine configuration file (using virsh edit):
<clock offset='utc'>
    <timer name='kvmclock' present='yes'/>
</clock>


