How to Create a Virtual Machine on Proxmox VE: An In-Depth Guide to Network Configuration
Proxmox VE is a powerful open-source virtualization platform that provides extensive capabilities for managing virtual machines (VMs). This guide will focus on one of the most important aspects of creating a virtual machine – network configuration. We will thoroughly examine the various network configurations available in Proxmox VE, explain how to properly set them up for different scenarios, and provide concrete examples of commands and configuration files so that you can successfully create and configure your virtual machine with optimal network parameters.
In this guide, we will walk through the process from selecting a network interface to configuring VLANs and network bridges. You will learn how to create virtual networks, configure IP addresses, gateways, and DNS servers for your virtual machines. Whether you are a newcomer to virtualization or an experienced system administrator, this guide will provide you with the necessary knowledge and practical skills to create virtual machines with optimal network configuration in Proxmox VE.
- Selecting a Network Interface for a Virtual Machine
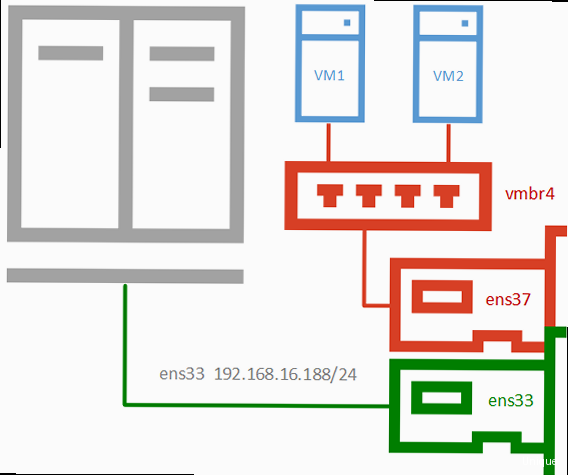
- Configuring a Network Bridge for Connecting to a Physical Network
- Configuring VLANs for Virtual Machines in Proxmox VE
- Configuring IP Addresses and DNS Servers in a Virtual Machine
Selecting a Network Interface for a Virtual Machine

- VirtIO (paravirtualized): This interface type provides the best performance because it is specifically designed for virtualization and uses drivers optimized for interaction with the hypervisor. Recommended for most cases.
- Intel E1000: Emulates an Intel E1000 network card. It has good compatibility with most operating systems, especially older versions. Can be used if VirtIO is not supported by the guest OS.
- Realtek RTL8139: Emulates a Realtek RTL8139 network card. It is recommended to use it only as a last resort when other options do not work, as this interface has lower performance.
qm set 100 --net0 virtio=vmbr0Configuring a Network Bridge for Connecting to a Physical Network

ip addr- Edit the `/etc/network/interfaces` file.
- Add the following configuration:
auto vmbr1
iface vmbr1 inet static
        address 192.168.2.1
        netmask 255.255.255.0
        bridge-ports none
        bridge-stp off
        bridge-fd 0
auto vmbr1: enables the interface when the system boots. iface vmbr1 inet static: defines that the interface has a static servers with IP addresses.address 192.168.2.1: The IP address of the bridge. Select an IP address from the range corresponding to your network.netmask 255.255.255.0: Subnet mask.bridge-ports none: Specifies that the bridge is not bound to a physical interface. You can bind it to a physical interface by specifying the interface name (for example, `bridge-ports enp4s0`).bridge-stp off: Disables the STP (Spanning Tree Protocol).bridge-fd 0: Sets the forwarding delay to 0 seconds.
systemctl restart networkingauto vmbr0
iface vmbr0 inet static
address 192.168.1.10
netmask 255.255.255.0
gateway 192.168.1.1
bridge-ports enp3s0
bridge-stp off
bridge-fd 0Configuring VLANs for Virtual Machines in Proxmox VE
VLANs (Virtual LANs) allow you to divide one physical network into several logical networks. This is useful for isolating traffic, improving security, and managing network resources. Proxmox VE supports VLANs, which allows you to create virtual machines that belong to different VLANs, even if they are on the same physical server. To configure VLANs in Proxmox VE, you need to follow several steps:- Create a VLAN interface on the Proxmox VE host system.
- Assign a VLAN ID to the virtual machine.
- Configure the IP address and other network parameters of the virtual machine in accordance with the VLAN.
auto vmbr0.10
iface vmbr0.10 inet static
        address 192.168.10.1
        netmask 255.255.255.0
        vlan-raw-device vmbr0
auto vmbr0.10: enables the VLAN interface `vmbr0.10` when the system boots.iface vmbr0.10 inet static: defines that the interface has a static IP address.address 192.168.10.1: The IP address of the VLAN interface. Select an IP address from the range corresponding to your VLAN.netmask 255.255.255.0: Subnet mask.vlan-raw-device vmbr0: Indicates that the VLAN interface is created on the basis of the `vmbr0` bridge.
systemctl restart networkingqm set 100 --net0 virtio=vmbr0,tag=10Configuring IP Addresses and DNS Servers in a Virtual Machine
After you have selected a network interface and configured a network bridge or VLAN, the next step is to configure the IP address, network mask, gateway, and DNS servers in the virtual machine. This will allow the virtual machine to communicate with other devices on the network and access the Internet. There are two main ways to assign IP addresses:- Static IP address: You manually assign the IP address, network mask, gateway, and DNS servers to the virtual machine. This method is suitable for virtual machines that require a permanent IP address, such as servers.
- Dynamic IP address (DHCP): The virtual machine receives the IP address, network mask, gateway, and DNS servers automatically from the DHCP server. This method is suitable for virtual machines that do not require a permanent IP address, such as workstations.
auto eth0
iface eth0 inet static
        address 192.168.1.20
        netmask 255.255.255.0
        gateway 192.168.1.1
        dns-nameservers 8.8.8.8 8.8.4.4
address 192.168.1.20: The IP address of the virtual machine. Select an IP address from your network range.netmask 255.255.255.0: Subnet mask.gateway 192.168.1.1: The IP address of the gateway (usually the IP address of your router).dns-nameservers 8.8.8.8 8.8.4.4: IP addresses of DNS servers (in this case, Google DNS servers). You can use other DNS servers, such as your provider’s DNS servers.
sudo systemctl restart networking- Open «Network and Sharing Center».
- Select «Change adapter settings».
- Right-click on the network adapter and select «Properties».
- Select «Internet Protocol Version 4 (TCP/IPv4)» and click «Properties».
- Select «Use the following IP address» and enter the IP address, subnet mask, gateway, and DNS servers.
- Click «OK» to save the changes.
auto eth0
iface eth0 inet dhcpsudo systemctl restart networkingping 8.8.8.8| Characteristic | Static IP | DHCP |
|---|---|---|
| IP address assignment | Manually | Automatically |
| DHCP server required | No | Yes |
| Suitable for servers | Yes | No (usually) |
| Suitable for workstations | No (usually) | Yes |
| Requires manual configuration | Yes | No |
| Risk of IP address conflicts | High (if configured incorrectly) | Low |


