Expert Quote:
Automation and Infrastructure as Code (IaC) are becoming increasingly important. Netplan is a step in the right direction, allowing you to define network configuration declaratively.
Chris Richardson, DevOps Engineer
In the next section, we will explore how to configure the firewall for additional IP addresses.
Configuring the Firewall

After adding additional IP addresses, it is important to configure the firewall to ensure the security of your VPS. The firewall acts as a barrier between your server and the outside world, blocking unwanted traffic and allowing only what is necessary.
The most common firewalls in Linux are iptables and firewalld. iptables is an older but still widely used firewall. firewalld is a more modern firewall offering a more user-friendly management interface.
Firewalld (recommended for CentOS and Ubuntu)
firewalld uses the concept of zones, which represent different levels of trust in the network. For example, the public zone is intended for public networks and has stricter rules than the home zone, which is intended for home networks.
To check which firewall is being used and its status, use the command:
# systemctl status firewalld
If firewalld is not running, start it:
# systemctl start firewalld
# systemctl enable firewalld
The first command starts the firewall, and the second enables it to start automatically when the system boots.
To add a firewall rule for an additional IP address, you must first determine which zone it should be assigned to. If you want the IP address to be accessible from any network, use the public zone. If you want to restrict access only from certain networks, create a new zone or use an existing one, such as trusted.
Suppose you want to allow access to the web server (ports 80 and 443) on the additional IP address 192.168.1.101. Run the following commands:
# firewall-cmd --permanent --zone=public --add-rich-rule='rule family="ipv4" source address="192.168.1.101" port port="80" protocol="tcp" accept'
# firewall-cmd --permanent --zone=public --add-rich-rule='rule family="ipv4" source address="192.168.1.101" port port="443" protocol="tcp" accept'
# firewall-cmd --reload
The first two commands add rules allowing inbound traffic on ports 80 and 443 from IP address 192.168.1.101 in the public zone. The --permanent option specifies that the rules should be added to the permanent configuration, which is preserved after a system reboot. The third command reloads the firewall for the changes to take effect.
To verify that the rules have been successfully added, use the command:
# firewall-cmd --list-all --zone=public
You should see the added rules in the output. You can also use the command firewall-cmd --list-rich-rules --zone=public to view only rich rules.
If you want to allow access to all ports from a specific IP address, use the following rule:
# firewall-cmd --permanent --zone=trusted --add-source=192.168.1.101
# firewall-cmd --reload
This rule adds the IP address 192.168.1.101 to the trusted zone, which allows all traffic from that IP address.
Iptables (alternative option)
If you are using iptables, you will need to manually add rules for each port and IP address. Before making changes, it is recommended to save the current iptables configuration:
# iptables-save > /etc/iptables.rules
To allow access to the web server (ports 80 and 443) on the additional IP address 192.168.1.101, run the following commands:
# iptables -A INPUT -p tcp -s 192.168.1.101 --dport 80 -j ACCEPT
# iptables -A INPUT -p tcp -s 192.168.1.101 --dport 443 -j ACCEPT
These commands add rules to the INPUT table, allowing inbound traffic on ports 80 and 443 from the IP address 192.168.1.101. The -A option adds the rule to the end of the table.
Let’s break down the parameters:
DEVICE: Specifies the device name.eth0:1indicates that this is an additional IP address on theeth0interface.IPADDR: Specifies the additional IP address.NETMASK: Specifies the subnet mask.ONBOOT: Specifies whether the interface should be activated when the system boots.
To create the file, use a text editor such as vi or nano:
# vi /etc/sysconfig/network-scripts/ifcfg-eth0:1
Paste the content specified above into the file and save it. After that, you need to restart the network service for the changes to take effect:
# systemctl restart network
To verify that the IP address has been successfully added, use the command ip addr show eth0:
# ip addr show eth0
2: eth0: <BROADCAST,MULTICAST,UP,LOWER_UP> mtu 1500 qdisc pfifo_fast state UP group default qlen 1000
    link/ether 00:11:22:33:44:55 brd ff:ff:ff:ff:ff:ff
    inet 192.168.1.100/24 brd 192.168.1.255 scope global eth0
       valid_lft forever preferred_lft forever
    inet 192.168.1.101/24 scope global secondary eth0:1
       valid_lft forever preferred_lft forever
You should see both IP addresses (192.168.1.100 and 192.168.1.101) in the output. Note the line inet 192.168.1.101/24 scope global secondary eth0:1, which confirms that the additional IP address has been added as a secondary address on the eth0 interface.
Alternative method (nmcli):
In modern versions of CentOS, you can use the nmcli (NetworkManager Command Line Interface) utility to manage network connections. This is a more modern and recommended way to add IP addresses.
# nmcli con add type ethernet con-name eth0-1 ifname eth0 ip4 192.168.1.101/24
# nmcli con up eth0-1
The first command adds a new ethernet connection named eth0-1, which uses the eth0 interface and the IP address 192.168.1.101/24. The second command activates this connection. You can also configure the default gateway using nmcli, if needed.
Important! Make sure that your hosting provider has allowed the use of additional IP addresses and that they are properly configured on their side. Otherwise, traffic to these IP addresses may not be routed to your VPS.
To debug network issues in CentOS, you can use the following commands:
# ping 192.168.1.101
# traceroute 192.168.1.101
# systemctl status network
# journalctl -u network
ping checks connectivity to the IP address. traceroute shows the path of traffic to the IP address. systemctl status network shows the status of the network service. journalctl -u network shows the logs of the network service.
Comparison table of IP addition methods in CentOS:
| Method | Simplicity | Modernity | Recommendability |
|---|---|---|---|
| ifcfg-ethX:Y | Medium | Outdated | Not Recommended |
| nmcli | High | Modern | Recommended |
In the next section, we will explore how to add additional IP addresses in Ubuntu/Debian.
Adding IP Addresses in Ubuntu/Debian
In Ubuntu and Debian, adding additional IP addresses is slightly different from CentOS. Traditionally, this was done through the /etc/network/interfaces file, but modern versions of Ubuntu often use Netplan.
Method 1: /etc/network/interfaces (traditional)
This method involves editing the /etc/network/interfaces file. Warning: Incorrectly editing this file can cause network problems. Before making changes, back up the file:
# cp /etc/network/interfaces /etc/network/interfaces.bak
Then, open the /etc/network/interfaces file in a text editor:
# nano /etc/network/interfaces
Suppose your main interface is eth0, and its configuration looks something like this:
auto eth0
iface eth0 inet static
    address 192.168.1.100
    netmask 255.255.255.0
    gateway 192.168.1.1
    dns-nameservers 8.8.8.8 8.8.4.4
To add an additional IP address 192.168.1.101, add the following lines to the end of the file:
auto eth0:1
iface eth0:1 inet static
    address 192.168.1.101
    netmask 255.255.255.0
Note that we use eth0:1 to denote the additional IP address. After making the changes, save the file and restart the network service:
# systemctl restart networking
To verify that the IP address has been successfully added, use the command ip addr show eth0:
# ip addr show eth0
2: eth0: <BROADCAST,MULTICAST,UP,LOWER_UP> mtu 1500 qdisc pfifo_fast state UP group default qlen 1000
    link/ether 00:11:22:33:44:55 brd ff:ff:ff:ff:ff:ff
    inet 192.168.1.100/24 brd 192.168.1.255 scope global eth0
       valid_lft forever preferred_lft forever
    inet 192.168.1.101/24 scope global secondary eth0:1
       valid_lft forever preferred_lft forever
You should see both IP addresses in the output, as in CentOS.
Method 2: Netplan (modern)
Netplan is a network configuration system used in modern versions of Ubuntu. Netplan configuration files are located in the /etc/netplan/ directory and have the .yaml extension. The file name may vary, for example, 01-network-config.yaml.
To add an additional IP address using Netplan, you need to edit the existing configuration file or create a new one. First, determine the name of your network interface using the ip link command:
# ip link
1: lo: <LOOPBACK,UP,LOWER_UP> mtu 65536 qdisc noqueue state UNKNOWN mode DEFAULT group default qlen 1000
    link/loopback 00:00:00:00:00:00 brd 00:00:00:00:00:00
2: eth0: <BROADCAST,MULTICAST,UP,LOWER_UP> mtu 1500 qdisc mq state UP mode DEFAULT group default qlen 1000
    link/ether 00:11:22:33:44:55 brd ff:ff:ff:ff:ff:ff
In this example, the interface name is eth0. Then, open the Netplan configuration file in a text editor:
# nano /etc/netplan/01-network-config.yaml
Suppose the original file looks something like this:
network:
  version: 2
  renderer: networkd
  ethernets:
    eth0:
      dhcp4: no
      addresses: [192.168.1.100/24]
      gateway4: 192.168.1.1
      nameservers:
          addresses: [8.8.8.8, 8.8.4.4]
To add an additional IP address 192.168.1.101, modify the file as follows:
network:
  version: 2
  renderer: networkd
  ethernets:
    eth0:
      dhcp4: no
      addresses: [192.168.1.100/24, 192.168.1.101/24]
      gateway4: 192.168.1.1
      nameservers:
          addresses: [8.8.8.8, 8.8.4.4]
Note that we added 192.168.1.101/24 to the addresses list. After making the changes, save the file and apply the Netplan configuration:
# netplan apply
If errors occur, you can use the netplan --debug apply command for more information.
Caution: YAML files are indentation-sensitive. Make sure the indentation in your Netplan file is correct. Incorrect indentation can lead to configuration errors.
As in CentOS, you can use the commands ping, traceroute, systemctl status networking, and journalctl -u networking to debug network issues in Ubuntu/Debian.
Expert Quote:
Automation and Infrastructure as Code (IaC) are becoming increasingly important. Netplan is a step in the right direction, allowing you to define network configuration declaratively.
Chris Richardson, DevOps Engineer
In the next section, we will explore how to configure the firewall for additional IP addresses.
Configuring the Firewall
After adding additional IP addresses, it is important to configure the firewall to ensure the security of your VPS. The firewall acts as a barrier between your server and the outside world, blocking unwanted traffic and allowing only what is necessary.
The most common firewalls in Linux are iptables and firewalld. iptables is an older but still widely used firewall. firewalld is a more modern firewall offering a more user-friendly management interface.
Firewalld (recommended for CentOS and Ubuntu)
firewalld uses the concept of zones, which represent different levels of trust in the network. For example, the public zone is intended for public networks and has stricter rules than the home zone, which is intended for home networks.
To check which firewall is being used and its status, use the command:
# systemctl status firewalld
If firewalld is not running, start it:
# systemctl start firewalld
# systemctl enable firewalld
The first command starts the firewall, and the second enables it to start automatically when the system boots.
To add a firewall rule for an additional IP address, you must first determine which zone it should be assigned to. If you want the IP address to be accessible from any network, use the public zone. If you want to restrict access only from certain networks, create a new zone or use an existing one, such as trusted.
Suppose you want to allow access to the web server (ports 80 and 443) on the additional IP address 192.168.1.101. Run the following commands:
# firewall-cmd --permanent --zone=public --add-rich-rule='rule family="ipv4" source address="192.168.1.101" port port="80" protocol="tcp" accept'
# firewall-cmd --permanent --zone=public --add-rich-rule='rule family="ipv4" source address="192.168.1.101" port port="443" protocol="tcp" accept'
# firewall-cmd --reload
The first two commands add rules allowing inbound traffic on ports 80 and 443 from IP address 192.168.1.101 in the public zone. The --permanent option specifies that the rules should be added to the permanent configuration, which is preserved after a system reboot. The third command reloads the firewall for the changes to take effect.
To verify that the rules have been successfully added, use the command:
# firewall-cmd --list-all --zone=public
You should see the added rules in the output. You can also use the command firewall-cmd --list-rich-rules --zone=public to view only rich rules.
If you want to allow access to all ports from a specific IP address, use the following rule:
# firewall-cmd --permanent --zone=trusted --add-source=192.168.1.101
# firewall-cmd --reload
This rule adds the IP address 192.168.1.101 to the trusted zone, which allows all traffic from that IP address.
Iptables (alternative option)
If you are using iptables, you will need to manually add rules for each port and IP address. Before making changes, it is recommended to save the current iptables configuration:
# iptables-save > /etc/iptables.rules
To allow access to the web server (ports 80 and 443) on the additional IP address 192.168.1.101, run the following commands:
# iptables -A INPUT -p tcp -s 192.168.1.101 --dport 80 -j ACCEPT
# iptables -A INPUT -p tcp -s 192.168.1.101 --dport 443 -j ACCEPT
These commands add rules to the INPUT table, allowing inbound traffic on ports 80 and 443 from the IP address 192.168.1.101. The -A option adds the rule to the end of the table.
Expert Quote:
IP addresses are the foundation of the modern network. Understanding how they work is essential for effective network infrastructure management.
Vint Cerf, one of the «fathers of the Internet»
In the next section, we will explore how to add additional IP addresses in CentOS.
Adding IP Addresses in CentOS
In CentOS (and other Red Hat distributions), adding additional IP addresses usually involves creating additional configuration files for network interfaces. Traditionally, this was done through the /etc/sysconfig/network-scripts/ifcfg-ethX:Y files, where ethX is the name of your primary network interface (e.g., eth0), and Y is a number to distinguish the additional IP addresses.
Suppose you have a primary IP address of 192.168.1.100, a subnet mask of 255.255.255.0, and you want to add an additional IP address of 192.168.1.101 with the same subnet mask. You need to create a file /etc/sysconfig/network-scripts/ifcfg-eth0:1 with the following content:
DEVICE=eth0:1
IPADDR=192.168.1.101
NETMASK=255.255.255.0
ONBOOT=yes
Let’s break down the parameters:
DEVICE: Specifies the device name.eth0:1indicates that this is an additional IP address on theeth0interface.IPADDR: Specifies the additional IP address.NETMASK: Specifies the subnet mask.ONBOOT: Specifies whether the interface should be activated when the system boots.
To create the file, use a text editor such as vi or nano:
# vi /etc/sysconfig/network-scripts/ifcfg-eth0:1
Paste the content specified above into the file and save it. After that, you need to restart the network service for the changes to take effect:
# systemctl restart network
To verify that the IP address has been successfully added, use the command ip addr show eth0:
# ip addr show eth0
2: eth0: <BROADCAST,MULTICAST,UP,LOWER_UP> mtu 1500 qdisc pfifo_fast state UP group default qlen 1000
    link/ether 00:11:22:33:44:55 brd ff:ff:ff:ff:ff:ff
    inet 192.168.1.100/24 brd 192.168.1.255 scope global eth0
       valid_lft forever preferred_lft forever
    inet 192.168.1.101/24 scope global secondary eth0:1
       valid_lft forever preferred_lft forever
You should see both IP addresses (192.168.1.100 and 192.168.1.101) in the output. Note the line inet 192.168.1.101/24 scope global secondary eth0:1, which confirms that the additional IP address has been added as a secondary address on the eth0 interface.
Alternative method (nmcli):
In modern versions of CentOS, you can use the nmcli (NetworkManager Command Line Interface) utility to manage network connections. This is a more modern and recommended way to add IP addresses.
# nmcli con add type ethernet con-name eth0-1 ifname eth0 ip4 192.168.1.101/24
# nmcli con up eth0-1
The first command adds a new ethernet connection named eth0-1, which uses the eth0 interface and the IP address 192.168.1.101/24. The second command activates this connection. You can also configure the default gateway using nmcli, if needed.
Important! Make sure that your hosting provider has allowed the use of additional IP addresses and that they are properly configured on their side. Otherwise, traffic to these IP addresses may not be routed to your VPS.
To debug network issues in CentOS, you can use the following commands:
# ping 192.168.1.101
# traceroute 192.168.1.101
# systemctl status network
# journalctl -u network
ping checks connectivity to the IP address. traceroute shows the path of traffic to the IP address. systemctl status network shows the status of the network service. journalctl -u network shows the logs of the network service.
Comparison table of IP addition methods in CentOS:
| Method | Simplicity | Modernity | Recommendability |
|---|---|---|---|
| ifcfg-ethX:Y | Medium | Outdated | Not Recommended |
| nmcli | High | Modern | Recommended |
In the next section, we will explore how to add additional IP addresses in Ubuntu/Debian.
Adding IP Addresses in Ubuntu/Debian
In Ubuntu and Debian, adding additional IP addresses is slightly different from CentOS. Traditionally, this was done through the /etc/network/interfaces file, but modern versions of Ubuntu often use Netplan.
Method 1: /etc/network/interfaces (traditional)
This method involves editing the /etc/network/interfaces file. Warning: Incorrectly editing this file can cause network problems. Before making changes, back up the file:
# cp /etc/network/interfaces /etc/network/interfaces.bak
Then, open the /etc/network/interfaces file in a text editor:
# nano /etc/network/interfaces
Suppose your main interface is eth0, and its configuration looks something like this:
auto eth0
iface eth0 inet static
    address 192.168.1.100
    netmask 255.255.255.0
    gateway 192.168.1.1
    dns-nameservers 8.8.8.8 8.8.4.4
To add an additional IP address 192.168.1.101, add the following lines to the end of the file:
auto eth0:1
iface eth0:1 inet static
    address 192.168.1.101
    netmask 255.255.255.0
Note that we use eth0:1 to denote the additional IP address. After making the changes, save the file and restart the network service:
# systemctl restart networking
To verify that the IP address has been successfully added, use the command ip addr show eth0:
# ip addr show eth0
2: eth0: <BROADCAST,MULTICAST,UP,LOWER_UP> mtu 1500 qdisc pfifo_fast state UP group default qlen 1000
    link/ether 00:11:22:33:44:55 brd ff:ff:ff:ff:ff:ff
    inet 192.168.1.100/24 brd 192.168.1.255 scope global eth0
       valid_lft forever preferred_lft forever
    inet 192.168.1.101/24 scope global secondary eth0:1
       valid_lft forever preferred_lft forever
You should see both IP addresses in the output, as in CentOS.
Method 2: Netplan (modern)
Netplan is a network configuration system used in modern versions of Ubuntu. Netplan configuration files are located in the /etc/netplan/ directory and have the .yaml extension. The file name may vary, for example, 01-network-config.yaml.
To add an additional IP address using Netplan, you need to edit the existing configuration file or create a new one. First, determine the name of your network interface using the ip link command:
# ip link
1: lo: <LOOPBACK,UP,LOWER_UP> mtu 65536 qdisc noqueue state UNKNOWN mode DEFAULT group default qlen 1000
    link/loopback 00:00:00:00:00:00 brd 00:00:00:00:00:00
2: eth0: <BROADCAST,MULTICAST,UP,LOWER_UP> mtu 1500 qdisc mq state UP mode DEFAULT group default qlen 1000
    link/ether 00:11:22:33:44:55 brd ff:ff:ff:ff:ff:ff
In this example, the interface name is eth0. Then, open the Netplan configuration file in a text editor:
# nano /etc/netplan/01-network-config.yaml
Suppose the original file looks something like this:
network:
  version: 2
  renderer: networkd
  ethernets:
    eth0:
      dhcp4: no
      addresses: [192.168.1.100/24]
      gateway4: 192.168.1.1
      nameservers:
          addresses: [8.8.8.8, 8.8.4.4]
To add an additional IP address 192.168.1.101, modify the file as follows:
network:
  version: 2
  renderer: networkd
  ethernets:
    eth0:
      dhcp4: no
      addresses: [192.168.1.100/24, 192.168.1.101/24]
      gateway4: 192.168.1.1
      nameservers:
          addresses: [8.8.8.8, 8.8.4.4]
Note that we added 192.168.1.101/24 to the addresses list. After making the changes, save the file and apply the Netplan configuration:
# netplan apply
If errors occur, you can use the netplan --debug apply command for more information.
Caution: YAML files are indentation-sensitive. Make sure the indentation in your Netplan file is correct. Incorrect indentation can lead to configuration errors.
As in CentOS, you can use the commands ping, traceroute, systemctl status networking, and journalctl -u networking to debug network issues in Ubuntu/Debian.
Expert Quote:
Automation and Infrastructure as Code (IaC) are becoming increasingly important. Netplan is a step in the right direction, allowing you to define network configuration declaratively.
Chris Richardson, DevOps Engineer
In the next section, we will explore how to configure the firewall for additional IP addresses.
Configuring the Firewall
After adding additional IP addresses, it is important to configure the firewall to ensure the security of your VPS. The firewall acts as a barrier between your server and the outside world, blocking unwanted traffic and allowing only what is necessary.
The most common firewalls in Linux are iptables and firewalld. iptables is an older but still widely used firewall. firewalld is a more modern firewall offering a more user-friendly management interface.
Firewalld (recommended for CentOS and Ubuntu)
firewalld uses the concept of zones, which represent different levels of trust in the network. For example, the public zone is intended for public networks and has stricter rules than the home zone, which is intended for home networks.
To check which firewall is being used and its status, use the command:
# systemctl status firewalld
If firewalld is not running, start it:
# systemctl start firewalld
# systemctl enable firewalld
The first command starts the firewall, and the second enables it to start automatically when the system boots.
To add a firewall rule for an additional IP address, you must first determine which zone it should be assigned to. If you want the IP address to be accessible from any network, use the public zone. If you want to restrict access only from certain networks, create a new zone or use an existing one, such as trusted.
Suppose you want to allow access to the web server (ports 80 and 443) on the additional IP address 192.168.1.101. Run the following commands:
# firewall-cmd --permanent --zone=public --add-rich-rule='rule family="ipv4" source address="192.168.1.101" port port="80" protocol="tcp" accept'
# firewall-cmd --permanent --zone=public --add-rich-rule='rule family="ipv4" source address="192.168.1.101" port port="443" protocol="tcp" accept'
# firewall-cmd --reload
The first two commands add rules allowing inbound traffic on ports 80 and 443 from IP address 192.168.1.101 in the public zone. The --permanent option specifies that the rules should be added to the permanent configuration, which is preserved after a system reboot. The third command reloads the firewall for the changes to take effect.
To verify that the rules have been successfully added, use the command:
# firewall-cmd --list-all --zone=public
You should see the added rules in the output. You can also use the command firewall-cmd --list-rich-rules --zone=public to view only rich rules.
If you want to allow access to all ports from a specific IP address, use the following rule:
# firewall-cmd --permanent --zone=trusted --add-source=192.168.1.101
# firewall-cmd --reload
This rule adds the IP address 192.168.1.101 to the trusted zone, which allows all traffic from that IP address.
Iptables (alternative option)
If you are using iptables, you will need to manually add rules for each port and IP address. Before making changes, it is recommended to save the current iptables configuration:
# iptables-save > /etc/iptables.rules
To allow access to the web server (ports 80 and 443) on the additional IP address 192.168.1.101, run the following commands:
# iptables -A INPUT -p tcp -s 192.168.1.101 --dport 80 -j ACCEPT
# iptables -A INPUT -p tcp -s 192.168.1.101 --dport 443 -j ACCEPT
These commands add rules to the INPUT table, allowing inbound traffic on ports 80 and 443 from the IP address 192.168.1.101. The -A option adds the rule to the end of the table.«`html
How to Add Additional IP Addresses to a VPS?
In this comprehensive guide, we’ll explore how to add additional IP addresses to your Virtual Private Server (VPS). We’ll cover the theoretical foundations, practical steps for the most popular Linux operating systems (CentOS, Ubuntu, Debian), and address common issues and how to resolve them. Whether you’re a beginner or an experienced system administrator, this guide will help you properly configure additional IP addresses for your VPS to maximize its capabilities. We’ll also touch on security and performance optimization.
Contents:
- Introduction
- Understanding IP Addresses
- Adding IP Addresses in CentOS
- Adding IP Addresses in Ubuntu/Debian
- Configuring the Firewall
- Testing and Troubleshooting
Introduction
A Virtual Private Server (VPS) provides the resources needed to run websites, applications, and other services. Sometimes, one IP address is not enough. Adding additional IP addresses can be useful for various purposes, such as hosting multiple websites with different SSL certificates, separating traffic, or improving security. In this section, we will cover the basics of adding additional IP addresses to a VPS.
For example, imagine you own a web hosting company. You need to host sites for multiple clients, and each site requires a unique SSL certificate. To do this, each site needs its own IP address. Adding additional IP addresses to your VPS allows you to do this.
Another example is when you want to separate traffic between different services. For example, you can dedicate one IP address for the web server, another for the mail server, and a third for the database server. This helps isolate different services from each other and improves security.
Before you begin, make sure you have root privileges or sudo privileges on your VPS. You also need to know your VPS’s network settings, including the current IP address, subnet mask, and default gateway. This information can be obtained from your hosting provider or by using the following commands:
# ip addr show
# route -n
# cat /etc/resolv.conf
The ip addr show command displays all network interfaces and their IP addresses. route -n shows the routing table, which indicates the default gateway. cat /etc/resolv.conf displays the list of DNS servers used by your system.
It is important to note that the process of adding additional IP addresses may differ slightly depending on the operating system of your VPS. In the following sections, we will explore how to do this for CentOS and Ubuntu/Debian.
Comparison of Operating Systems for VPS:
| Operating System | Ease of Use | Security | Community Support |
|---|---|---|---|
| CentOS | Medium | High | Large |
| Ubuntu | High | Medium | Very Large |
| Debian | Medium | High | Large |
The choice of operating system depends on your needs and experience. CentOS and Debian are known for their stability and security, while Ubuntu offers a more user-friendly interface and greater community support.
Understanding IP Addresses
Before adding additional IP addresses, it is important to understand what an IP address is and how it works. An IP address (Internet Protocol address) is a unique numerical identifier assigned to each device connected to a computer network using the IP protocol for communication. It acts as a postal address for data on the internet.
There are two main types of IP addresses: IPv4 and IPv6. IPv4 uses a 32-bit address space, which allows for about 4.3 billion unique addresses. IPv6 uses a 128-bit address space, offering a virtually unlimited number of addresses. Currently, IPv4 is still widely used, but IPv6 is gradually being implemented due to the exhaustion of the IPv4 address space.
IP addresses can also be divided into static and dynamic. A static IP address is assigned to a device manually and remains unchanged. A dynamic IP address is assigned to a device automatically by a DHCP (Dynamic Host Configuration Protocol) server and may change over time. VPS usually use static IP addresses because they provide stable and predictable access to the server.
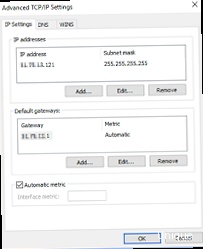
Each IP address is associated with a subnet mask, which determines which part of the IP address identifies the network and which identifies the host in that network. For example, a subnet mask of 255.255.255.0 means that the first 24 bits of the IP address identify the network, and the last 8 bits identify the host. The default gateway is the IP address of the router through which traffic leaves your local network.
When adding additional IP addresses to a VPS, you need to know the following parameters for each IP address: IP address, subnet mask, and default gateway. This information is usually provided by your hosting provider.
To check the current network configuration, you can use the ip route command. For example:
# ip route
default via 192.168.1.1 dev eth0
192.168.1.0/24 dev eth0 proto kernel scope link src 192.168.1.100
This output shows that the default gateway is 192.168.1.1, and the network interface is eth0. You can also use the ifconfig command (although it may be deprecated in some systems) to get information about IP addresses and subnet masks.
Expert Quote:
IP addresses are the foundation of the modern network. Understanding how they work is essential for effective network infrastructure management.
Vint Cerf, one of the «fathers of the Internet»
In the next section, we will explore how to add additional IP addresses in CentOS.
Adding IP Addresses in CentOS
In CentOS (and other Red Hat distributions), adding additional IP addresses usually involves creating additional configuration files for network interfaces. Traditionally, this was done through the /etc/sysconfig/network-scripts/ifcfg-ethX:Y files, where ethX is the name of your primary network interface (e.g., eth0), and Y is a number to distinguish the additional IP addresses.
Suppose you have a primary IP address of 192.168.1.100, a subnet mask of 255.255.255.0, and you want to add an additional IP address of 192.168.1.101 with the same subnet mask. You need to create a file /etc/sysconfig/network-scripts/ifcfg-eth0:1 with the following content:
DEVICE=eth0:1
IPADDR=192.168.1.101
NETMASK=255.255.255.0
ONBOOT=yes
Let’s break down the parameters:
DEVICE: Specifies the device name.eth0:1indicates that this is an additional IP address on theeth0interface.IPADDR: Specifies the additional IP address.NETMASK: Specifies the subnet mask.ONBOOT: Specifies whether the interface should be activated when the system boots.
To create the file, use a text editor such as vi or nano:
# vi /etc/sysconfig/network-scripts/ifcfg-eth0:1
Paste the content specified above into the file and save it. After that, you need to restart the network service for the changes to take effect:
# systemctl restart network
To verify that the IP address has been successfully added, use the command ip addr show eth0:
# ip addr show eth0
2: eth0: <BROADCAST,MULTICAST,UP,LOWER_UP> mtu 1500 qdisc pfifo_fast state UP group default qlen 1000
    link/ether 00:11:22:33:44:55 brd ff:ff:ff:ff:ff:ff
    inet 192.168.1.100/24 brd 192.168.1.255 scope global eth0
       valid_lft forever preferred_lft forever
    inet 192.168.1.101/24 scope global secondary eth0:1
       valid_lft forever preferred_lft forever
You should see both IP addresses (192.168.1.100 and 192.168.1.101) in the output. Note the line inet 192.168.1.101/24 scope global secondary eth0:1, which confirms that the additional IP address has been added as a secondary address on the eth0 interface.
Alternative method (nmcli):
In modern versions of CentOS, you can use the nmcli (NetworkManager Command Line Interface) utility to manage network connections. This is a more modern and recommended way to add IP addresses.
# nmcli con add type ethernet con-name eth0-1 ifname eth0 ip4 192.168.1.101/24
# nmcli con up eth0-1
The first command adds a new ethernet connection named eth0-1, which uses the eth0 interface and the IP address 192.168.1.101/24. The second command activates this connection. You can also configure the default gateway using nmcli, if needed.
Important! Make sure that your hosting provider has allowed the use of additional IP addresses and that they are properly configured on their side. Otherwise, traffic to these IP addresses may not be routed to your VPS.
To debug network issues in CentOS, you can use the following commands:
# ping 192.168.1.101
# traceroute 192.168.1.101
# systemctl status network
# journalctl -u network
ping checks connectivity to the IP address. traceroute shows the path of traffic to the IP address. systemctl status network shows the status of the network service. journalctl -u network shows the logs of the network service.
Comparison table of IP addition methods in CentOS:
| Method | Simplicity | Modernity | Recommendability |
|---|---|---|---|
| ifcfg-ethX:Y | Medium | Outdated | Not Recommended |
| nmcli | High | Modern | Recommended |
In the next section, we will explore how to add additional IP addresses in Ubuntu/Debian.
Adding IP Addresses in Ubuntu/Debian
In Ubuntu and Debian, adding additional IP addresses is slightly different from CentOS. Traditionally, this was done through the /etc/network/interfaces file, but modern versions of Ubuntu often use Netplan.
Method 1: /etc/network/interfaces (traditional)
This method involves editing the /etc/network/interfaces file. Warning: Incorrectly editing this file can cause network problems. Before making changes, back up the file:
# cp /etc/network/interfaces /etc/network/interfaces.bak
Then, open the /etc/network/interfaces file in a text editor:
# nano /etc/network/interfaces
Suppose your main interface is eth0, and its configuration looks something like this:
auto eth0
iface eth0 inet static
    address 192.168.1.100
    netmask 255.255.255.0
    gateway 192.168.1.1
    dns-nameservers 8.8.8.8 8.8.4.4
To add an additional IP address 192.168.1.101, add the following lines to the end of the file:
auto eth0:1
iface eth0:1 inet static
    address 192.168.1.101
    netmask 255.255.255.0
Note that we use eth0:1 to denote the additional IP address. After making the changes, save the file and restart the network service:
# systemctl restart networking
To verify that the IP address has been successfully added, use the command ip addr show eth0:
# ip addr show eth0
2: eth0: <BROADCAST,MULTICAST,UP,LOWER_UP> mtu 1500 qdisc pfifo_fast state UP group default qlen 1000
    link/ether 00:11:22:33:44:55 brd ff:ff:ff:ff:ff:ff
    inet 192.168.1.100/24 brd 192.168.1.255 scope global eth0
       valid_lft forever preferred_lft forever
    inet 192.168.1.101/24 scope global secondary eth0:1
       valid_lft forever preferred_lft forever
You should see both IP addresses in the output, as in CentOS.
Method 2: Netplan (modern)
Netplan is a network configuration system used in modern versions of Ubuntu. Netplan configuration files are located in the /etc/netplan/ directory and have the .yaml extension. The file name may vary, for example, 01-network-config.yaml.
To add an additional IP address using Netplan, you need to edit the existing configuration file or create a new one. First, determine the name of your network interface using the ip link command:
# ip link
1: lo: <LOOPBACK,UP,LOWER_UP> mtu 65536 qdisc noqueue state UNKNOWN mode DEFAULT group default qlen 1000
    link/loopback 00:00:00:00:00:00 brd 00:00:00:00:00:00
2: eth0: <BROADCAST,MULTICAST,UP,LOWER_UP> mtu 1500 qdisc mq state UP mode DEFAULT group default qlen 1000
    link/ether 00:11:22:33:44:55 brd ff:ff:ff:ff:ff:ff
In this example, the interface name is eth0. Then, open the Netplan configuration file in a text editor:
# nano /etc/netplan/01-network-config.yaml
Suppose the original file looks something like this:
network:
  version: 2
  renderer: networkd
  ethernets:
    eth0:
      dhcp4: no
      addresses: [192.168.1.100/24]
      gateway4: 192.168.1.1
      nameservers:
          addresses: [8.8.8.8, 8.8.4.4]
To add an additional IP address 192.168.1.101, modify the file as follows:
network:
  version: 2
  renderer: networkd
  ethernets:
    eth0:
      dhcp4: no
      addresses: [192.168.1.100/24, 192.168.1.101/24]
      gateway4: 192.168.1.1
      nameservers:
          addresses: [8.8.8.8, 8.8.4.4]
Note that we added 192.168.1.101/24 to the addresses list. After making the changes, save the file and apply the Netplan configuration:
# netplan apply
If errors occur, you can use the netplan --debug apply command for more information.
Caution: YAML files are indentation-sensitive. Make sure the indentation in your Netplan file is correct. Incorrect indentation can lead to configuration errors.
As in CentOS, you can use the commands ping, traceroute, systemctl status networking, and journalctl -u networking to debug network issues in Ubuntu/Debian.
Expert Quote:
Automation and Infrastructure as Code (IaC) are becoming increasingly important. Netplan is a step in the right direction, allowing you to define network configuration declaratively.
Chris Richardson, DevOps Engineer
In the next section, we will explore how to configure the firewall for additional IP addresses.
Configuring the Firewall
After adding additional IP addresses, it is important to configure the firewall to ensure the security of your VPS. The firewall acts as a barrier between your server and the outside world, blocking unwanted traffic and allowing only what is necessary.
The most common firewalls in Linux are iptables and firewalld. iptables is an older but still widely used firewall. firewalld is a more modern firewall offering a more user-friendly management interface.
Firewalld (recommended for CentOS and Ubuntu)
firewalld uses the concept of zones, which represent different levels of trust in the network. For example, the public zone is intended for public networks and has stricter rules than the home zone, which is intended for home networks.
To check which firewall is being used and its status, use the command:
# systemctl status firewalld
If firewalld is not running, start it:
# systemctl start firewalld
# systemctl enable firewalld
The first command starts the firewall, and the second enables it to start automatically when the system boots.
To add a firewall rule for an additional IP address, you must first determine which zone it should be assigned to. If you want the IP address to be accessible from any network, use the public zone. If you want to restrict access only from certain networks, create a new zone or use an existing one, such as trusted.
Suppose you want to allow access to the web server (ports 80 and 443) on the additional IP address 192.168.1.101. Run the following commands:
# firewall-cmd --permanent --zone=public --add-rich-rule='rule family="ipv4" source address="192.168.1.101" port port="80" protocol="tcp" accept'
# firewall-cmd --permanent --zone=public --add-rich-rule='rule family="ipv4" source address="192.168.1.101" port port="443" protocol="tcp" accept'
# firewall-cmd --reload
The first two commands add rules allowing inbound traffic on ports 80 and 443 from IP address 192.168.1.101 in the public zone. The --permanent option specifies that the rules should be added to the permanent configuration, which is preserved after a system reboot. The third command reloads the firewall for the changes to take effect.
To verify that the rules have been successfully added, use the command:
# firewall-cmd --list-all --zone=public
You should see the added rules in the output. You can also use the command firewall-cmd --list-rich-rules --zone=public to view only rich rules.
If you want to allow access to all ports from a specific IP address, use the following rule:
# firewall-cmd --permanent --zone=trusted --add-source=192.168.1.101
# firewall-cmd --reload
This rule adds the IP address 192.168.1.101 to the trusted zone, which allows all traffic from that IP address.
Iptables (alternative option)
If you are using iptables, you will need to manually add rules for each port and IP address. Before making changes, it is recommended to save the current iptables configuration:
# iptables-save > /etc/iptables.rules
To allow access to the web server (ports 80 and 443) on the additional IP address 192.168.1.101, run the following commands:
# iptables -A INPUT -p tcp -s 192.168.1.101 --dport 80 -j ACCEPT
# iptables -A INPUT -p tcp -s 192.168.1.101 --dport 443 -j ACCEPT
These commands add rules to the INPUT table, allowing inbound traffic on ports 80 and 443 from the IP address 192.168.1.101. The -A option adds the rule to the end of the table.