This error indicates problems with the database connection settings.
Solution:
- Make sure the database server (MySQL) is running:
sudo systemctl status mysql. - Check the hostname, port, username, and password are correct in the
/etc/phpmyadmin/config.inc.phpfile.
sudo systemctl status mysql
sudo nano /etc/phpmyadmin/config.inc.php
| Problem | Solution |
|---|---|
| 404 Not Found | Check the web server configuration, URL, symbolic link |
| Access denied | Check password, user, rights in MySQL |
| mbstring missing | Install php-mbstring, restart the web server |
| Cannot connect: invalid settings | Check MySQL status, hostname, port, user, password |
If you encounter another problem — do not despair! Google the error. Honestly, Google is your best friend. And Stack Overflow too.
“Always code as if the guy who ends up maintaining your code will be a violent psychopath who knows where you live.”
John Woods
And remember: it’s better to prevent a problem than to solve it. Therefore, make backups, configure security and regularly update phpMyAdmin. Word of warning: a miser pays twice. In this case, with his time and nerves.
That’s it! I hope this guide was helpful for you. Good luck to you in installing and configuring phpMyAdmin! If you have any questions, feel free to ask in the comments.
External links:
«`Contents
- Preparation for installation: Updating and installing what is needed
- Installing phpMyAdmin: The easiest way
- Configuring a web server (Nginx/Apache): Making it work
- Security configuration: Protecting against hacking
- Verification and testing: Checking that everything is OK
- Troubleshooting common problems: Analyzing the debriefing
Preparation for installation: Updating and installing what is needed
 установить phpMyAdmin на VPS? - A screenshot of the terminal showing package update commands being executed successfully." title="Illustration for A screenshot of the terminal showing package update commands being executed successfully." width="512" height="512" / class="wp-image-5000 wp-image-12400">
Okay, the first thing to do is make sure we’re fresh and ready to go. This is like brushing your teeth before an important meeting, only for your VPS. There’s no getting away from it! Let’s start by updating the package list and installing the necessary dependencies. Wanna make sure everything is up to date, right? We use `apt` (or `yum` if you have CentOS/RHEL, but I’ll show you using Debian/Ubuntu as an example, because that’s what I’m used to). Real talk, without this, moving on is more expensive. Tested from personal experience.
sudo apt update
sudo apt upgrade -y
sudo apt install -y php php-mysql php-common php-mbstring php-gd php-xml php-pear mysql-server
This is the holy grail for phpMyAdmin to work. Without `php-mysql` it simply won’t be able to communicate with the database, and without `php-mbstring` you’ll have encoding problems. Been there, done that. Trust me on this one.
We’ll also need a web server. If you already have Nginx or Apache installed — great! If not, it’s time to fix it. I personally prefer Nginx, it’s somehow faster and lighter. But that’s a matter of taste. Bottom line, either one will do.
sudo apt install -y nginxOr, if you’re an Apache fan:
sudo apt install -y apache2After installing the web server, make sure it is running. This is important!
sudo systemctl status nginx # Или sudo systemctl status apache2If you see «active (running)» — everything is ok. If not, google the error. No joke, google it! Stack Overflow to help you.
And the last thing at this stage is setting up MySQL. You need to set a password for the `root` user and create a database for phpMyAdmin. *Attention*: if you have just installed MySQL, then the password for `root` may not be set. In this case, you will need to use the `mysql_secure_installation` command. It will help you set a password and perform other important security settings.
sudo mysql_secure_installationAnswer the questions carefully. I usually recommend answering «Y» to all questions, except the question about changing the password (if you already have a strong password).
After that, we connect to MySQL and create a database:
sudo mysql -u root -p
CREATE DATABASE phpmyadmin;
CREATE USER 'phpmyadmin'@'localhost' IDENTIFIED BY 'YOUR_PASSWORD';
GRANT ALL PRIVILEGES ON phpmyadmin.* TO 'phpmyadmin'@'localhost';
FLUSH PRIVILEGES;
exit;
Replace `YOUR_PASSWORD` with a strong password. Don’t use «password» or «123456», I beg you! Seriously though, this is the foundation of security.
Phew, the first stage is completed. Now we have everything we need to install phpMyAdmin. Let’s move on!
Installing phpMyAdmin: The easiest way

Okay, now will be the easiest stage. Install phpMyAdmin from the repository. Honestly, this is the least painful way. You don’t need to download archives, unpack them and configure them manually. Just enter the command and wait. Easy peasy!
sudo apt install -y phpmyadminDuring installation, you will be asked a few questions. *Attention*: select «apache2» or «nginx» (depending on which web server you are using) and answer «Yes» when asked if you want to configure the database for phpMyAdmin. Also, when asked about the MySQL administrator password, enter the one you set for the `root` user.
If you messed something up during installation, don’t worry! Everything can be fixed. Just reinstall phpMyAdmin:
sudo dpkg-reconfigure phpmyadminThis command will restart the configuration process. Answer the questions carefully. I’ve spent hours debugging this, so trust me, it’s better to double-check.
After installation, you need to configure the web server so that phpMyAdmin is accessible from a browser. More on that — in the next section.
Configuring a web server (Nginx/Apache): Making it work
This is where the fun begins. You need to configure the web server so that it knows where to look for phpMyAdmin and how to handle it. Here we have two options: Nginx or Apache. I’ll show both, but with Nginx I’ll be a little more detailed, because, well, I like it more. Deal? Don’t you hate when you have to configure web servers?
Nginx configuration
Create a symbolic link to the phpMyAdmin configuration file in the Nginx directory:
sudo ln -s /etc/phpmyadmin/nginx.conf /etc/nginx/conf.d/phpmyadmin.confThen you need to restart Nginx for the changes to take effect:
sudo systemctl restart nginxIf you already have a configured virtual host for your site, then you will need to add the following block to the configuration file of this virtual host (for example, `/etc/nginx/sites-available/default`):
location /phpmyadmin {
    root /usr/share/;
    index index.php index.html index.htm;
    try_files $uri $uri/ /phpmyadmin/index.php?$args;

    location ~ ^/phpmyadmin/(.+\.php)$ {
        try_files $uri =404;
        include /etc/nginx/snippets/fastcgi-php.conf;
        fastcgi_pass unix:/run/php/php7.4-fpm.sock; # Replace with your PHP version
    }
}
Pay attention to the line `fastcgi_pass unix:/run/php/php7.4-fpm.sock;`. Here you need to specify the path to the PHP-FPM socket. Pro tip: the PHP version may be different, so check it before copying this code.
And, of course, restart Nginx:
sudo systemctl restart nginxApache configuration
In Apache, everything is a little simpler. After installing phpMyAdmin, it automatically creates a configuration file for Apache. The only thing you need to do is enable it:
sudo a2enconf phpmyadminAnd restart Apache:
sudo systemctl restart apache2That’s it! Now phpMyAdmin should be available at `http://your_ip_address/phpmyadmin` or `http://your_domain/phpmyadmin`. Time for the moment of truth! If you get a 404 error, double-check your configuration files. I’ll be straight with you, this is the most common mistake.
Security configuration: Protecting against hacking
Okay, this is a *very* important section. Security is no joke! phpMyAdmin is a tasty morsel for hackers, so you need to take all measures to protect it. Seriously though, it’s like putting a lock on your house.
The first and easiest thing to do is to change the standard URL. Don’t use `/phpmyadmin`. It’s too obvious! Change it to something more complex, for example, `/mysecretadminpanel`. To do this, you need to edit the Nginx or Apache configuration file.
For Nginx, this is done in the `/etc/nginx/conf.d/phpmyadmin.conf` file (or in the configuration file of your virtual host):
location /mysecretadminpanel {
    root /usr/share/;
    index index.php index.html index.htm;
    try_files $uri $uri/ /mysecretadminpanel/index.php?$args;

    location ~ ^/mysecretadminpanel/(.+\.php)$ {
        try_files $uri =404;
        include /etc/nginx/snippets/fastcgi-php.conf;
        fastcgi_pass unix:/run/php/php7.4-fpm.sock; # Replace with your PHP version
    }
}
For Apache, you need to edit the `/etc/phpmyadmin/apache.conf` (or `/etc/phpmyadmin/apache2.conf`) file and replace `/phpmyadmin` with `/mysecretadminpanel` in all lines.
After that, of course, we restart the web server.
Second, configure authentication and authorization. By default, phpMyAdmin uses MySQL authentication. This is not the safest way. It is better to use HTTP Basic Authentication or HTTP Digest Authentication. But this requires additional web server settings.
Third, configure the firewall. Allow access to phpMyAdmin only from specific IP addresses. Word of warning: this can be inconvenient if you frequently change your IP address, but it greatly increases security.
For this, you can use `iptables` or `ufw`. For example, to allow access only from the IP address `192.168.1.100`, use the following commands:
sudo ufw allow from 192.168.1.100 to any port 80,443
sudo ufw enable
Fourth, disable the ability to upload files. phpMyAdmin allows you to upload files to the server. This can be dangerous if an attacker can upload a malicious file. To disable this feature, you need to edit the phpMyAdmin configuration file (`/etc/phpmyadmin/config.inc.php`) and add the following lines:
$cfg['UploadDir'] = '';
$cfg['SaveDir'] = '';
Fifth, regularly update phpMyAdmin. Seriously though, it’s like installing updates on your phone. The newer the version, the fewer vulnerabilities.
The configuration file `/etc/phpmyadmin/config.inc.php` is the holy of holies of phpMyAdmin. All settings are stored here, including passwords and paths. Therefore, it must be protected like the apple of your eye.
<?php
/* Servers configuration */
$i = 0;

/* Server: localhost [1] */
$i++;
$cfg['Servers'][$i]['verbose'] = 'localhost';
$cfg['Servers'][$i]['host'] = 'localhost';
$cfg['Servers'][$i]['port'] = 3306;
$cfg['Servers'][$i]['user'] = 'phpmyadmin';
$cfg['Servers'][$i]['password'] = 'YOUR_PASSWORD';
$cfg['Servers'][$i]['auth_type'] = 'config';
$cfg['Servers'][$i]['AllowNoPassword'] = false;

/* Directories for saving/uploading files */
$cfg['UploadDir'] = '';
$cfg['SaveDir'] = '';

/* Other settings */
$cfg['blowfish_secret'] = 'YOUR_BLOWFISH_SECRET';
$cfg['DefaultLang'] = 'ru';
$cfg['ServerDefault'] = 1;
$cfg['LoginCookieValidity'] = 1440;

/**
 * phpMyAdmin configuration storage settings.
 */
$cfg['Servers'][$i]['pmadb'] = 'phpmyadmin';
$cfg['Servers'][$i]['controlhost'] = '';
$cfg['Servers'][$i]['controlport'] = '';
$cfg['Servers'][$i]['controluser'] = 'pma';
$cfg['Servers'][$i]['controlpass'] = 'pmapass';

/**
 * End of servers configuration
 */

/**
 * Disallow insecure transport
 */
$cfg['ForceSSL'] = true;

/**
 * Allow only local connections
 */
$cfg['AllowArbitraryServer'] = false;

?>
Replace `YOUR_PASSWORD` with the password of the `phpmyadmin` user, and `YOUR_BLOWFISH_SECRET` with a random string. No joke, this string should be really random. Use some random string generator. For example, `openssl rand -base64 32`.
“Security is not a product, but a process.”
Bruce Schneier
And, of course, don’t forget about backups! Regularly back up the database and configuration files. Plot twist: if something goes wrong, backups will save your life (and your VPS).
Verification and testing: Checking that everything is OK
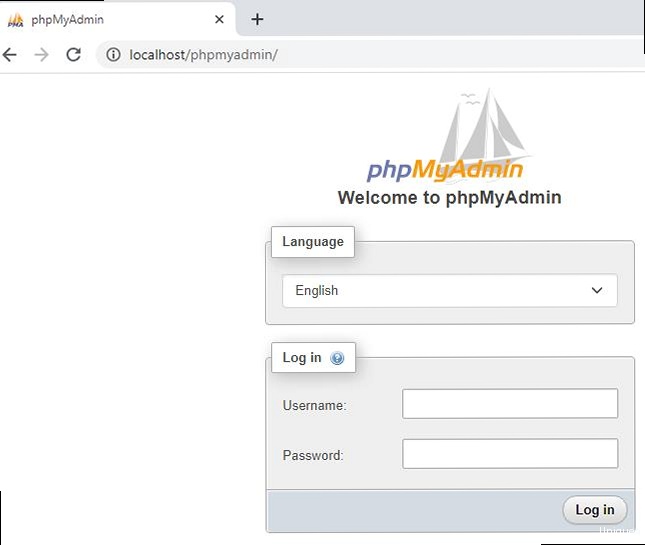
Okay, now we need to make sure everything works as it should. Go to phpMyAdmin through a browser (at the address you configured in the previous section) and try to log in. Use the username and password that you set for the `phpmyadmin` user in MySQL. Boom! That’s it!
If you see the phpMyAdmin page — great! If not, check the web server logs. There will surely be some useful information there. Yeah, this error message sucks, but at least it exists.
Check that you can connect to databases, create tables, add data, etc. Don’t be shy, experiment! But don’t break anything valuable.
You can create a test database and table:
CREATE DATABASE testdb;
USE testdb;
CREATE TABLE testtable (
    id INT PRIMARY KEY AUTO_INCREMENT,
    name VARCHAR(255)
);
INSERT INTO testtable (name) VALUES ('Test data');
SELECT * FROM testtable;
If everything works — congratulations! You have successfully installed and configured phpMyAdmin. This setup is fire!
But that is not all. You need to check that phpMyAdmin is running stably and does not crash with errors. For this, you can use the following commands:
sudo systemctl status php7.4-fpm  # Replace with your PHP version
sudo journalctl -u php7.4-fpm
sudo nginx -t  # Или sudo apachectl -t
These commands will show you the status of PHP-FPM, PHP-FPM logs, and the syntax of web server configuration files. If you see errors — google them. Sound familiar?
| Check | Command | Expected result |
|---|---|---|
| PHP-FPM status | sudo systemctl status php7.4-fpm | active (running) |
| PHP-FPM logs | sudo journalctl -u php7.4-fpm | No errors |
| Nginx syntax | sudo nginx -t | syntax is ok |
| Apache syntax | sudo apachectl -t | Syntax OK |
And finally — check that phpMyAdmin is only available from those IP addresses that you allowed in the firewall. This is important! No cap, this is really important.
Troubleshooting common problems: Analyzing the debriefing
Okay, even the most experienced developers sometimes have something go wrong. And phpMyAdmin is no exception. Now we will analyze the most typical problems and ways to solve them. Ugh, this part always trips people up.
Problem 1: 404 Not Found
This is the most common problem. It means that the web server cannot find phpMyAdmin. The reasons can be different:
- The web server is configured incorrectly. Check the Nginx or Apache configuration files.
- Incorrect URL. Make sure you enter the correct URL in the browser.
- A symbolic link to the phpMyAdmin configuration file has not been created (for Nginx).
Solution:
- Double-check the web server configuration files. Make sure there are no errors in them.
- Make sure you enter the correct URL in the browser.
- Check that the symbolic link to the phpMyAdmin configuration file exists (for Nginx).
- Restart the web server.
Problem 2: Access denied for user ‘phpmyadmin’@’localhost’
This problem means that phpMyAdmin cannot connect to the MySQL database. Reasons:
- Incorrect password for the `phpmyadmin` user in MySQL.
- The `phpmyadmin` user has not been created in MySQL.
- The `phpmyadmin` user does not have rights to the `phpmyadmin` database.
Solution:
- Check the password for the `phpmyadmin` user in the phpMyAdmin configuration file (`/etc/phpmyadmin/config.inc.php`).
- Make sure that the `phpmyadmin` user exists in MySQL and has rights to the `phpmyadmin` database.
- Restart the web server.
Problem 3: Fatal error: The mbstring extension is missing. Please check your PHP configuration.
This problem means that the `mbstring` library is not installed in PHP. Reasons:
- The `mbstring` library is not installed.
Solution:
- Install the `mbstring` library:
sudo apt install php-mbstring. - Restart the web server.
Problem 4: Cannot connect: invalid settings.
This error indicates problems with the database connection settings.
Solution:
- Make sure the database server (MySQL) is running:
sudo systemctl status mysql. - Check the hostname, port, username, and password are correct in the
/etc/phpmyadmin/config.inc.phpfile.
sudo systemctl status mysql
sudo nano /etc/phpmyadmin/config.inc.php
| Problem | Solution |
|---|---|
| 404 Not Found | Check the web server configuration, URL, symbolic link |
| Access denied | Check password, user, rights in MySQL |
| mbstring missing | Install php-mbstring, restart the web server |
| Cannot connect: invalid settings | Check MySQL status, hostname, port, user, password |
If you encounter another problem — do not despair! Google the error. Honestly, Google is your best friend. And Stack Overflow too.
“Always code as if the guy who ends up maintaining your code will be a violent psychopath who knows where you live.”
John Woods
And remember: it’s better to prevent a problem than to solve it. Therefore, make backups, configure security and regularly update phpMyAdmin. Word of warning: a miser pays twice. In this case, with his time and nerves.
That’s it! I hope this guide was helpful for you. Good luck to you in installing and configuring phpMyAdmin! If you have any questions, feel free to ask in the comments.
External links:
«`Contents
- Preparation for installation: Updating and installing what is needed
- Installing phpMyAdmin: The easiest way
- Configuring a web server (Nginx/Apache): Making it work
- Security configuration: Protecting against hacking
- Verification and testing: Checking that everything is OK
- Troubleshooting common problems: Analyzing the debriefing
Preparation for installation: Updating and installing what is needed
Okay, the first thing to do is make sure we’re fresh and ready to go. This is like brushing your teeth before an important meeting, only for your VPS. There’s no getting away from it! Let’s start by updating the package list and installing the necessary dependencies. Wanna make sure everything is up to date, right? We use `apt` (or `yum` if you have CentOS/RHEL, but I’ll show you using Debian/Ubuntu as an example, because that’s what I’m used to). Real talk, without this, moving on is more expensive. Tested from personal experience.
sudo apt update
sudo apt upgrade -y
sudo apt install -y php php-mysql php-common php-mbstring php-gd php-xml php-pear mysql-server
This is the holy grail for phpMyAdmin to work. Without `php-mysql` it simply won’t be able to communicate with the database, and without `php-mbstring` you’ll have encoding problems. Been there, done that. Trust me on this one.
We’ll also need a web server. If you already have Nginx or Apache installed — great! If not, it’s time to fix it. I personally prefer Nginx, it’s somehow faster and lighter. But that’s a matter of taste. Bottom line, either one will do.
sudo apt install -y nginxOr, if you’re an Apache fan:
sudo apt install -y apache2After installing the web server, make sure it is running. This is important!
sudo systemctl status nginx # Или sudo systemctl status apache2If you see «active (running)» — everything is ok. If not, google the error. No joke, google it! Stack Overflow to help you.
And the last thing at this stage is setting up MySQL. You need to set a password for the `root` user and create a database for phpMyAdmin. *Attention*: if you have just installed MySQL, then the password for `root` may not be set. In this case, you will need to use the `mysql_secure_installation` command. It will help you set a password and perform other important security settings.
sudo mysql_secure_installationAnswer the questions carefully. I usually recommend answering «Y» to all questions, except the question about changing the password (if you already have a strong password).
After that, we connect to MySQL and create a database:
sudo mysql -u root -p
CREATE DATABASE phpmyadmin;
CREATE USER 'phpmyadmin'@'localhost' IDENTIFIED BY 'YOUR_PASSWORD';
GRANT ALL PRIVILEGES ON phpmyadmin.* TO 'phpmyadmin'@'localhost';
FLUSH PRIVILEGES;
exit;
Replace `YOUR_PASSWORD` with a strong password. Don’t use «password» or «123456», I beg you! Seriously though, this is the foundation of security.
Phew, the first stage is completed. Now we have everything we need to install phpMyAdmin. Let’s move on!
Installing phpMyAdmin: The easiest way
Okay, now will be the easiest stage. Install phpMyAdmin from the repository. Honestly, this is the least painful way. You don’t need to download archives, unpack them and configure them manually. Just enter the command and wait. Easy peasy!
sudo apt install -y phpmyadminDuring installation, you will be asked a few questions. *Attention*: select «apache2» or «nginx» (depending on which web server you are using) and answer «Yes» when asked if you want to configure the database for phpMyAdmin. Also, when asked about the MySQL administrator password, enter the one you set for the `root` user.
If you messed something up during installation, don’t worry! Everything can be fixed. Just reinstall phpMyAdmin:
sudo dpkg-reconfigure phpmyadminThis command will restart the configuration process. Answer the questions carefully. I’ve spent hours debugging this, so trust me, it’s better to double-check.
After installation, you need to configure the web server so that phpMyAdmin is accessible from a browser. More on that — in the next section.
Configuring a web server (Nginx/Apache): Making it work
This is where the fun begins. You need to configure the web server so that it knows where to look for phpMyAdmin and how to handle it. Here we have two options: Nginx or Apache. I’ll show both, but with Nginx I’ll be a little more detailed, because, well, I like it more. Deal? Don’t you hate when you have to configure web servers?
Nginx configuration
Create a symbolic link to the phpMyAdmin configuration file in the Nginx directory:
sudo ln -s /etc/phpmyadmin/nginx.conf /etc/nginx/conf.d/phpmyadmin.confThen you need to restart Nginx for the changes to take effect:
sudo systemctl restart nginxIf you already have a configured virtual host for your site, then you will need to add the following block to the configuration file of this virtual host (for example, `/etc/nginx/sites-available/default`):
location /phpmyadmin {
    root /usr/share/;
    index index.php index.html index.htm;
    try_files $uri $uri/ /phpmyadmin/index.php?$args;

    location ~ ^/phpmyadmin/(.+\.php)$ {
        try_files $uri =404;
        include /etc/nginx/snippets/fastcgi-php.conf;
        fastcgi_pass unix:/run/php/php7.4-fpm.sock; # Replace with your PHP version
    }
}
Pay attention to the line `fastcgi_pass unix:/run/php/php7.4-fpm.sock;`. Here you need to specify the path to the PHP-FPM socket. Pro tip: the PHP version may be different, so check it before copying this code.
And, of course, restart Nginx:
sudo systemctl restart nginxApache configuration
In Apache, everything is a little simpler. After installing phpMyAdmin, it automatically creates a configuration file for Apache. The only thing you need to do is enable it:
sudo a2enconf phpmyadminAnd restart Apache:
sudo systemctl restart apache2That’s it! Now phpMyAdmin should be available at `http://your_ip_address/phpmyadmin` or `http://your_domain/phpmyadmin`. Time for the moment of truth! If you get a 404 error, double-check your configuration files. I’ll be straight with you, this is the most common mistake.
Security configuration: Protecting against hacking
Okay, this is a *very* important section. Security is no joke! phpMyAdmin is a tasty morsel for hackers, so you need to take all measures to protect it. Seriously though, it’s like putting a lock on your house.
The first and easiest thing to do is to change the standard URL. Don’t use `/phpmyadmin`. It’s too obvious! Change it to something more complex, for example, `/mysecretadminpanel`. To do this, you need to edit the Nginx or Apache configuration file.
For Nginx, this is done in the `/etc/nginx/conf.d/phpmyadmin.conf` file (or in the configuration file of your virtual host):
location /mysecretadminpanel {
    root /usr/share/;
    index index.php index.html index.htm;
    try_files $uri $uri/ /mysecretadminpanel/index.php?$args;

    location ~ ^/mysecretadminpanel/(.+\.php)$ {
        try_files $uri =404;
        include /etc/nginx/snippets/fastcgi-php.conf;
        fastcgi_pass unix:/run/php/php7.4-fpm.sock; # Replace with your PHP version
    }
}
For Apache, you need to edit the `/etc/phpmyadmin/apache.conf` (or `/etc/phpmyadmin/apache2.conf`) file and replace `/phpmyadmin` with `/mysecretadminpanel` in all lines.
After that, of course, we restart the web server.
Second, configure authentication and authorization. By default, phpMyAdmin uses MySQL authentication. This is not the safest way. It is better to use HTTP Basic Authentication or HTTP Digest Authentication. But this requires additional web server settings.
Third, configure the firewall. Allow access to phpMyAdmin only from specific IP addresses. Word of warning: this can be inconvenient if you frequently change your IP address, but it greatly increases security.
For this, you can use `iptables` or `ufw`. For example, to allow access only from the IP address `192.168.1.100`, use the following commands:
sudo ufw allow from 192.168.1.100 to any port 80,443
sudo ufw enable
Fourth, disable the ability to upload files. phpMyAdmin allows you to upload files to the server. This can be dangerous if an attacker can upload a malicious file. To disable this feature, you need to edit the phpMyAdmin configuration file (`/etc/phpmyadmin/config.inc.php`) and add the following lines:
$cfg['UploadDir'] = '';
$cfg['SaveDir'] = '';
Fifth, regularly update phpMyAdmin. Seriously though, it’s like installing updates on your phone. The newer the version, the fewer vulnerabilities.
The configuration file `/etc/phpmyadmin/config.inc.php` is the holy of holies of phpMyAdmin. All settings are stored here, including passwords and paths. Therefore, it must be protected like the apple of your eye.
<?php
/* Servers configuration */
$i = 0;

/* Server: localhost [1] */
$i++;
$cfg['Servers'][$i]['verbose'] = 'localhost';
$cfg['Servers'][$i]['host'] = 'localhost';
$cfg['Servers'][$i]['port'] = 3306;
$cfg['Servers'][$i]['user'] = 'phpmyadmin';
$cfg['Servers'][$i]['password'] = 'YOUR_PASSWORD';
$cfg['Servers'][$i]['auth_type'] = 'config';
$cfg['Servers'][$i]['AllowNoPassword'] = false;

/* Directories for saving/uploading files */
$cfg['UploadDir'] = '';
$cfg['SaveDir'] = '';

/* Other settings */
$cfg['blowfish_secret'] = 'YOUR_BLOWFISH_SECRET';
$cfg['DefaultLang'] = 'ru';
$cfg['ServerDefault'] = 1;
$cfg['LoginCookieValidity'] = 1440;

/**
 * phpMyAdmin configuration storage settings.
 */
$cfg['Servers'][$i]['pmadb'] = 'phpmyadmin';
$cfg['Servers'][$i]['controlhost'] = '';
$cfg['Servers'][$i]['controlport'] = '';
$cfg['Servers'][$i]['controluser'] = 'pma';
$cfg['Servers'][$i]['controlpass'] = 'pmapass';

/**
 * End of servers configuration
 */

/**
 * Disallow insecure transport
 */
$cfg['ForceSSL'] = true;

/**
 * Allow only local connections
 */
$cfg['AllowArbitraryServer'] = false;

?>
Replace `YOUR_PASSWORD` with the password of the `phpmyadmin` user, and `YOUR_BLOWFISH_SECRET` with a random string. No joke, this string should be really random. Use some random string generator. For example, `openssl rand -base64 32`.
“Security is not a product, but a process.”
Bruce Schneier
And, of course, don’t forget about backups! Regularly back up the database and configuration files. Plot twist: if something goes wrong, backups will save your life (and your VPS).
Verification and testing: Checking that everything is OK
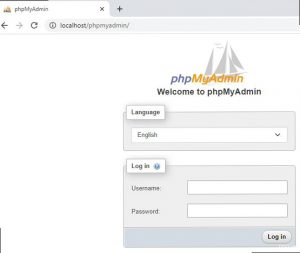
Okay, now we need to make sure everything works as it should. Go to phpMyAdmin through a browser (at the address you configured in the previous section) and try to log in. Use the username and password that you set for the `phpmyadmin` user in MySQL. Boom! That’s it!
If you see the phpMyAdmin page — great! If not, check the web server logs. There will surely be some useful information there. Yeah, this error message sucks, but at least it exists.
Check that you can connect to databases, create tables, add data, etc. Don’t be shy, experiment! But don’t break anything valuable.
You can create a test database and table:
CREATE DATABASE testdb;
USE testdb;
CREATE TABLE testtable (
    id INT PRIMARY KEY AUTO_INCREMENT,
    name VARCHAR(255)
);
INSERT INTO testtable (name) VALUES ('Test data');
SELECT * FROM testtable;
If everything works — congratulations! You have successfully installed and configured phpMyAdmin. This setup is fire!
But that is not all. You need to check that phpMyAdmin is running stably and does not crash with errors. For this, you can use the following commands:
sudo systemctl status php7.4-fpm  # Replace with your PHP version
sudo journalctl -u php7.4-fpm
sudo nginx -t  # Или sudo apachectl -t
These commands will show you the status of PHP-FPM, PHP-FPM logs, and the syntax of web server configuration files. If you see errors — google them. Sound familiar?
| Check | Command | Expected result |
|---|---|---|
| PHP-FPM status | sudo systemctl status php7.4-fpm | active (running) |
| PHP-FPM logs | sudo journalctl -u php7.4-fpm | No errors |
| Nginx syntax | sudo nginx -t | syntax is ok |
| Apache syntax | sudo apachectl -t | Syntax OK |
And finally — check that phpMyAdmin is only available from those IP addresses that you allowed in the firewall. This is important! No cap, this is really important.
Troubleshooting common problems: Analyzing the debriefing
Okay, even the most experienced developers sometimes have something go wrong. And phpMyAdmin is no exception. Now we will analyze the most typical problems and ways to solve them. Ugh, this part always trips people up.
Problem 1: 404 Not Found
This is the most common problem. It means that the web server cannot find phpMyAdmin. The reasons can be different:
- The web server is configured incorrectly. Check the Nginx or Apache configuration files.
- Incorrect URL. Make sure you enter the correct URL in the browser.
- A symbolic link to the phpMyAdmin configuration file has not been created (for Nginx).
Solution:
- Double-check the web server configuration files. Make sure there are no errors in them.
- Make sure you enter the correct URL in the browser.
- Check that the symbolic link to the phpMyAdmin configuration file exists (for Nginx).
- Restart the web server.
Problem 2: Access denied for user ‘phpmyadmin’@’localhost’
This problem means that phpMyAdmin cannot connect to the MySQL database. Reasons:
- Incorrect password for the `phpmyadmin` user in MySQL.
- The `phpmyadmin` user has not been created in MySQL.
- The `phpmyadmin` user does not have rights to the `phpmyadmin` database.
Solution:
- Check the password for the `phpmyadmin` user in the phpMyAdmin configuration file (`/etc/phpmyadmin/config.inc.php`).
- Make sure that the `phpmyadmin` user exists in MySQL and has rights to the `phpmyadmin` database.
- Restart the web server.
Problem 3: Fatal error: The mbstring extension is missing. Please check your PHP configuration.
This problem means that the `mbstring` library is not installed in PHP. Reasons:
- The `mbstring` library is not installed.
Solution:
- Install the `mbstring` library:
sudo apt install php-mbstring. - Restart the web server.
Problem 4: Cannot connect: invalid settings.
This error indicates problems with the database connection settings.
Solution:
- Make sure the database server (MySQL) is running:
sudo systemctl status mysql. - Check the hostname, port, username, and password are correct in the
/etc/phpmyadmin/config.inc.phpfile.
sudo systemctl status mysql
sudo nano /etc/phpmyadmin/config.inc.php
| Problem | Solution |
|---|---|
| 404 Not Found | Check the web server configuration, URL, symbolic link |
| Access denied | Check password, user, rights in MySQL |
| mbstring missing | Install php-mbstring, restart the web server |
| Cannot connect: invalid settings | Check MySQL status, hostname, port, user, password |
If you encounter another problem — do not despair! Google the error. Honestly, Google is your best friend. And Stack Overflow too.
“Always code as if the guy who ends up maintaining your code will be a violent psychopath who knows where you live.”
John Woods
And remember: it’s better to prevent a problem than to solve it. Therefore, make backups, configure security and regularly update phpMyAdmin. Word of warning: a miser pays twice. In this case, with his time and nerves.
That’s it! I hope this guide was helpful for you. Good luck to you in installing and configuring phpMyAdmin! If you have any questions, feel free to ask in the comments.
External links:
«`«`htmlHow to Install phpMyAdmin on a VPS? A Step-by-Step Guide for Beginners and Beyond!
Hello, colleagues! Tired of messing with MySQL through the command line? Want a convenient graphical interface to manage databases on your VPS? Then you’ve come to the right place! In this guide, as an experienced developer who has been through fire and water (and tons of errors in phpMyAdmin), I will tell you how to install and configure phpMyAdmin on your virtual server. Get ready, it’s going to be hot! We will go through all the stages: from updating packages to fine-tuning security. And yes, I will speak in simple language, without abstruse terms, because, seriously, who understands them the first time? Let’s go!
In this guide, you will learn:
- How to update packages and install the necessary dependencies.
- How to install phpMyAdmin and configure the web server (Nginx or Apache).
- How to configure authentication and authorization.
- How to improve phpMyAdmin security (this is *very* important!).
- How to check performance and troubleshoot common problems.
Don’t worry if you are a beginner. I will try to explain everything in as much detail as possible. And yes, I will use many real examples and commands. Ready?
Contents
- Preparation for installation: Updating and installing what is needed
- Installing phpMyAdmin: The easiest way
- Configuring a web server (Nginx/Apache): Making it work
- Security configuration: Protecting against hacking
- Verification and testing: Checking that everything is OK
- Troubleshooting common problems: Analyzing the debriefing
Preparation for installation: Updating and installing what is needed
Okay, the first thing to do is make sure we’re fresh and ready to go. This is like brushing your teeth before an important meeting, only for your VPS. There’s no getting away from it! Let’s start by updating the package list and installing the necessary dependencies. Wanna make sure everything is up to date, right? We use `apt` (or `yum` if you have CentOS/RHEL, but I’ll show you using Debian/Ubuntu as an example, because that’s what I’m used to). Real talk, without this, moving on is more expensive. Tested from personal experience.
sudo apt update
sudo apt upgrade -y
sudo apt install -y php php-mysql php-common php-mbstring php-gd php-xml php-pear mysql-server
This is the holy grail for phpMyAdmin to work. Without `php-mysql` it simply won’t be able to communicate with the database, and without `php-mbstring` you’ll have encoding problems. Been there, done that. Trust me on this one.
We’ll also need a web server. If you already have Nginx or Apache installed — great! If not, it’s time to fix it. I personally prefer Nginx, it’s somehow faster and lighter. But that’s a matter of taste. Bottom line, either one will do.
sudo apt install -y nginxOr, if you’re an Apache fan:
sudo apt install -y apache2After installing the web server, make sure it is running. This is important!
sudo systemctl status nginx # Или sudo systemctl status apache2If you see «active (running)» — everything is ok. If not, google the error. No joke, google it! Stack Overflow to help you.
And the last thing at this stage is setting up MySQL. You need to set a password for the `root` user and create a database for phpMyAdmin. *Attention*: if you have just installed MySQL, then the password for `root` may not be set. In this case, you will need to use the `mysql_secure_installation` command. It will help you set a password and perform other important security settings.
sudo mysql_secure_installationAnswer the questions carefully. I usually recommend answering «Y» to all questions, except the question about changing the password (if you already have a strong password).
After that, we connect to MySQL and create a database:
sudo mysql -u root -p
CREATE DATABASE phpmyadmin;
CREATE USER 'phpmyadmin'@'localhost' IDENTIFIED BY 'YOUR_PASSWORD';
GRANT ALL PRIVILEGES ON phpmyadmin.* TO 'phpmyadmin'@'localhost';
FLUSH PRIVILEGES;
exit;
Replace `YOUR_PASSWORD` with a strong password. Don’t use «password» or «123456», I beg you! Seriously though, this is the foundation of security.
Phew, the first stage is completed. Now we have everything we need to install phpMyAdmin. Let’s move on!
Installing phpMyAdmin: The easiest way
Okay, now will be the easiest stage. Install phpMyAdmin from the repository. Honestly, this is the least painful way. You don’t need to download archives, unpack them and configure them manually. Just enter the command and wait. Easy peasy!
sudo apt install -y phpmyadminDuring installation, you will be asked a few questions. *Attention*: select «apache2» or «nginx» (depending on which web server you are using) and answer «Yes» when asked if you want to configure the database for phpMyAdmin. Also, when asked about the MySQL administrator password, enter the one you set for the `root` user.
If you messed something up during installation, don’t worry! Everything can be fixed. Just reinstall phpMyAdmin:
sudo dpkg-reconfigure phpmyadminThis command will restart the configuration process. Answer the questions carefully. I’ve spent hours debugging this, so trust me, it’s better to double-check.
After installation, you need to configure the web server so that phpMyAdmin is accessible from a browser. More on that — in the next section.
Configuring a web server (Nginx/Apache): Making it work
This is where the fun begins. You need to configure the web server so that it knows where to look for phpMyAdmin and how to handle it. Here we have two options: Nginx or Apache. I’ll show both, but with Nginx I’ll be a little more detailed, because, well, I like it more. Deal? Don’t you hate when you have to configure web servers?
Nginx configuration
Create a symbolic link to the phpMyAdmin configuration file in the Nginx directory:
sudo ln -s /etc/phpmyadmin/nginx.conf /etc/nginx/conf.d/phpmyadmin.confThen you need to restart Nginx for the changes to take effect:
sudo systemctl restart nginxIf you already have a configured virtual host for your site, then you will need to add the following block to the configuration file of this virtual host (for example, `/etc/nginx/sites-available/default`):
location /phpmyadmin {
    root /usr/share/;
    index index.php index.html index.htm;
    try_files $uri $uri/ /phpmyadmin/index.php?$args;

    location ~ ^/phpmyadmin/(.+\.php)$ {
        try_files $uri =404;
        include /etc/nginx/snippets/fastcgi-php.conf;
        fastcgi_pass unix:/run/php/php7.4-fpm.sock; # Replace with your PHP version
    }
}
Pay attention to the line `fastcgi_pass unix:/run/php/php7.4-fpm.sock;`. Here you need to specify the path to the PHP-FPM socket. Pro tip: the PHP version may be different, so check it before copying this code.
And, of course, restart Nginx:
sudo systemctl restart nginxApache configuration
In Apache, everything is a little simpler. After installing phpMyAdmin, it automatically creates a configuration file for Apache. The only thing you need to do is enable it:
sudo a2enconf phpmyadminAnd restart Apache:
sudo systemctl restart apache2That’s it! Now phpMyAdmin should be available at `http://your_ip_address/phpmyadmin` or `http://your_domain/phpmyadmin`. Time for the moment of truth! If you get a 404 error, double-check your configuration files. I’ll be straight with you, this is the most common mistake.
Security configuration: Protecting against hacking
Okay, this is a *very* important section. Security is no joke! phpMyAdmin is a tasty morsel for hackers, so you need to take all measures to protect it. Seriously though, it’s like putting a lock on your house.
The first and easiest thing to do is to change the standard URL. Don’t use `/phpmyadmin`. It’s too obvious! Change it to something more complex, for example, `/mysecretadminpanel`. To do this, you need to edit the Nginx or Apache configuration file.
For Nginx, this is done in the `/etc/nginx/conf.d/phpmyadmin.conf` file (or in the configuration file of your virtual host):
location /mysecretadminpanel {
    root /usr/share/;
    index index.php index.html index.htm;
    try_files $uri $uri/ /mysecretadminpanel/index.php?$args;

    location ~ ^/mysecretadminpanel/(.+\.php)$ {
        try_files $uri =404;
        include /etc/nginx/snippets/fastcgi-php.conf;
        fastcgi_pass unix:/run/php/php7.4-fpm.sock; # Replace with your PHP version
    }
}
For Apache, you need to edit the `/etc/phpmyadmin/apache.conf` (or `/etc/phpmyadmin/apache2.conf`) file and replace `/phpmyadmin` with `/mysecretadminpanel` in all lines.
After that, of course, we restart the web server.
Second, configure authentication and authorization. By default, phpMyAdmin uses MySQL authentication. This is not the safest way. It is better to use HTTP Basic Authentication or HTTP Digest Authentication. But this requires additional web server settings.
Third, configure the firewall. Allow access to phpMyAdmin only from specific IP addresses. Word of warning: this can be inconvenient if you frequently change your IP address, but it greatly increases security.
For this, you can use `iptables` or `ufw`. For example, to allow access only from the IP address `192.168.1.100`, use the following commands:
sudo ufw allow from 192.168.1.100 to any port 80,443
sudo ufw enable
Fourth, disable the ability to upload files. phpMyAdmin allows you to upload files to the server. This can be dangerous if an attacker can upload a malicious file. To disable this feature, you need to edit the phpMyAdmin configuration file (`/etc/phpmyadmin/config.inc.php`) and add the following lines:
$cfg['UploadDir'] = '';
$cfg['SaveDir'] = '';
Fifth, regularly update phpMyAdmin. Seriously though, it’s like installing updates on your phone. The newer the version, the fewer vulnerabilities.
The configuration file `/etc/phpmyadmin/config.inc.php` is the holy of holies of phpMyAdmin. All settings are stored here, including passwords and paths. Therefore, it must be protected like the apple of your eye.
<?php
/* Servers configuration */
$i = 0;

/* Server: localhost [1] */
$i++;
$cfg['Servers'][$i]['verbose'] = 'localhost';
$cfg['Servers'][$i]['host'] = 'localhost';
$cfg['Servers'][$i]['port'] = 3306;
$cfg['Servers'][$i]['user'] = 'phpmyadmin';
$cfg['Servers'][$i]['password'] = 'YOUR_PASSWORD';
$cfg['Servers'][$i]['auth_type'] = 'config';
$cfg['Servers'][$i]['AllowNoPassword'] = false;

/* Directories for saving/uploading files */
$cfg['UploadDir'] = '';
$cfg['SaveDir'] = '';

/* Other settings */
$cfg['blowfish_secret'] = 'YOUR_BLOWFISH_SECRET';
$cfg['DefaultLang'] = 'ru';
$cfg['ServerDefault'] = 1;
$cfg['LoginCookieValidity'] = 1440;

/**
 * phpMyAdmin configuration storage settings.
 */
$cfg['Servers'][$i]['pmadb'] = 'phpmyadmin';
$cfg['Servers'][$i]['controlhost'] = '';
$cfg['Servers'][$i]['controlport'] = '';
$cfg['Servers'][$i]['controluser'] = 'pma';
$cfg['Servers'][$i]['controlpass'] = 'pmapass';

/**
 * End of servers configuration
 */

/**
 * Disallow insecure transport
 */
$cfg['ForceSSL'] = true;

/**
 * Allow only local connections
 */
$cfg['AllowArbitraryServer'] = false;

?>
Replace `YOUR_PASSWORD` with the password of the `phpmyadmin` user, and `YOUR_BLOWFISH_SECRET` with a random string. No joke, this string should be really random. Use some random string generator. For example, `openssl rand -base64 32`.
“Security is not a product, but a process.”
Bruce Schneier
And, of course, don’t forget about backups! Regularly back up the database and configuration files. Plot twist: if something goes wrong, backups will save your life (and your VPS).
Verification and testing: Checking that everything is OK
Okay, now we need to make sure everything works as it should. Go to phpMyAdmin through a browser (at the address you configured in the previous section) and try to log in. Use the username and password that you set for the `phpmyadmin` user in MySQL. Boom! That’s it!
If you see the phpMyAdmin page — great! If not, check the web server logs. There will surely be some useful information there. Yeah, this error message sucks, but at least it exists.
Check that you can connect to databases, create tables, add data, etc. Don’t be shy, experiment! But don’t break anything valuable.
You can create a test database and table:
CREATE DATABASE testdb;
USE testdb;
CREATE TABLE testtable (
    id INT PRIMARY KEY AUTO_INCREMENT,
    name VARCHAR(255)
);
INSERT INTO testtable (name) VALUES ('Test data');
SELECT * FROM testtable;
If everything works — congratulations! You have successfully installed and configured phpMyAdmin. This setup is fire!
But that is not all. You need to check that phpMyAdmin is running stably and does not crash with errors. For this, you can use the following commands:
sudo systemctl status php7.4-fpm  # Replace with your PHP version
sudo journalctl -u php7.4-fpm
sudo nginx -t  # Или sudo apachectl -t
These commands will show you the status of PHP-FPM, PHP-FPM logs, and the syntax of web server configuration files. If you see errors — google them. Sound familiar?
| Check | Command | Expected result |
|---|---|---|
| PHP-FPM status | sudo systemctl status php7.4-fpm | active (running) |
| PHP-FPM logs | sudo journalctl -u php7.4-fpm | No errors |
| Nginx syntax | sudo nginx -t | syntax is ok |
| Apache syntax | sudo apachectl -t | Syntax OK |
And finally — check that phpMyAdmin is only available from those IP addresses that you allowed in the firewall. This is important! No cap, this is really important.
Troubleshooting common problems: Analyzing the debriefing
Okay, even the most experienced developers sometimes have something go wrong. And phpMyAdmin is no exception. Now we will analyze the most typical problems and ways to solve them. Ugh, this part always trips people up.
Problem 1: 404 Not Found
This is the most common problem. It means that the web server cannot find phpMyAdmin. The reasons can be different:
- The web server is configured incorrectly. Check the Nginx or Apache configuration files.
- Incorrect URL. Make sure you enter the correct URL in the browser.
- A symbolic link to the phpMyAdmin configuration file has not been created (for Nginx).
Solution:
- Double-check the web server configuration files. Make sure there are no errors in them.
- Make sure you enter the correct URL in the browser.
- Check that the symbolic link to the phpMyAdmin configuration file exists (for Nginx).
- Restart the web server.
Problem 2: Access denied for user ‘phpmyadmin’@’localhost’
This problem means that phpMyAdmin cannot connect to the MySQL database. Reasons:
- Incorrect password for the `phpmyadmin` user in MySQL.
- The `phpmyadmin` user has not been created in MySQL.
- The `phpmyadmin` user does not have rights to the `phpmyadmin` database.
Solution:
- Check the password for the `phpmyadmin` user in the phpMyAdmin configuration file (`/etc/phpmyadmin/config.inc.php`).
- Make sure that the `phpmyadmin` user exists in MySQL and has rights to the `phpmyadmin` database.
- Restart the web server.
Problem 3: Fatal error: The mbstring extension is missing. Please check your PHP configuration.
This problem means that the `mbstring` library is not installed in PHP. Reasons:
- The `mbstring` library is not installed.
Solution:
- Install the `mbstring` library:
sudo apt install php-mbstring. - Restart the web server.
Problem 4: Cannot connect: invalid settings.
This error indicates problems with the database connection settings.
Solution:
- Make sure the database server (MySQL) is running:
sudo systemctl status mysql. - Check the hostname, port, username, and password are correct in the
/etc/phpmyadmin/config.inc.phpfile.
sudo systemctl status mysql
sudo nano /etc/phpmyadmin/config.inc.php
| Problem | Solution |
|---|---|
| 404 Not Found | Check the web server configuration, URL, symbolic link |
| Access denied | Check password, user, rights in MySQL |
| mbstring missing | Install php-mbstring, restart the web server |
| Cannot connect: invalid settings | Check MySQL status, hostname, port, user, password |
If you encounter another problem — do not despair! Google the error. Honestly, Google is your best friend. And Stack Overflow too.
“Always code as if the guy who ends up maintaining your code will be a violent psychopath who knows where you live.”
John Woods
And remember: it’s better to prevent a problem than to solve it. Therefore, make backups, configure security and regularly update phpMyAdmin. Word of warning: a miser pays twice. In this case, with his time and nerves.
That’s it! I hope this guide was helpful for you. Good luck to you in installing and configuring phpMyAdmin! If you have any questions, feel free to ask in the comments.
External links:
«`