Hi friend! Congratulations! You now have your own Linux VPS – a piece of the internet where you’re the absolute owner. Cool, right? You can deploy a website, set up a VPN, run a bot, or even a game server for your friends – the possibilities are limited only by your imagination (and your plan, of course). But with this freedom comes responsibility. Your server is online 24/7, and believe me, there are plenty of people who want to «knock» on an unprotected door. Don’t worry, I’m here to help you take the first, most important steps in strengthening the defenses of your new digital home. It’s like putting a reliable lock on your apartment door after moving in.
This guide is your starter kit for VPS security configuration. We won’t delve into the depths of cryptography or build an impregnable fortress (those are topics for separate discussions), but we will close the most obvious holes through which uninvited guests most often enter. We’ll cover the main points: change the default password, create a separate user (because constantly working as root is a bad idea!), set up SSH key authentication (you’ll forget about passwords like a bad dream), tweak the SSH server itself, configure a basic firewall using UFW (it’s simpler than it seems!), and install Fail2Ban – a faithful guardian who will ward off password crackers.
Even if you’re a complete beginner and words like sudo or sshd_config cause mild panic – relax. I will explain everything as simply and step-by-step as possible. Let’s strengthen your Ubuntu VPS (or CentOS VPS, the principles are very similar)!
Table of Contents
- 1. First Login and Changing the root Password: The Very First Thing
- 2. Creating a New User: Don’t Work as root!
- 3. SSH Key Setup: Forget Passwords, Hello Security
- 4. Securing the SSH Server: Tightening the Bolts
- 5. Firewall Configuration with UFW: Building a Wall
- 6. Installing and Configuring Fail2Ban: Automatic Ban Hammer
- 7. A Bit of Wisdom
- 8. Conclusions: What Have We Learned?
1. First Login and Changing the root Password: The Very First Thing
When you rented a VPS, the host probably sent you the server’s IP address and password for the root user. Root is the superuser in Linux; it can do *absolutely everything*. And the first thing you need to do is change the default, often automatically generated password to your own, strong, and unique password.
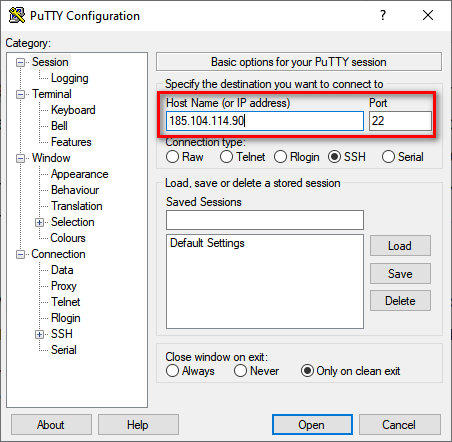
Connect to the server via SSH. If you’re on Windows, use a client like PuTTY. If you’re on Linux or macOS – just open a terminal.
ssh root@YOUR_SERVER_IP_ADDRESS
The system will ask for a password – enter the one the host sent you. When entering a password in the terminal, the characters are not displayed – this is normal, it should be so for security. Press Enter.
Once logged in, immediately change the password using the command:
passwd
The system will ask you to enter a new password and then repeat it for confirmation. Come up with something really reliable: long (12+ characters), with uppercase and lowercase letters, numbers, and special symbols. Forget about «qwerty», «123456» or your cat’s name! Write down the password in a safe place (a password manager is your best friend).
2. Creating a New User: Don’t Work as root!
Constantly working as root is like walking through a minefield blindfolded. One typo in a command – and you can accidentally delete something important. Therefore, let’s create a regular user to whom we will grant superuser privileges (sudo) only when it is really necessary. This is one of the pillars of VPS security configuration.
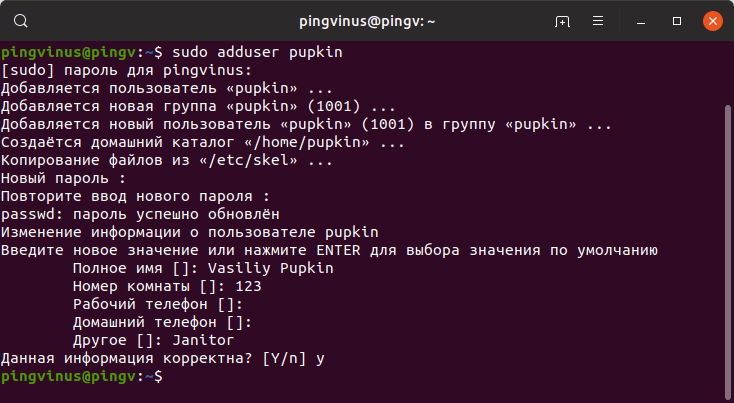
Let’s create a user, for example, with the name alex (replace with any desired name):
adduser alex
The system will ask a few questions: first, it will ask you to come up with a password for the new user (again, a strong one!), and then it will offer to enter additional information (name, phone, etc.) – this can be skipped by simply pressing Enter.
Now let’s give our alex the right to execute commands on behalf of root using sudo. This is necessary so that he can install programs, edit system files, and do other important things. In Ubuntu/Debian, users are added to the sudo group for this:
usermod -aG sudo alex
(Note: In CentOS/RHEL, the group is usually called wheel, the command will be usermod -aG wheel alex)
That’s it, the user is created and given the necessary rights. Now log out of the server (exit) and log in as the new user:
ssh alex@YOUR_SERVER_IP_ADDRESS
Now, if you need to execute a command with superuser privileges, simply add sudo before it. For example, to update the package list:
sudo apt update
The system will ask for the password of the alex user (not root!). The first time, a small warning about responsibility may appear – this is normal.
3. SSH Key Setup: Forget Passwords, Hello Security
Password authentication is, of course, familiar, but not the safest option. Passwords can be cracked (brute-forced), viewed, and are simply inconvenient to enter constantly. It is much safer to use SSH keys. This is a pair of files: private (secret, stored on your computer) and public (not secret, placed on the server). When you connect, the system checks if your private key matches the public key on the server. If so – you’re in, without any passwords!
3.1. Generating Keys on Your Computer
First, you need to create this key pair on your local computer.
- On Linux/macOS: Open the terminal and execute:
ssh-keygen -t rsa -b 4096The system will ask where to save the keys (the default path
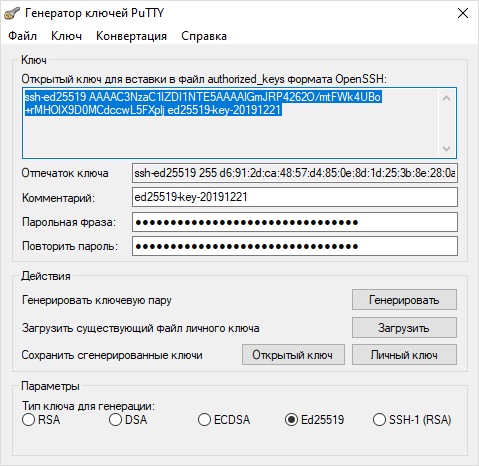
~/.ssh/id_rsausually works, just press Enter). Then it will offer to set a passphrase for additional protection of the private key. This is like a password for the key itself. I strongly recommend setting it! Enter the phrase, then repeat it. - On Windows: It is most convenient to use the PuTTYgen utility (usually comes bundled with PuTTY, can be downloaded separately). Launch PuTTYgen, make sure that the RSA key type is selected and the number of bits is at least 2048 (preferably 4096), click «Generate». Move the mouse over the empty field to generate randomness. After generation, set a passphrase in the «Key passphrase» and «Confirm passphrase» fields. Be sure to save *both* keys: public («Save public key») and private («Save private key»). You will also need the public key in text form from the top «Public key for pasting…» field.
3.2. Copying the Public Key to the Server
Now you need to copy the *public* key (usually the id_rsa.pub file or the one you copied from PuTTYgen) to your Linux VPS. We are copying it for the alex user, under which we plan to work.
The easiest way (if you have Linux/macOS and ssh-copy-id is available on the server):
ssh-copy-id alex@YOUR_SERVER_IP_ADDRESS
Enter the password for the alex user, and the utility will do everything itself: connect, create the necessary folders and files on the server, and add your key there.
Manual method (if ssh-copy-id is not available or you are on Windows):
- Connect to the server via SSH as the
alexuser using your password. - Create the
.sshfolder in your home directory, if it doesn’t already exist, and set the correct permissions:mkdir -p ~/.ssh
chmod 700 ~/.ssh - Create (or open) the
authorized_keysfile in this folder and set permissions:touch ~/.ssh/authorized_keys
chmod 600 ~/.ssh/authorized_keys - Now open this file in a text editor, for example,
nano:nano ~/.ssh/authorized_keys - Copy the contents of your *public* key (the contents of the
id_rsa.pubfile or the text from the PuTTYgen field) and paste it into thenanoeditor. If the file already contains keys, paste the new key on a new line. - Save the file (in
nanothis is Ctrl+O, Enter) and exit the editor (Ctrl+X).
3.3. Checking Key-Based Login
Now try connecting to the server again as the alex user. If you set a passphrase for the key, the system will ask you to enter it. It should no longer ask for the alex user password. If everything went successfully – congratulations, key-based login is configured!
4. Securing the SSH Server: Tightening the Bolts
Now that we’ve set up key-based login, we can make SSH access even more secure. To do this, you need to edit the SSH server configuration file. It is usually located here: /etc/ssh/sshd_config. Open it with sudo privileges:
sudo nano /etc/ssh/sshd_config
Find and change (or add, if they are not there) the following lines:
4.1. Disabling root Login
We created a separate user, so root is no longer needed for direct login. This significantly reduces risks, as the name root is standard and is always the first target of attacks.
Find the line #PermitRootLogin prohibit-password or PermitRootLogin yes. Uncomment (remove the # at the beginning, if there is one) and change the value to no:
PermitRootLogin no
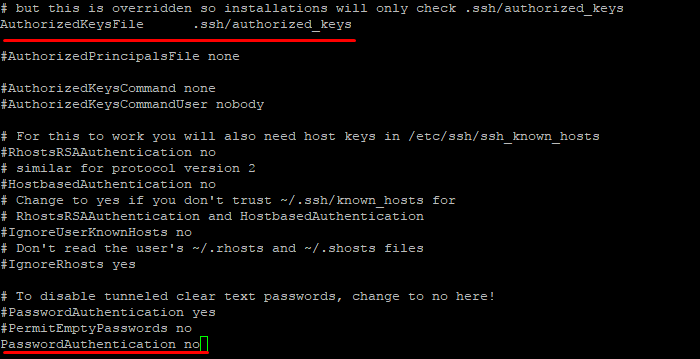
4.2. Disabling Password Authentication
Warning! Do this *only* after you are 100% sure that SSH key login works for your user (alex in our example)! Otherwise, you risk losing access to the server.
Find the line #PasswordAuthentication yes. Uncomment and change the value to no:
PasswordAuthentication no
This will completely disable the ability to log in with a password, leaving only keys. Goodbye, brute-force attacks!
4.3. (Optional) Changing the Default SSH Port
By default, SSH listens on port 22. All bots and scanners on the internet hammer exactly this port. By changing the port to a non-standard one (for example, 2222 or any other free port above 1024), you make your server less visible to automated attacks. This is «security through obscurity,» it does not replace other measures, but it can be a useful addition.
Find the line #Port 22. Uncomment and change 22 to your chosen port, for example:
Port 2222
Important: If you change the port, don’t forget to allow it in the firewall (more on this below) and specify it when connecting:
ssh -p 2222 alex@YOUR_SERVER_IP_ADDRESS
After making changes to sshd_config, save the file (Ctrl+O, Enter in nano) and exit (Ctrl+X). For the changes to take effect, you need to restart the SSH service:
sudo systemctl restart sshd
(In older systems or some distributions, the command may be sudo systemctl restart ssh or sudo service sshd restart).
Tip: Before closing the current SSH session, open a new terminal window and try connecting with the new settings (with the key, without a password, possibly with a new port). Make sure everything works before disconnecting!
5. Firewall Configuration with UFW: Building a Wall
A firewall is like a guard at the entrance who only lets in those who are on the list. It controls incoming and outgoing traffic, allowing only the necessary connections. Ubuntu often has UFW (Uncomplicated Firewall) pre-installed – a very simple and convenient wrapper over the standard iptables. If you have CentOS, it may have firewalld, but UFW can be installed.
Let’s check if UFW is installed, and if not – let’s install it (for Ubuntu/Debian):
sudo apt update
sudo apt install ufw
Now let’s configure the basic rules. First, let’s deny all incoming connections by default and allow all outgoing connections:
sudo ufw default deny incoming
sudo ufw default allow outgoing
Now you need to allow the ports we need. The most important thing is to allow SSH, otherwise we will block ourselves!
sudo ufw allow ssh
This command automatically allows the standard port 22. If you changed the SSH port to another (for example, 2222), then use the port number:
sudo ufw allow 2222/tcp
If you plan to run a web server, you need to allow ports HTTP (80) and HTTPS (443):
sudo ufw allow http
sudo ufw allow https
Or you can specify port numbers:
sudo ufw allow 80/tcp
sudo ufw allow 443/tcp
Add here any other ports that your applications may need.
When all the necessary rules are added, enable the firewall:
sudo ufw enable
The system will warn you that this may break current SSH connections (usually does not break if the SSH rule is added correctly). Confirm (y).
You can check the status and current rules with the command:
sudo ufw status verbose
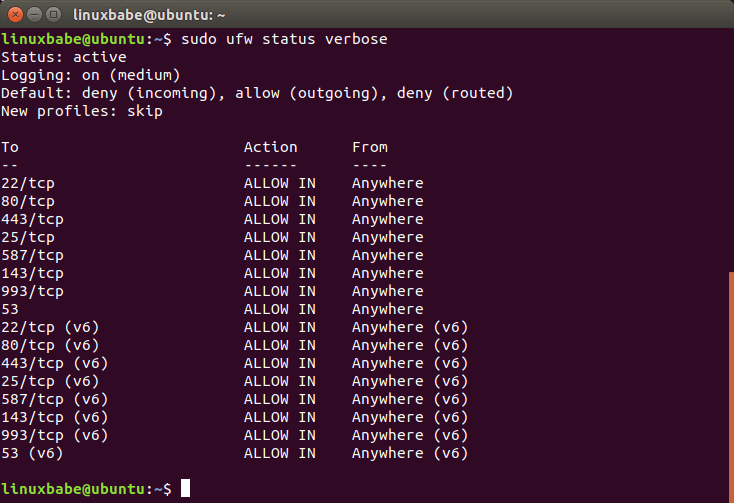
Now your Linux VPS is protected by a basic firewall!
6. Installing and Configuring Fail2Ban: Automatic Ban Hammer
Even with password login disabled and a non-standard port, bots can still try to access your SSH (and other services). Fail2Ban is a great utility that monitors server logs (e.g., SSH login attempt logs) and automatically blocks IP addresses from which suspicious activity originates (e.g., many unsuccessful login attempts). This significantly reduces the load on the server and filters out automated brute-forcing.
Let’s install Fail2Ban (for Ubuntu/Debian):
sudo apt update
sudo apt install fail2ban
After installation, Fail2Ban usually starts immediately with the default configuration, which already includes protection for SSH. The main configuration file is /etc/fail2ban/jail.conf, but it is not recommended to edit it directly, as it may be overwritten during updates. Instead, let’s create a local configuration file /etc/fail2ban/jail.local where we will make our changes.
Let’s copy the default file:
sudo cp /etc/fail2ban/jail.conf /etc/fail2ban/jail.local
Now let’s open jail.local for editing:
sudo nano /etc/fail2ban/jail.local
What can be configured here? Find the [DEFAULT] section. Here you can change general parameters, such as:
bantime: How long to block an IP (e.g.,1h— 1 hour,1d— 1 day).findtime: The time interval for which failed attempts are counted.maxretry: The number of failed attempts after which the IP is blocked.
For example, you can set bantime = 1d to ban for a day.
Next, find the [sshd] section (or [ssh] in older versions). Make sure there is a line enabled = true. If you changed the SSH port, then in this section you need to specify the new port, changing the line port = ssh to port = 2222 (or your port).
[sshd]
enabled = true
port    = ssh  # or your port, for example, 2222
# other parameters can be left at default or configured
Save the file (Ctrl+O, Enter) and exit (Ctrl+X).
Let’s restart Fail2Ban to apply the changes:
sudo systemctl restart fail2ban
You can check the service status and see if it has already blocked anyone for SSH like this:
sudo fail2ban-client status sshd
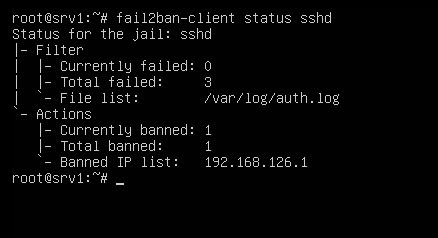
Now Fail2Ban will vigilantly monitor login attempts and automatically ban offenders.
7. A Bit of Wisdom
“Security through obscurity is not security.”
— Linus Torvalds
Remember this. Changing the SSH port