How to Enable Anti-Phishing in Microsoft Edge?
Anti-phishing is an important online security tool that helps prevent malicious attacks aimed at stealing personal information. Microsoft Edge is Microsoft’s browser that offers various features, including phishing protection. The latest browser versions offer improved detection and blocking of malicious websites. If you want to learn how to enable anti-phishing in Microsoft Edge, follow our guide.
Step 1: Open Browser Settings
To begin, open Microsoft Edge on your device. Click the three dots in the upper right corner of the screen to open the menu. Then, select «Settings» from the bottom of the list.
Step 2: Go to the «Privacy, search, and services» section
In the «Settings» section, select «Privacy, search, and services» from the left panel. Here you will find various options related to security and privacy in Microsoft Edge.
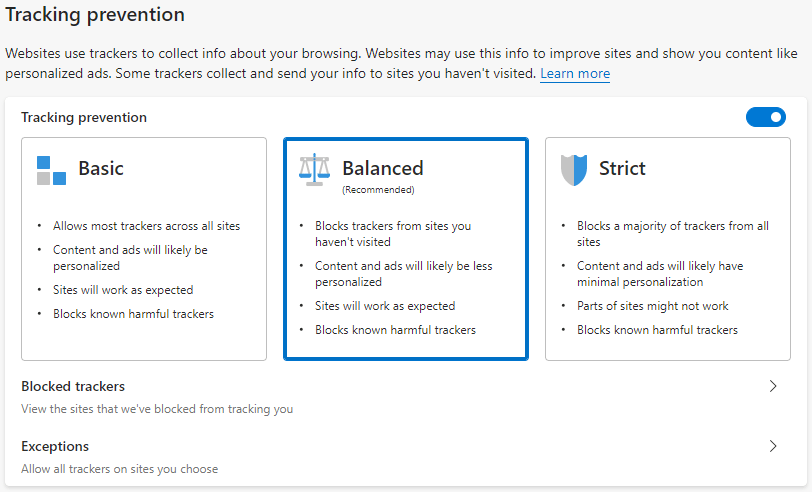
Step 3: Configure Anti-Phishing Settings
Scroll down to the «Security» section. Here you will find the «Microsoft Defender SmartScreen» option. Ensure it is turned on. This enables anti-phishing functionality.
Step 4: Check Security Settings
After enabling anti-phishing, it is also recommended to check other security settings in Microsoft Edge. Make sure that appropriate filters and blockers are in place to protect against malicious websites and attacks.
Step 5: Enjoy Safe Internet Browsing
Now that you’ve enabled anti-phishing in Microsoft Edge, you can be confident in your protection when visiting websites. Remember that online security is an important part of protecting personal information and preventing fraud attempts.
Follow our instructions and protect your data from online attacks!